This article provides audiences with knowledge about profiles and hot to manage customer data with Mobio.
What is a profile?
The CDP module is a central hub that consolidates data from various sources, where profiles are recorded, stored, merged, and enriched with data using NLP – Natural Language Processing & AI – Artificial intelligence algorithms.
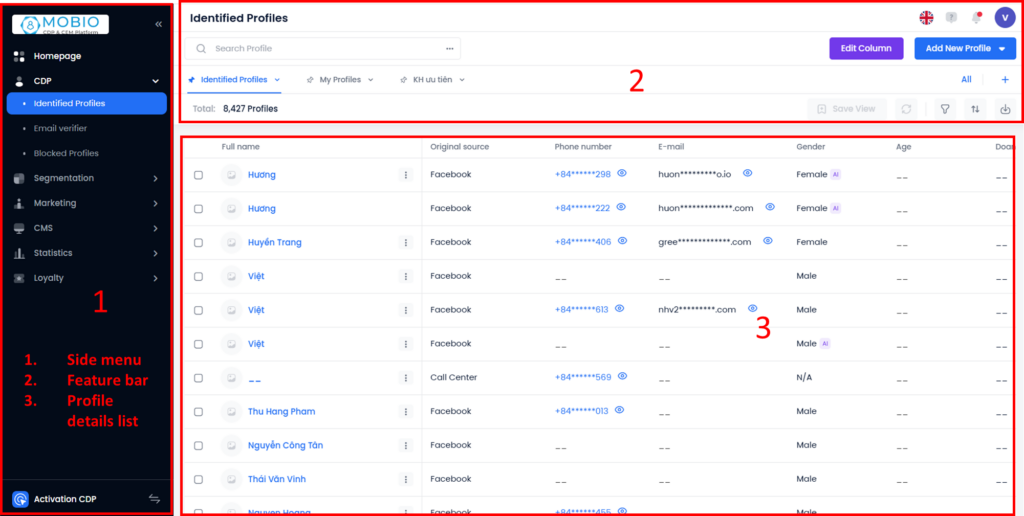
On the CDP module interface, users frequently encounter the following terms:
- CDP (Customer Data Platform): where Mobio stores the list of total profiles captured through various interaction channels.
- Profile: Detailed information about a customer or a partner, including data such as personal information, purchase history, browsing behavior, and other relevant information.
- Identify Profile: An identity profile includes at least 1 field of identifying information, such as phone number, email, social ID, Profile ID, and Identity documents.
How to add a new Profile
Users can add a new profile manually or import a list from an Excel file.
Add a new profile manually
Step 1: Click “Create new profiles”.
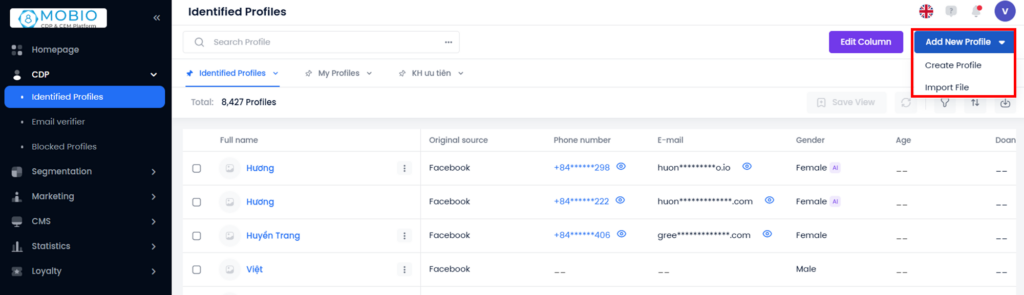
Step 2: Choose Create new → A popup window appears in the right corner to create a new profile.
Users input information into the fields to create a new profile in the popup window that just appeared. Fields marked with an asterisk (*) are mandatory.
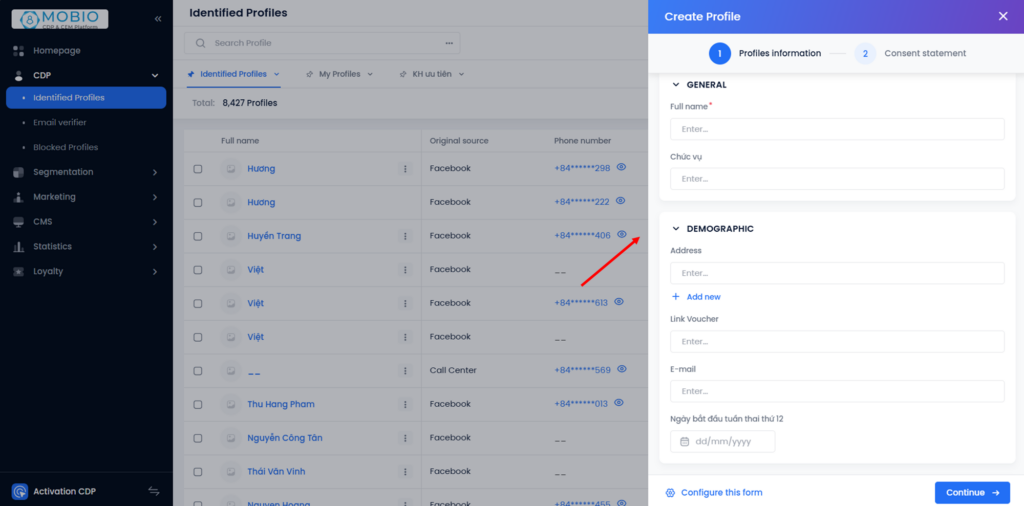
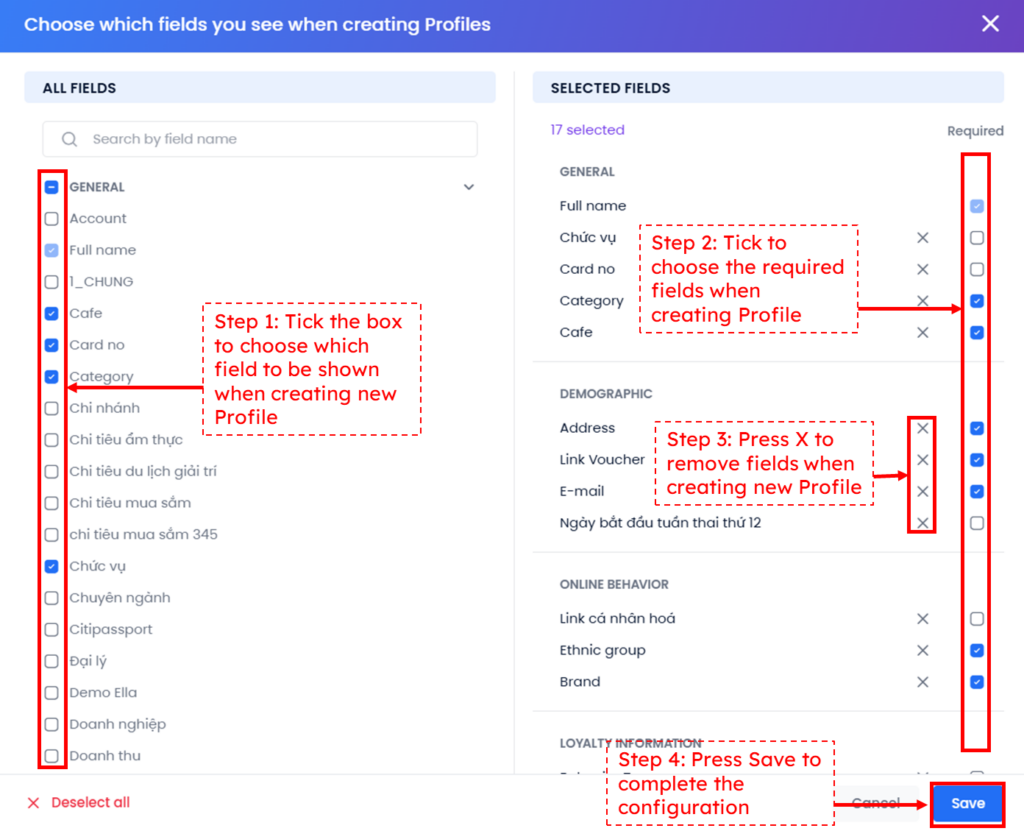
Configure the display fields when creating/editing a profile.
Each profile can have hundreds of different fields; however, users should select some basic fields to display when creating/editing a profile.
There are two ways to configure the displayed fields when creating/editing a profile.
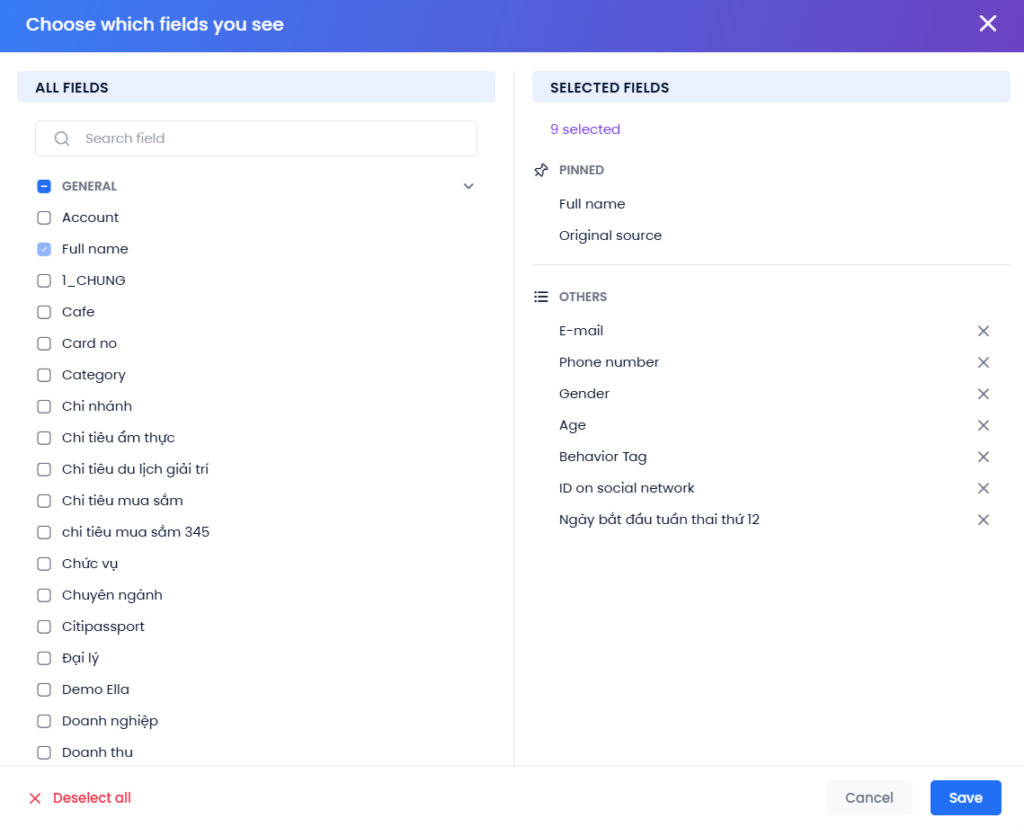
1. On the Profile creation pop-up, click “Config this form.” The system then displays another popup: “Choose which fields you see when creating Profiles.”
2. Users configure this in the Business Settings. For details, refer to “How to Manage Entities on the Mobio Platform.”
Step 3: Add Consent statement.
Users can upload customers’ consent as evidence of their permission for the business to store and utilize their data.
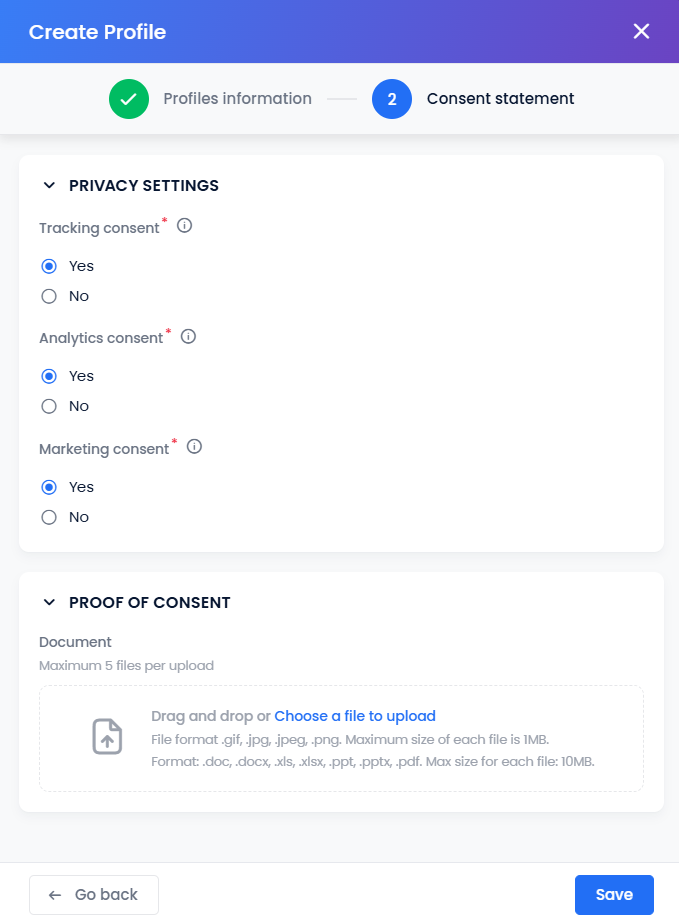
The consent statement consists of the following three types:
– Tracking consent refers to the permission granted by users to allow tracking of their activities on a website, application, or device.
– Analytic consent refers to the permission granted by users to analyze their data for various purposes, such as understanding user behavior, improving services, and making data-driven decisions.
– Marketing consent refers to individuals’ explicit permission to receive marketing communications from a company or organization. This consent allows businesses to send promotional messages, newsletters, and other marketing materials to individuals who have opted in to receive them.
In the Privacy Settings, select “Yes” for each type of consent if users have documented evidence of consent. Then, users can drag and drop the corresponding evidence files into the section below.
Step 4: Click “Save” to complete the creation of a new Profile or “Back” to edit the information.
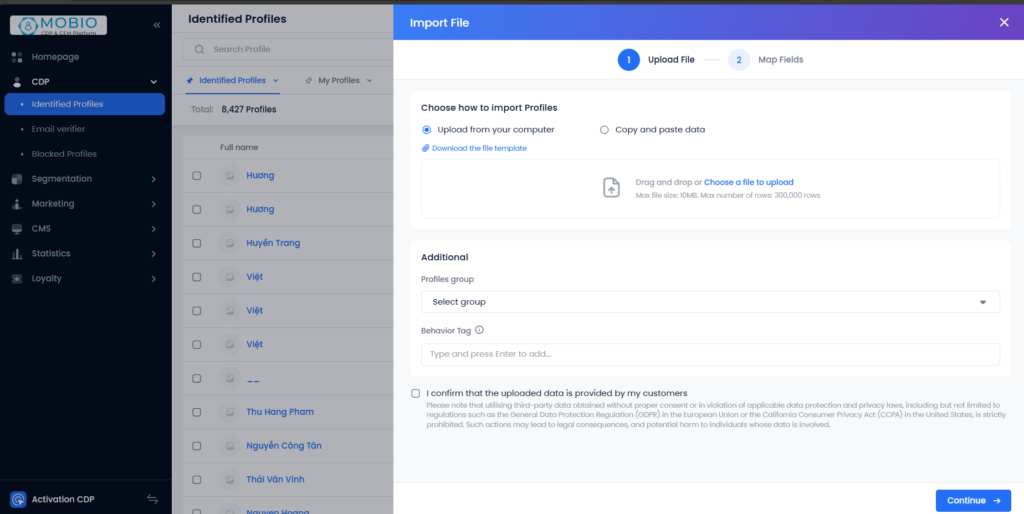
Import Profiles in bulk
Step 1: Click Import file.
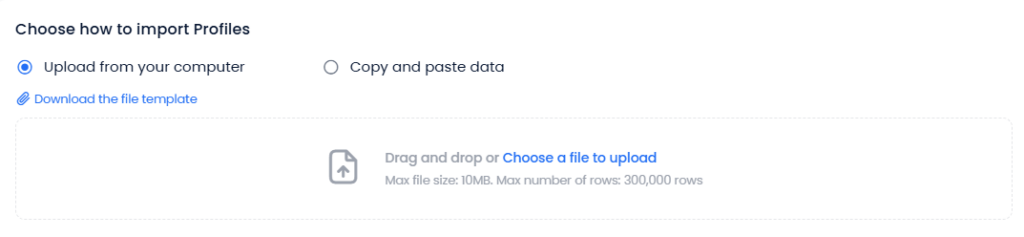
Here, you can choose either “Upload from your computer”, or “Copy and paste data.”
Upload from your computer
Step 1: On the Profile creation pop-up, Click “Drag and drop or Choose a file to upload.”
- Drag and drop the file into the upload area; or Click on the upload area and select the file from your computer.
- Each file can have a maximum size of 10MB or 300,000 rows.
- Ấn vào Mẫu file danh sách Profile để tải file mẫu của hệ thống.
Note:
- Each file can have a maximum size of 10MB or 300,000 rows.
- Users can download the template file.
Copy and paste data
Step 1: Copy the content from the Excel file and paste it into the upload area.
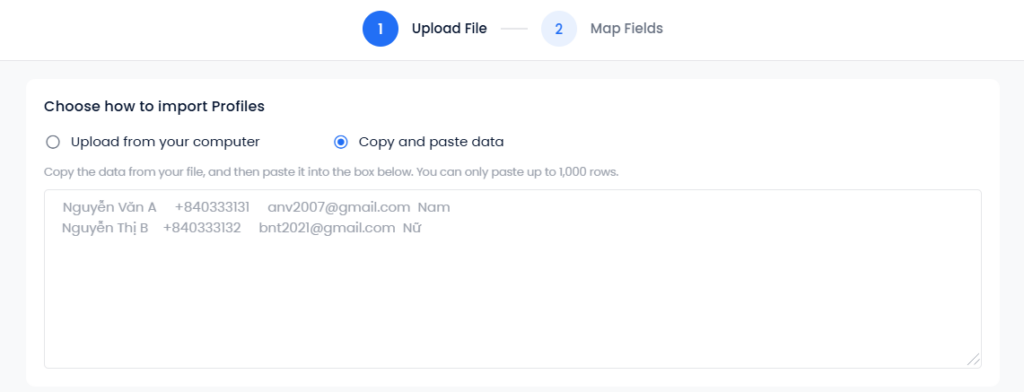
Note:
- The maximum limit for copied data row is 1000.
- When pasting data, each field needs to be separated by a tab.
Additional: is where additional information related to the uploaded Profile set is provided, including:
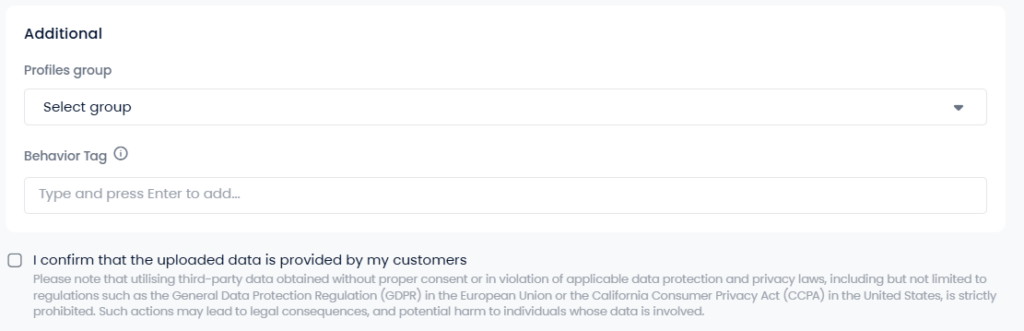
Note:
Behavioral tag is a useful feature that helps users easily filter the uploaded files. Press enter after typing the tag name, so the system can recognize and attach the tag to the file.
Step 2. Match the fields in the file with the corresponding fields in Mobio.
Based on the two columns “Column header from file” and “Preview information,” select the corresponding information field in the “Import as” column.
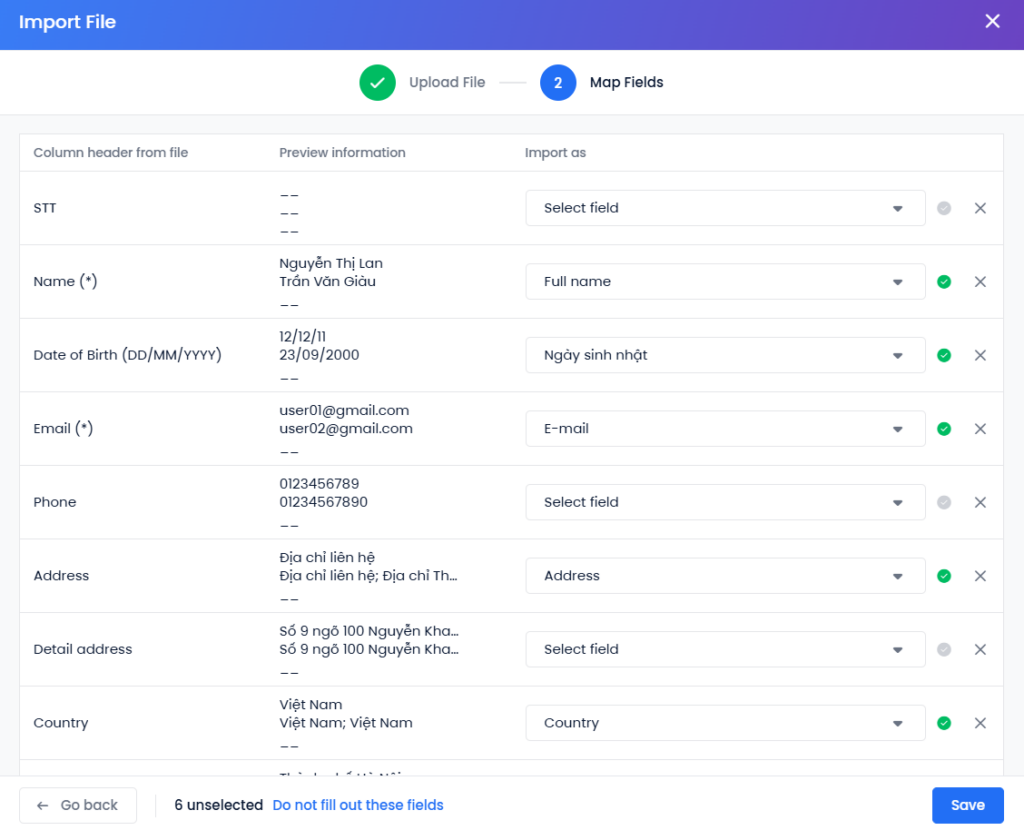
- For unselected fields, check “Do not fill out these fields” to skip them when updating the file.
Step 3. Select “Save” to complete the file upload process.
The system then notifies that the file has been successfully uploaded and requires some time to process. Once completed, the system will send you an email with the uploading result.
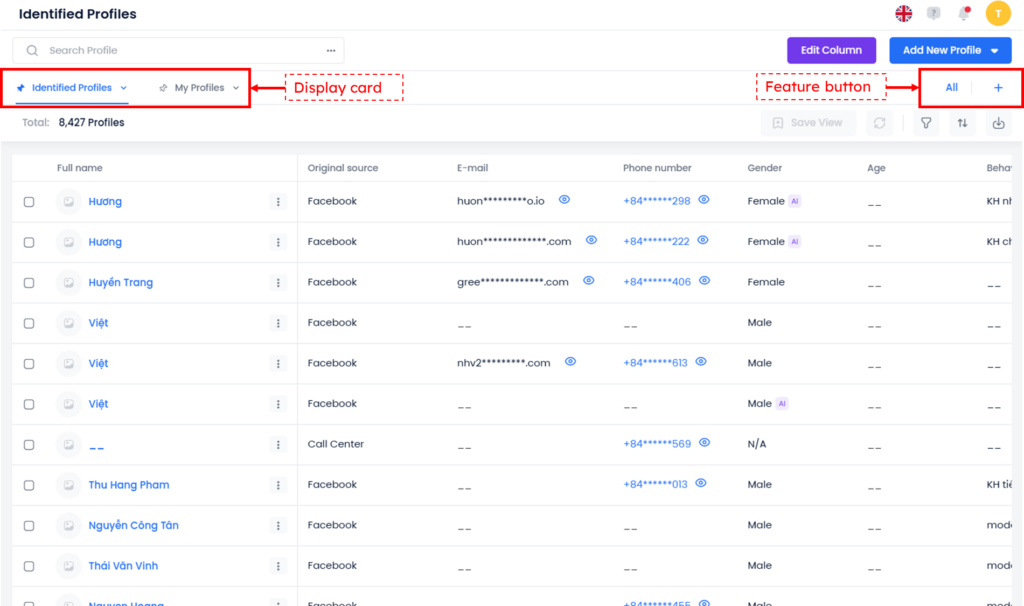
Configuring the information fields in the Profile list.
On the Profile list, the system defaults to displaying all available information fields of the profiles. However, users can show or hide fields, depending on their demands. This configuration is applied individually for each user.
There are two ways to select information fields to display in the profile list:
2. Configure in Business Settings.
View details and edit Profile
View details
In the Profile list, click on the profile you want to view → the screen will switch to the profile information page, where users can:
- View the profile’s data, including personal information and interaction activities from various channels such as email, phone, social media, transactions, etc.
- Perform various actions: add notes, send emails, make phone calls, update/edit profile information, and add orders or tickets for the profile.
The area in the middle of the screen is where customer interactions with the business are recorded.
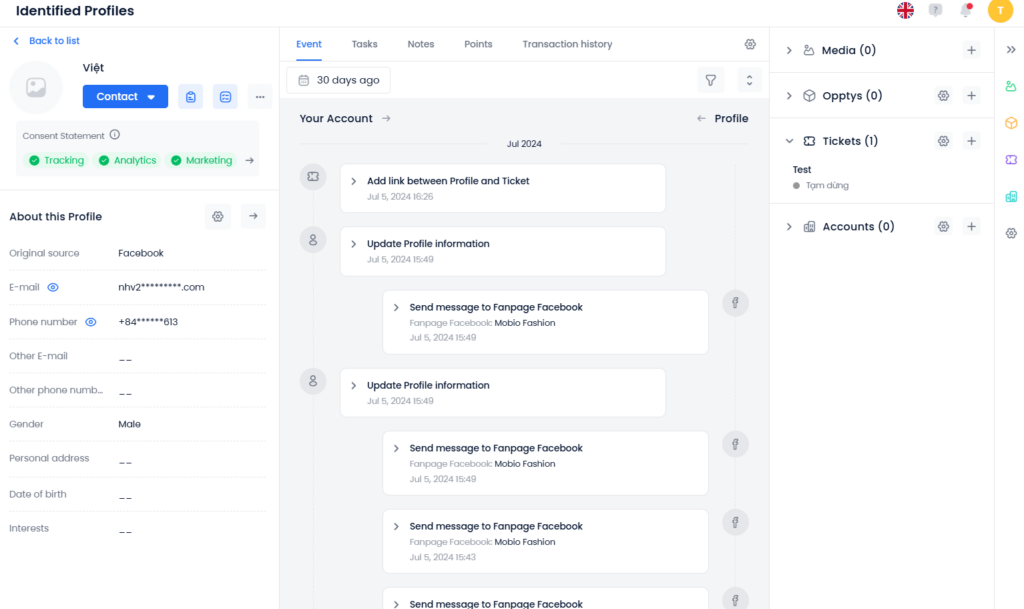
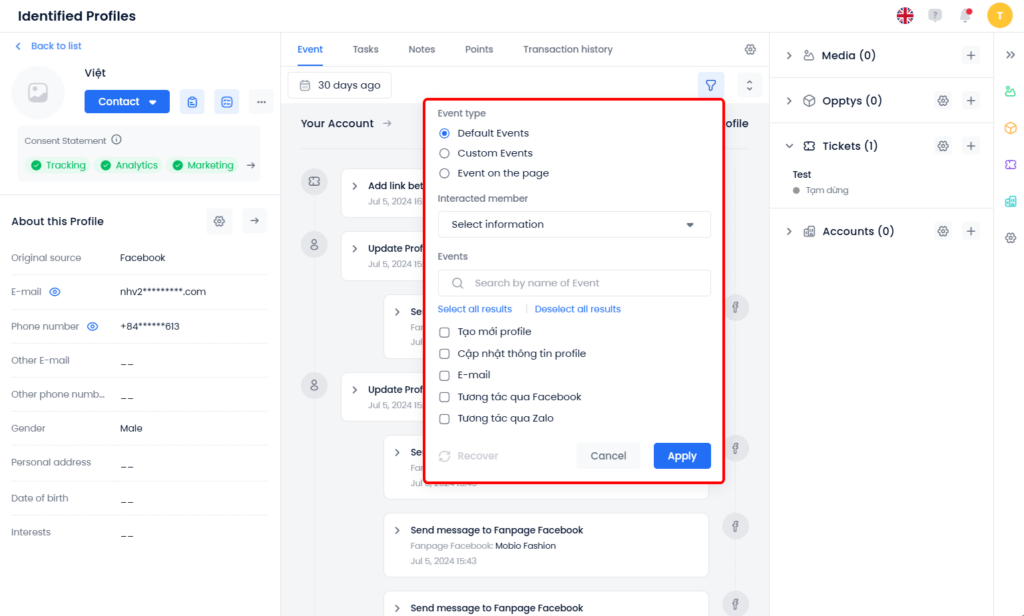
The Event tab is divided into two sub-tabs for easy search and tracking: Default Events and Custom Events. Users can filter Events by interaction time, event type, and interacting users.
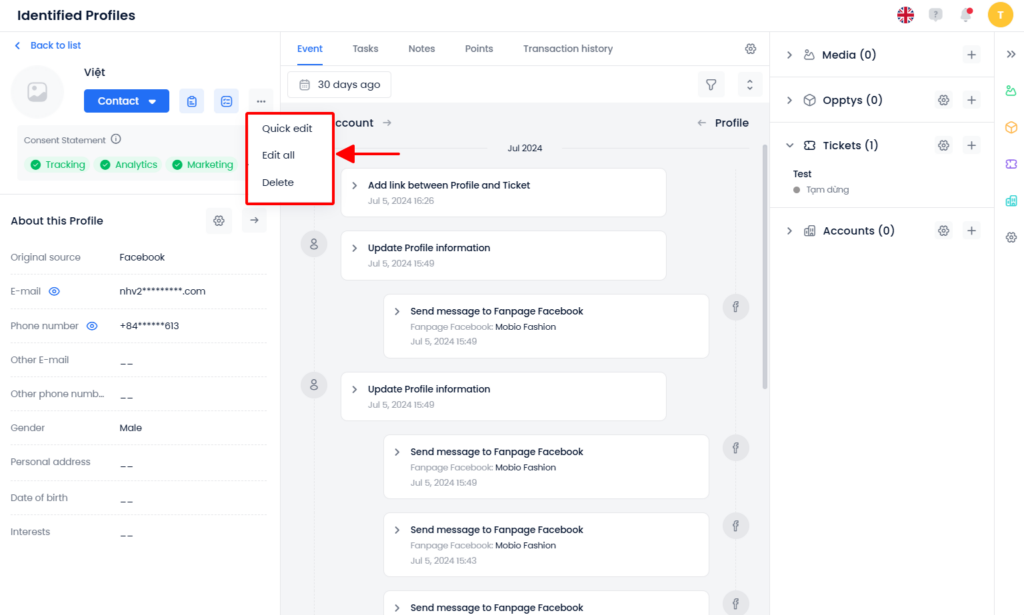
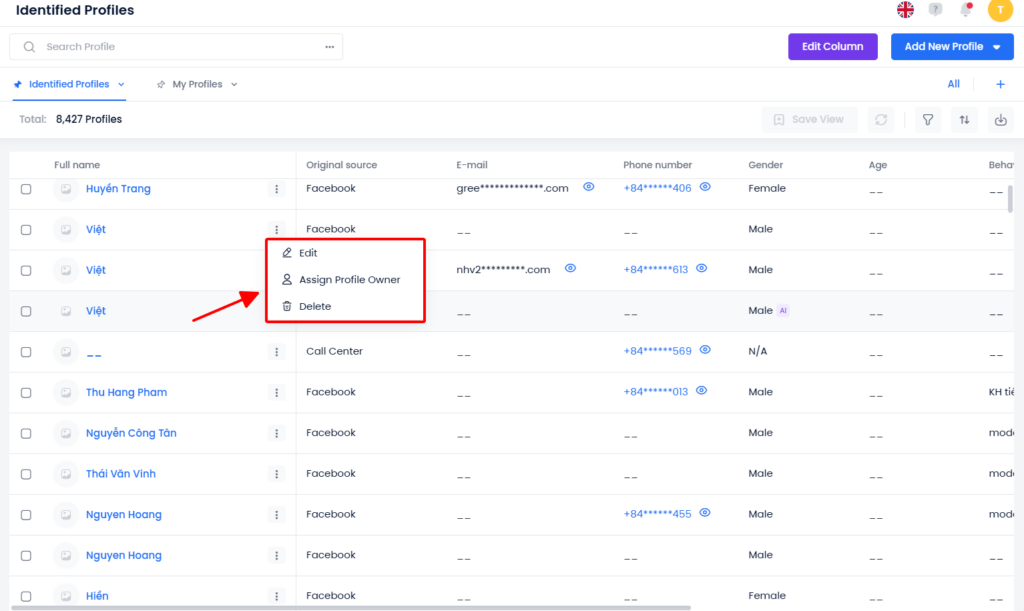
Edit Profile
Users can edit profile details on these 2 interfaces:
Note: For profiles with only one unique identifier field, such as email or phone number, if users remove the information in the identifier field, that profile will no longer be searchable in the profile list.
Configure the display of related information in Profile Details.
The right-hand section of the screen contains objects related to the profile, such as sales opportunities, tickets, media, and companies.
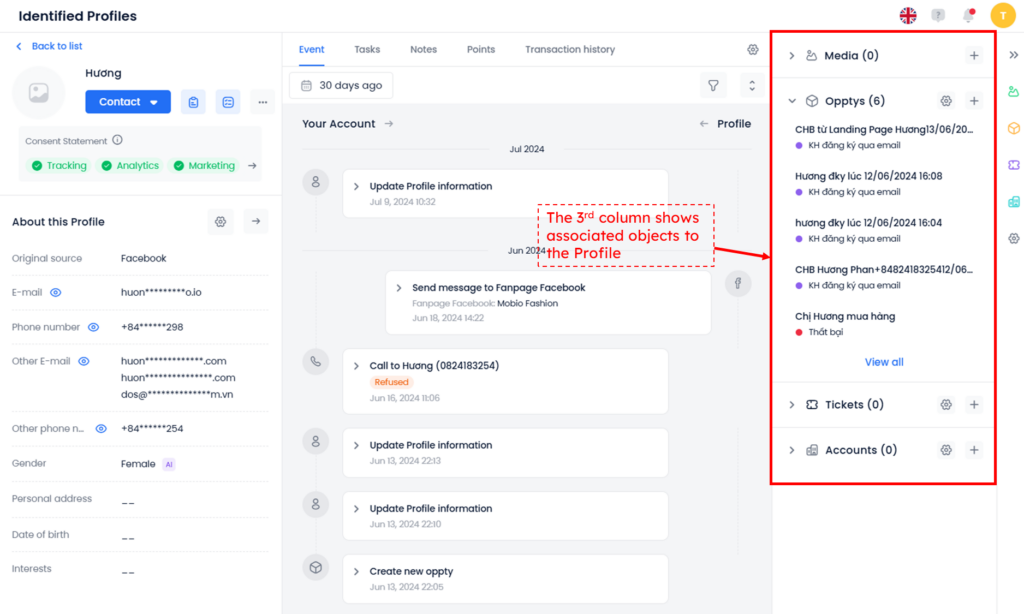
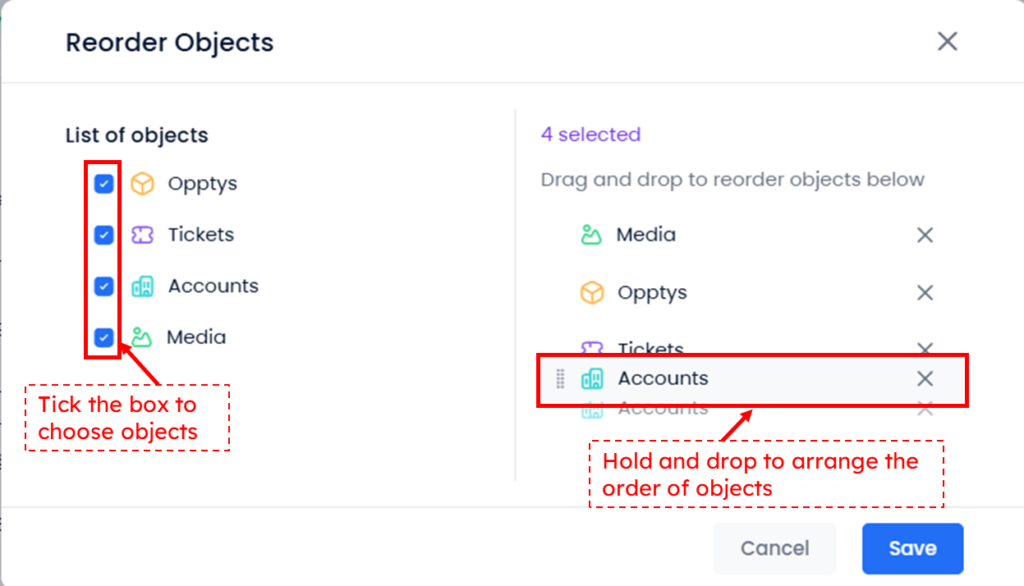
To configure which information groups will be displayed/hidden in this area, users can follow these steps:
Step 1: Select the gear icon on the right edge of the screen.
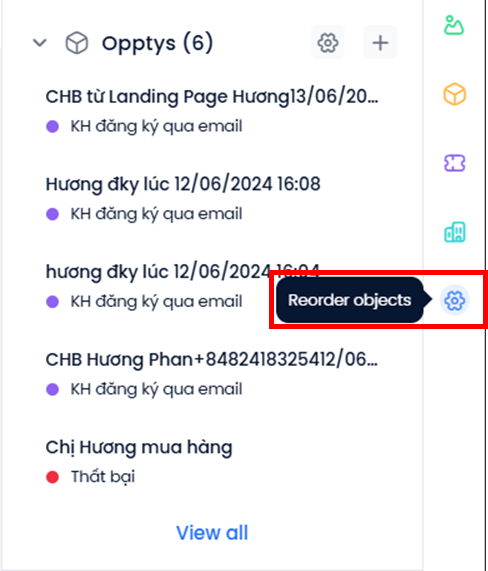
Step 2: Users can select the fields they want to display on the configuration pop-up and rearrange their positions by dragging and dropping.
Filter – save – export Profiles
On the profile list, users can filter profiles, save display cards, and export profiles from the profile list interface.
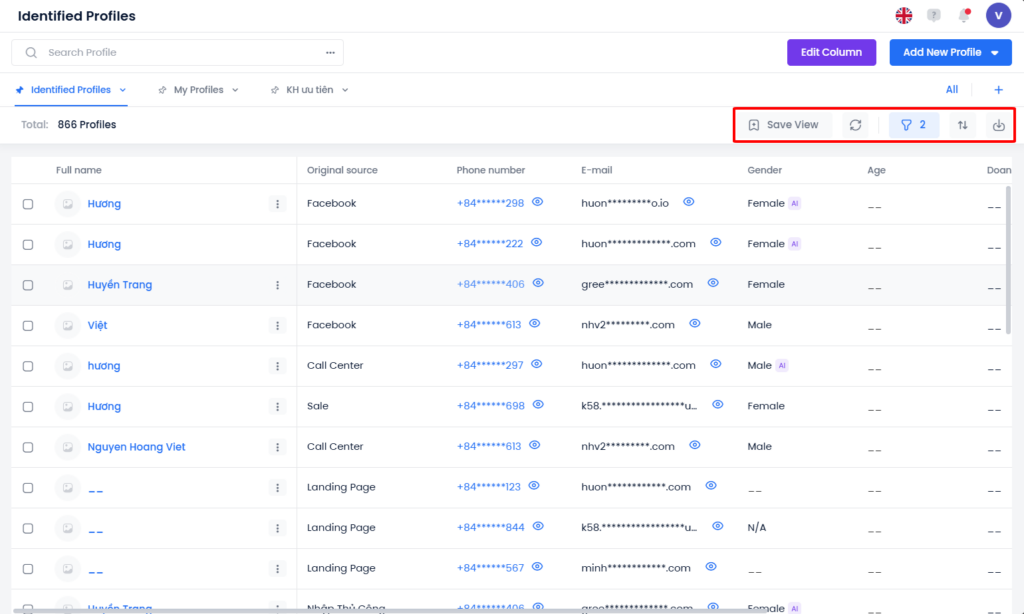
Filter Profile
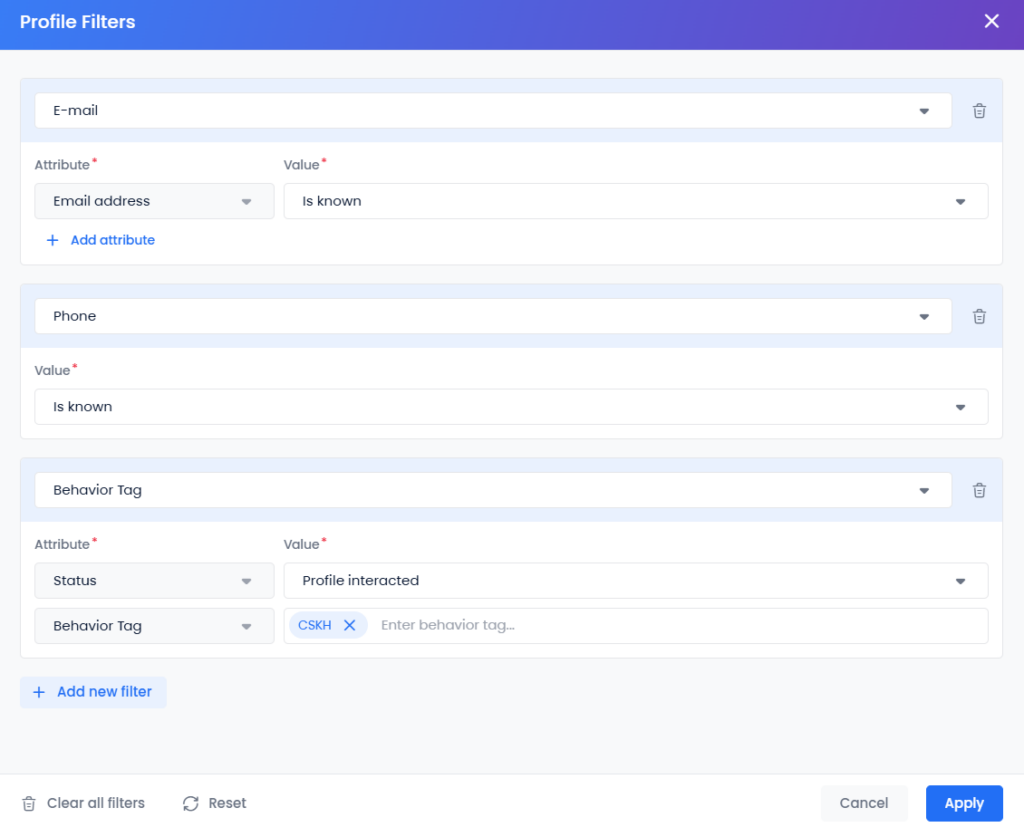
Step 1: Select the funnel icon at the top right corner of the screen.
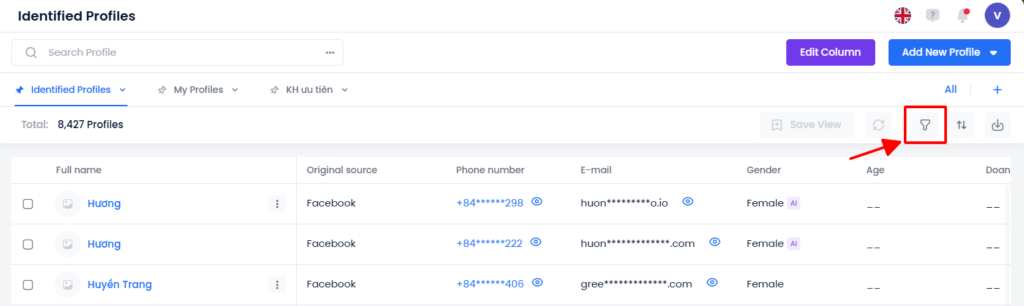
Step 2: In the filter popup, choose one or more fields to filter, then configure the parameters and attributes of the selected fields.
Step 3: Choose Apply → The system will display a list of profiles that meet the selected filtering criteria.
e search bar. If there are too many display cards, users can search for them by clicking the blue “All” at the top right corner.
Export Profile
Step 1: Select the download icon at the top right corner of the screen.
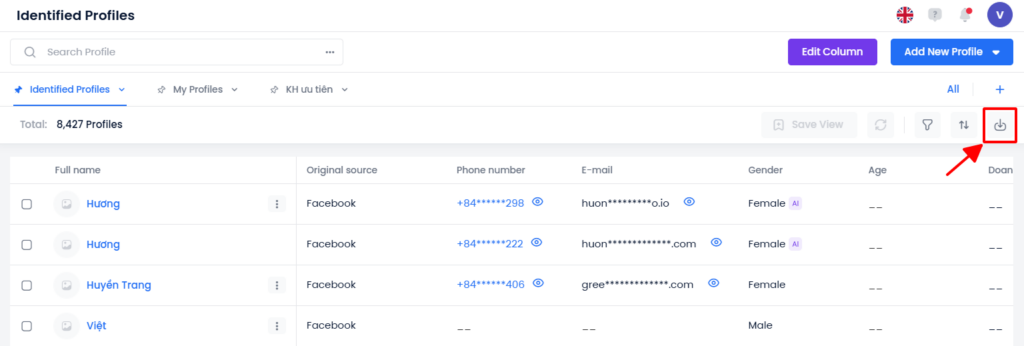
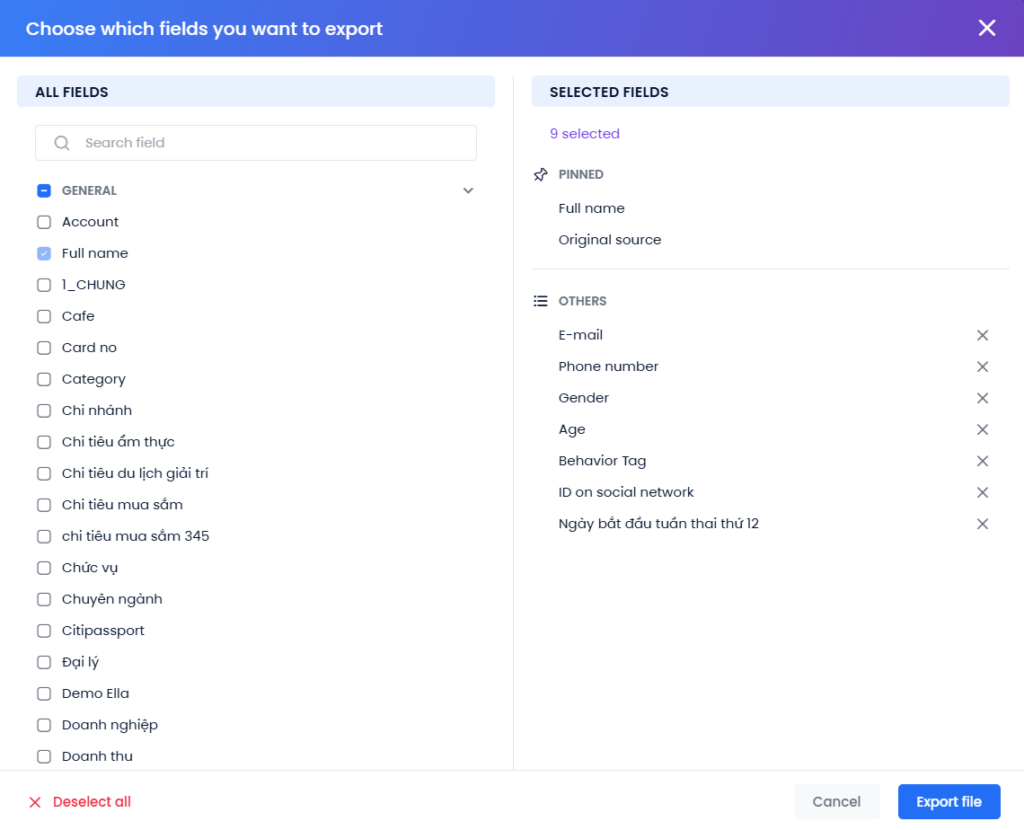
Step 2: Select the fields to export → click Export.
Note: For exported files with fewer than 10,000 rows, the Excel file will be downloaded directly to your computer. Otherwise, the system will send the exported file to the user’s email.
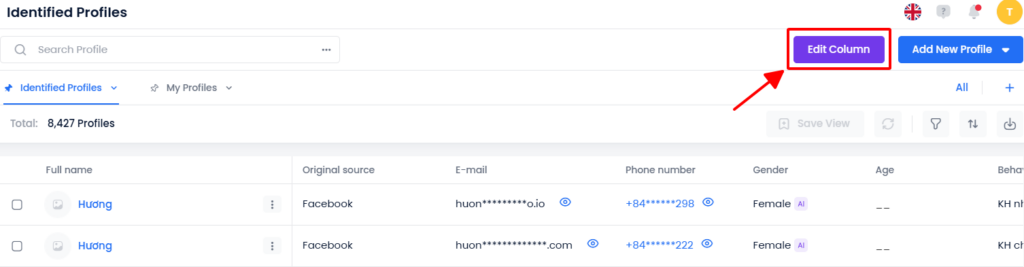
Edit column
This feature helps users configure the desired fields to be displayed on the Profiles list.
Step 1: Click Edit Column
Step 2: On the popup, choose fields to display at All fields.
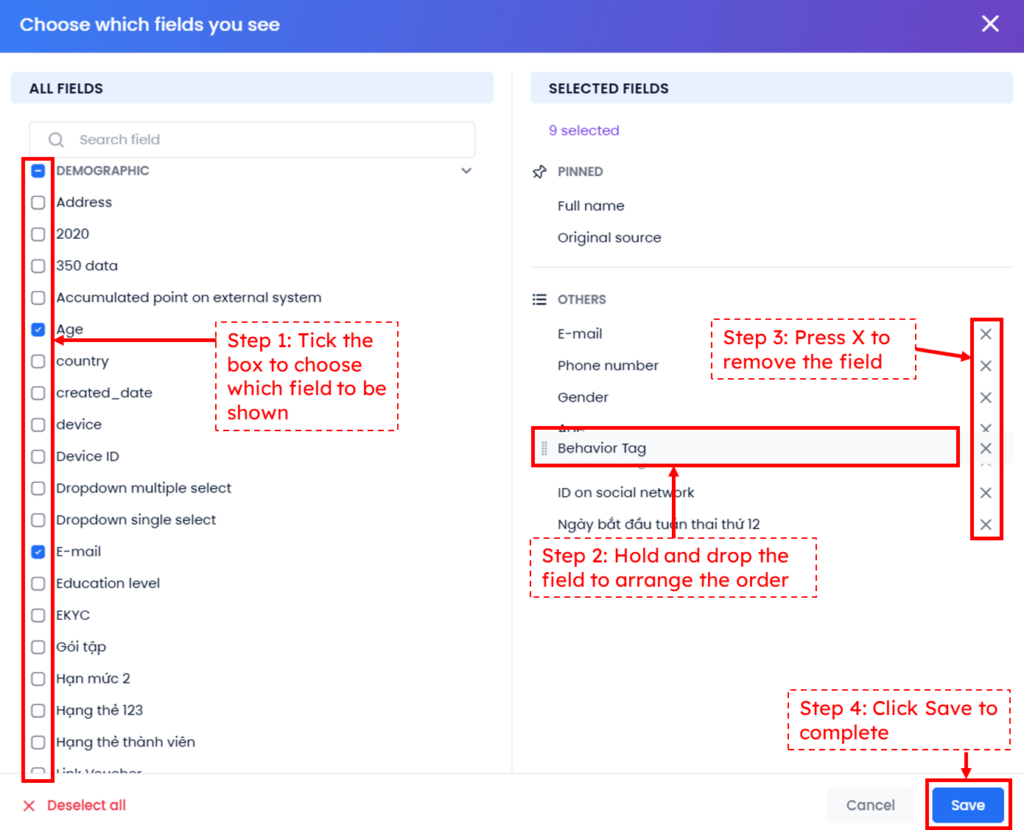
On selected fields area, users can:
- See pinned fields and other fields. Pinned fields default to displaying and cannot be rearranged.
- Select, deselect, and arrange fields.
Step 3: Click Save.
Profile views
There are 2 default views:
Save filters as a new view
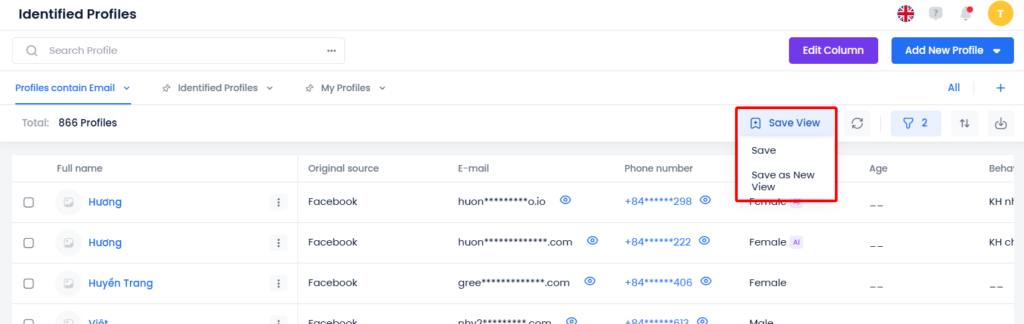
Users can save filters as a display card for complex filtering criteria that require combining multiple filters to save time when selecting filters.
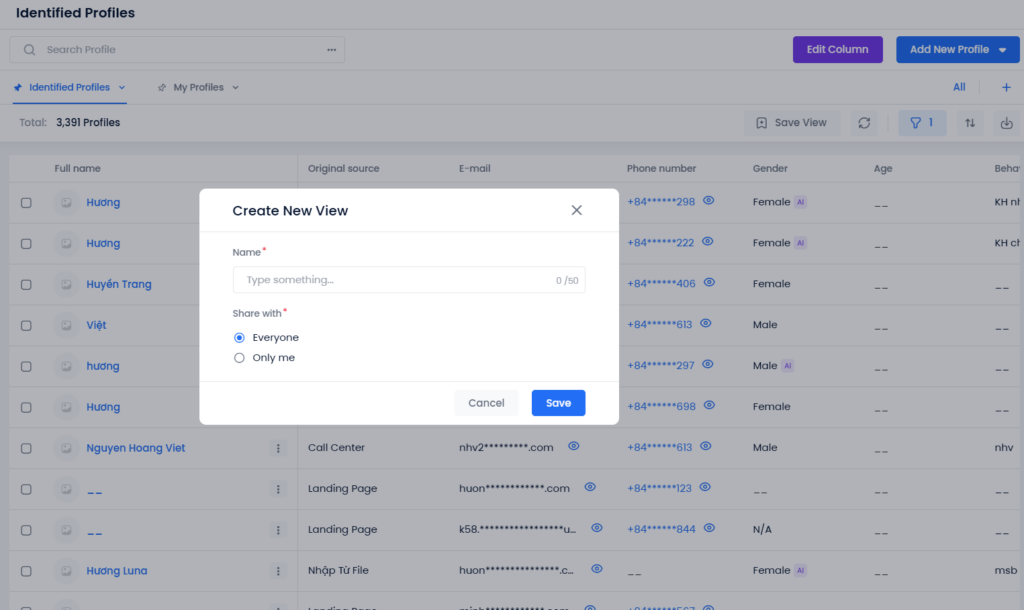
Step 1: After selecting and applying filters → click Save view → Save as new view / Save.
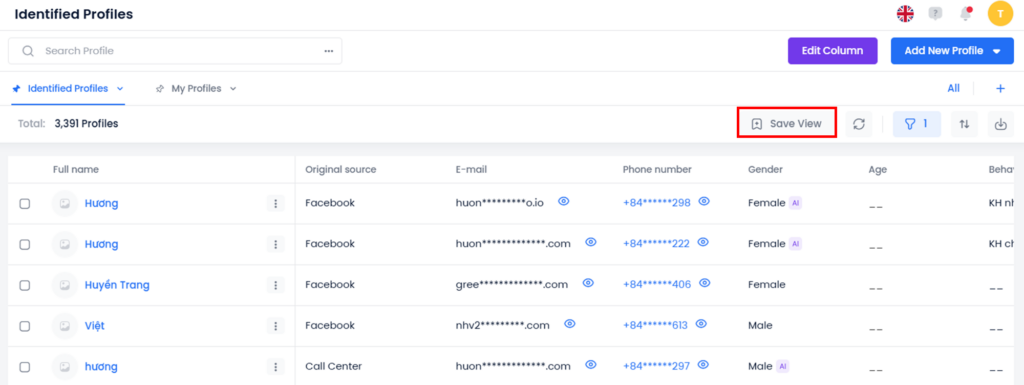
Step 2: On the Create New View pop-up, name your display card and choose to share it with everyone or only you.
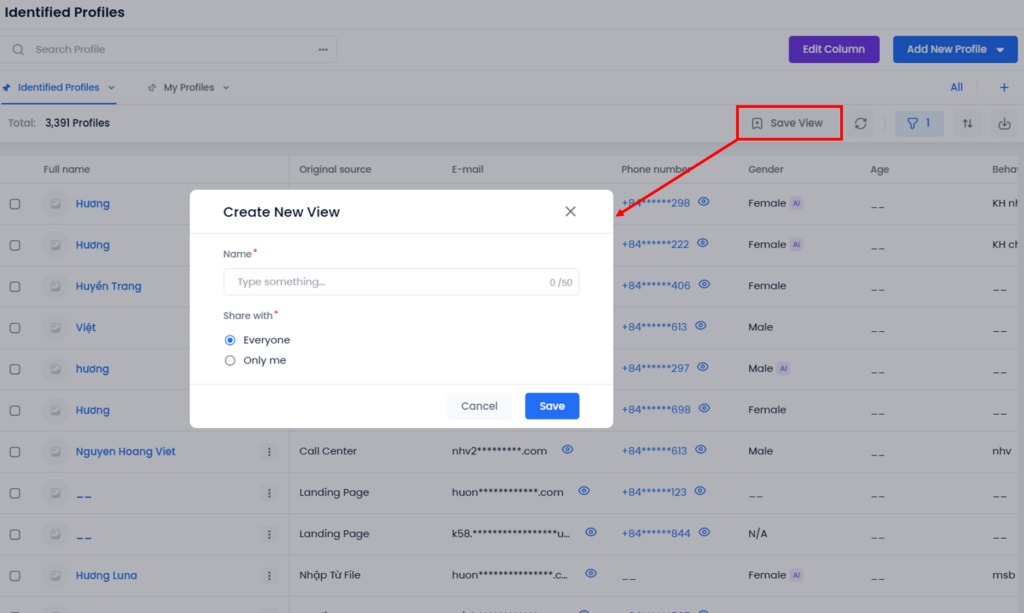
Step 3: Click Save. The saved display cards are located below the search bar.
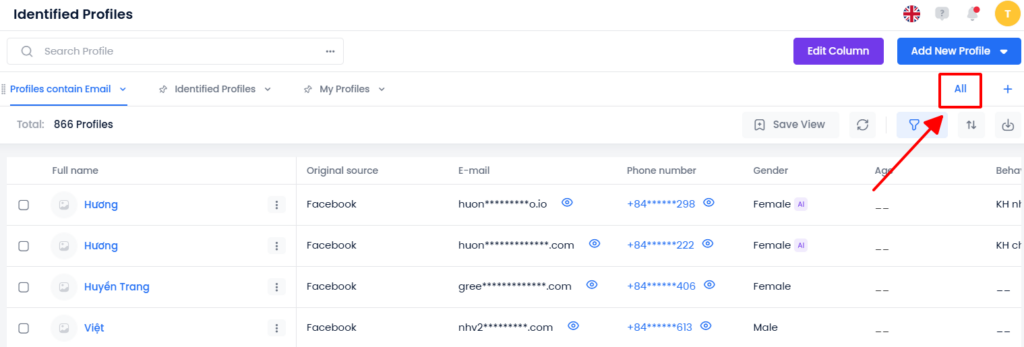
If there are too many display cards, users can search for them by clicking the blue “All” at the top right corner.
Create a new view
Step 1: Select the blue plus icon on the top right corner (Create display card).
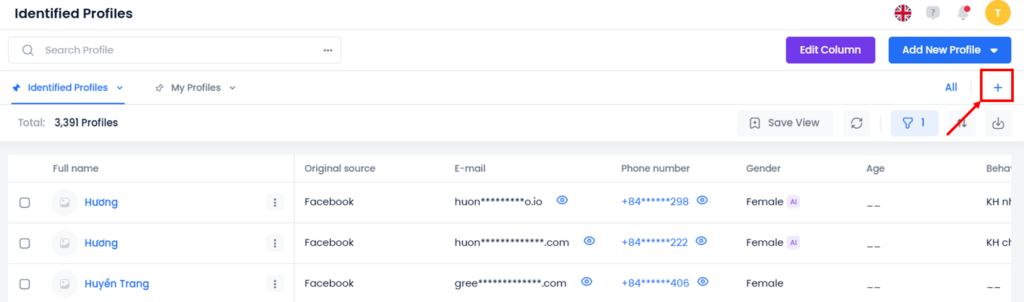
Step 2: On the Create New View pop-up, name your display card and choose to share it with everyone or only you.
Step 3: Click Save. The saved display cards are located below the search bar.
Step 4: After selecting filtering criteria, select Save to save the applied filters for the view.
Note: Pin or set a view as default to display it on the interface.
Choose a view to see
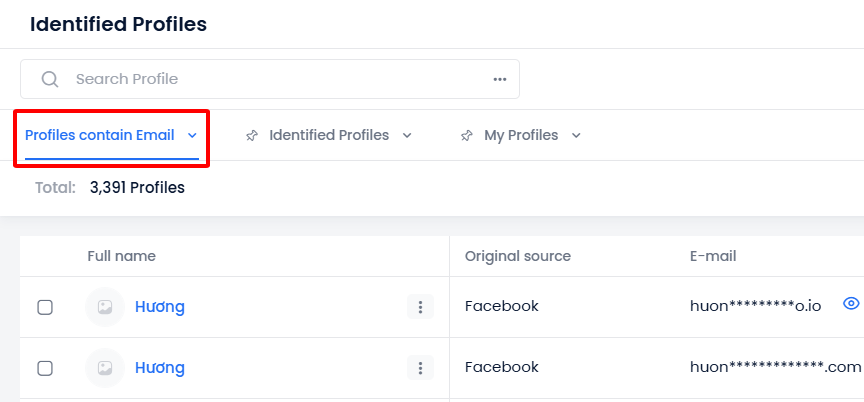
Step 1: Click “All” on the top right of the screen
Step 2: Choose a view to see from the left side of the screen. Views can be searched by name and are categorized into 3 groups:
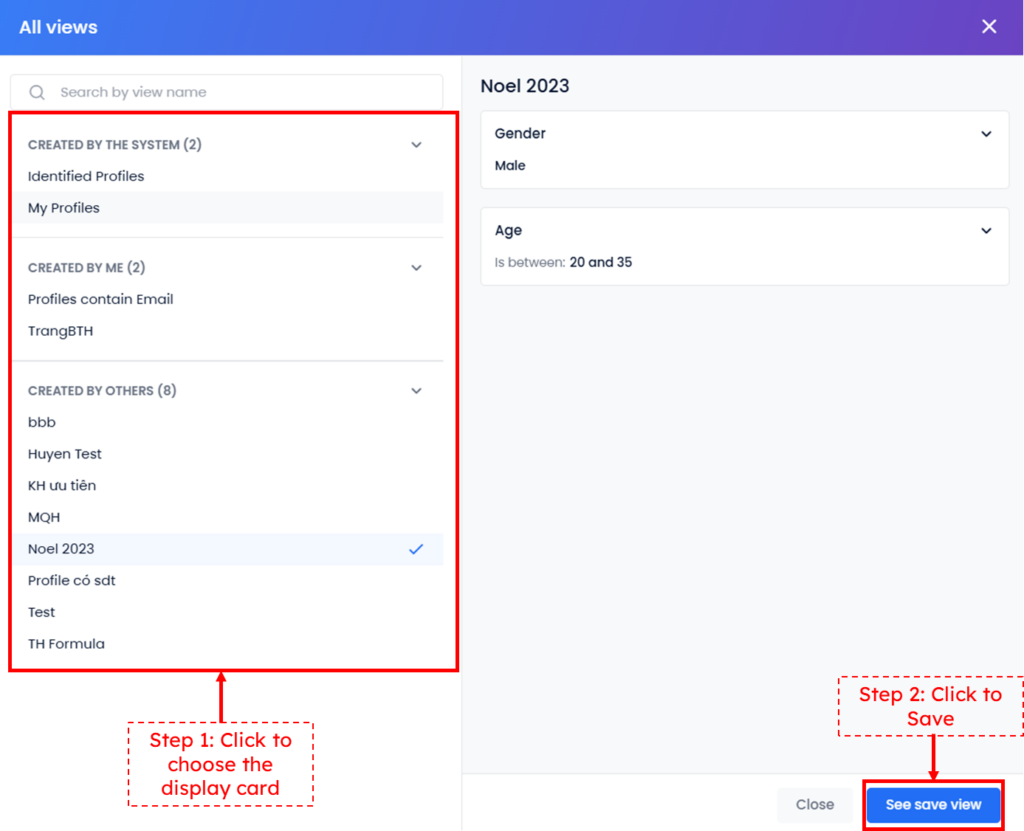
Step 3: Choose “See the view“
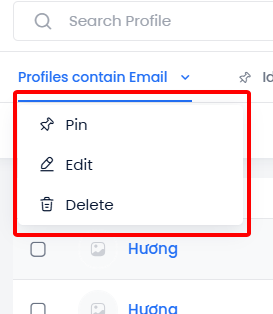
Pin a view to the view bar
The pinned cards on the view bar are always displayed when users access the profile list interface.
Step 1: Click the downward arrow icon next to the display card name → select Pin.
Users can perform the same actions to Unpin a view from the view bar.
Edit, delete a view bar
Edit a view
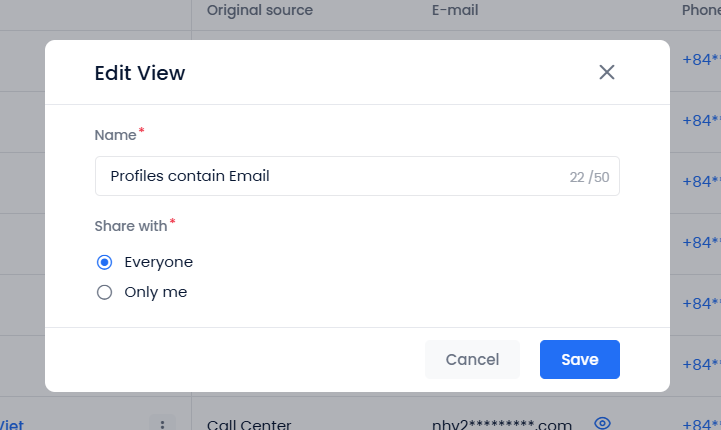
Step 1: Click the downward arrow icon next to the display card name → select Edit

Step 2: On the Edit View pop-up, rename your display card and choose to share it with everyone or only you.
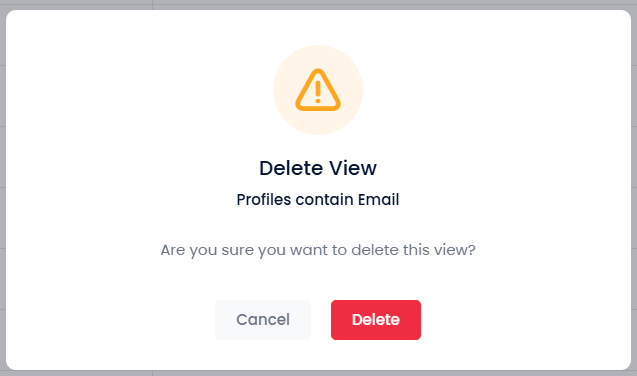
Delete a view
Step 1: Click the downward arrow icon next to the display card name → select Delete.
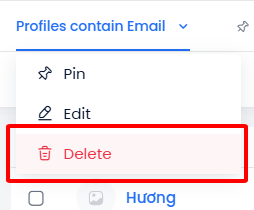
Step 2: When the confirmation popup appears, choose Delete.