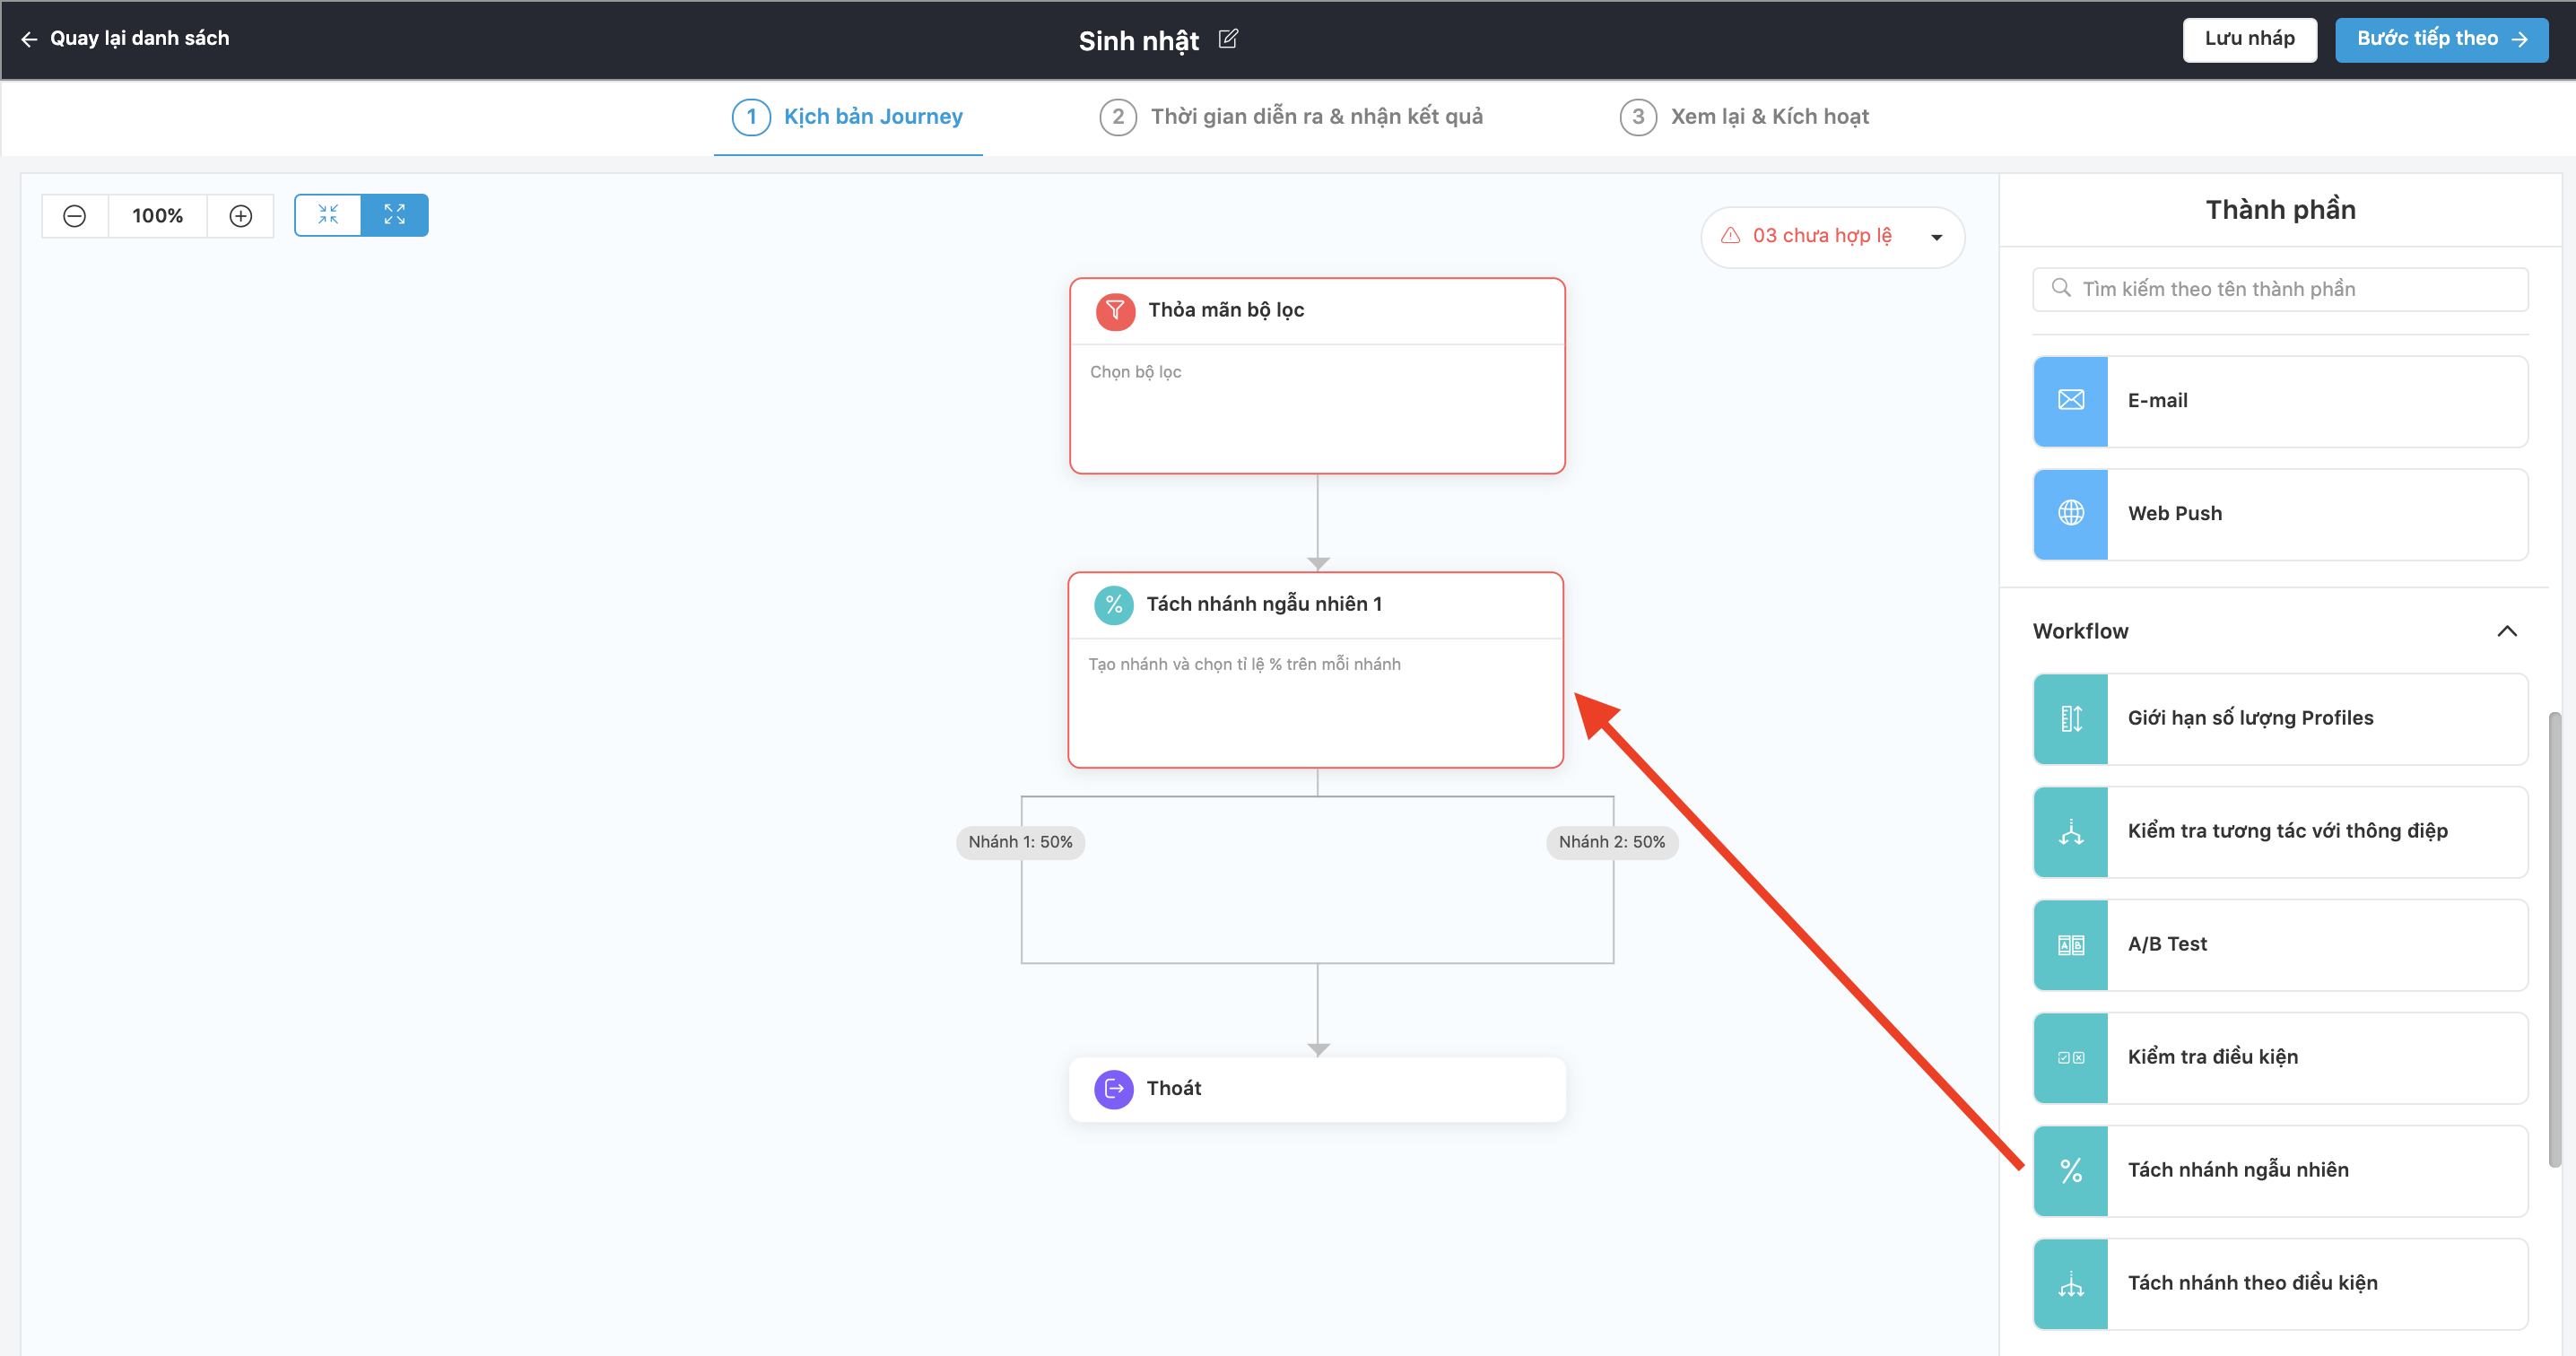
The workflow block helps users increase the variety of scenarios combined with sending multi-channel messages.
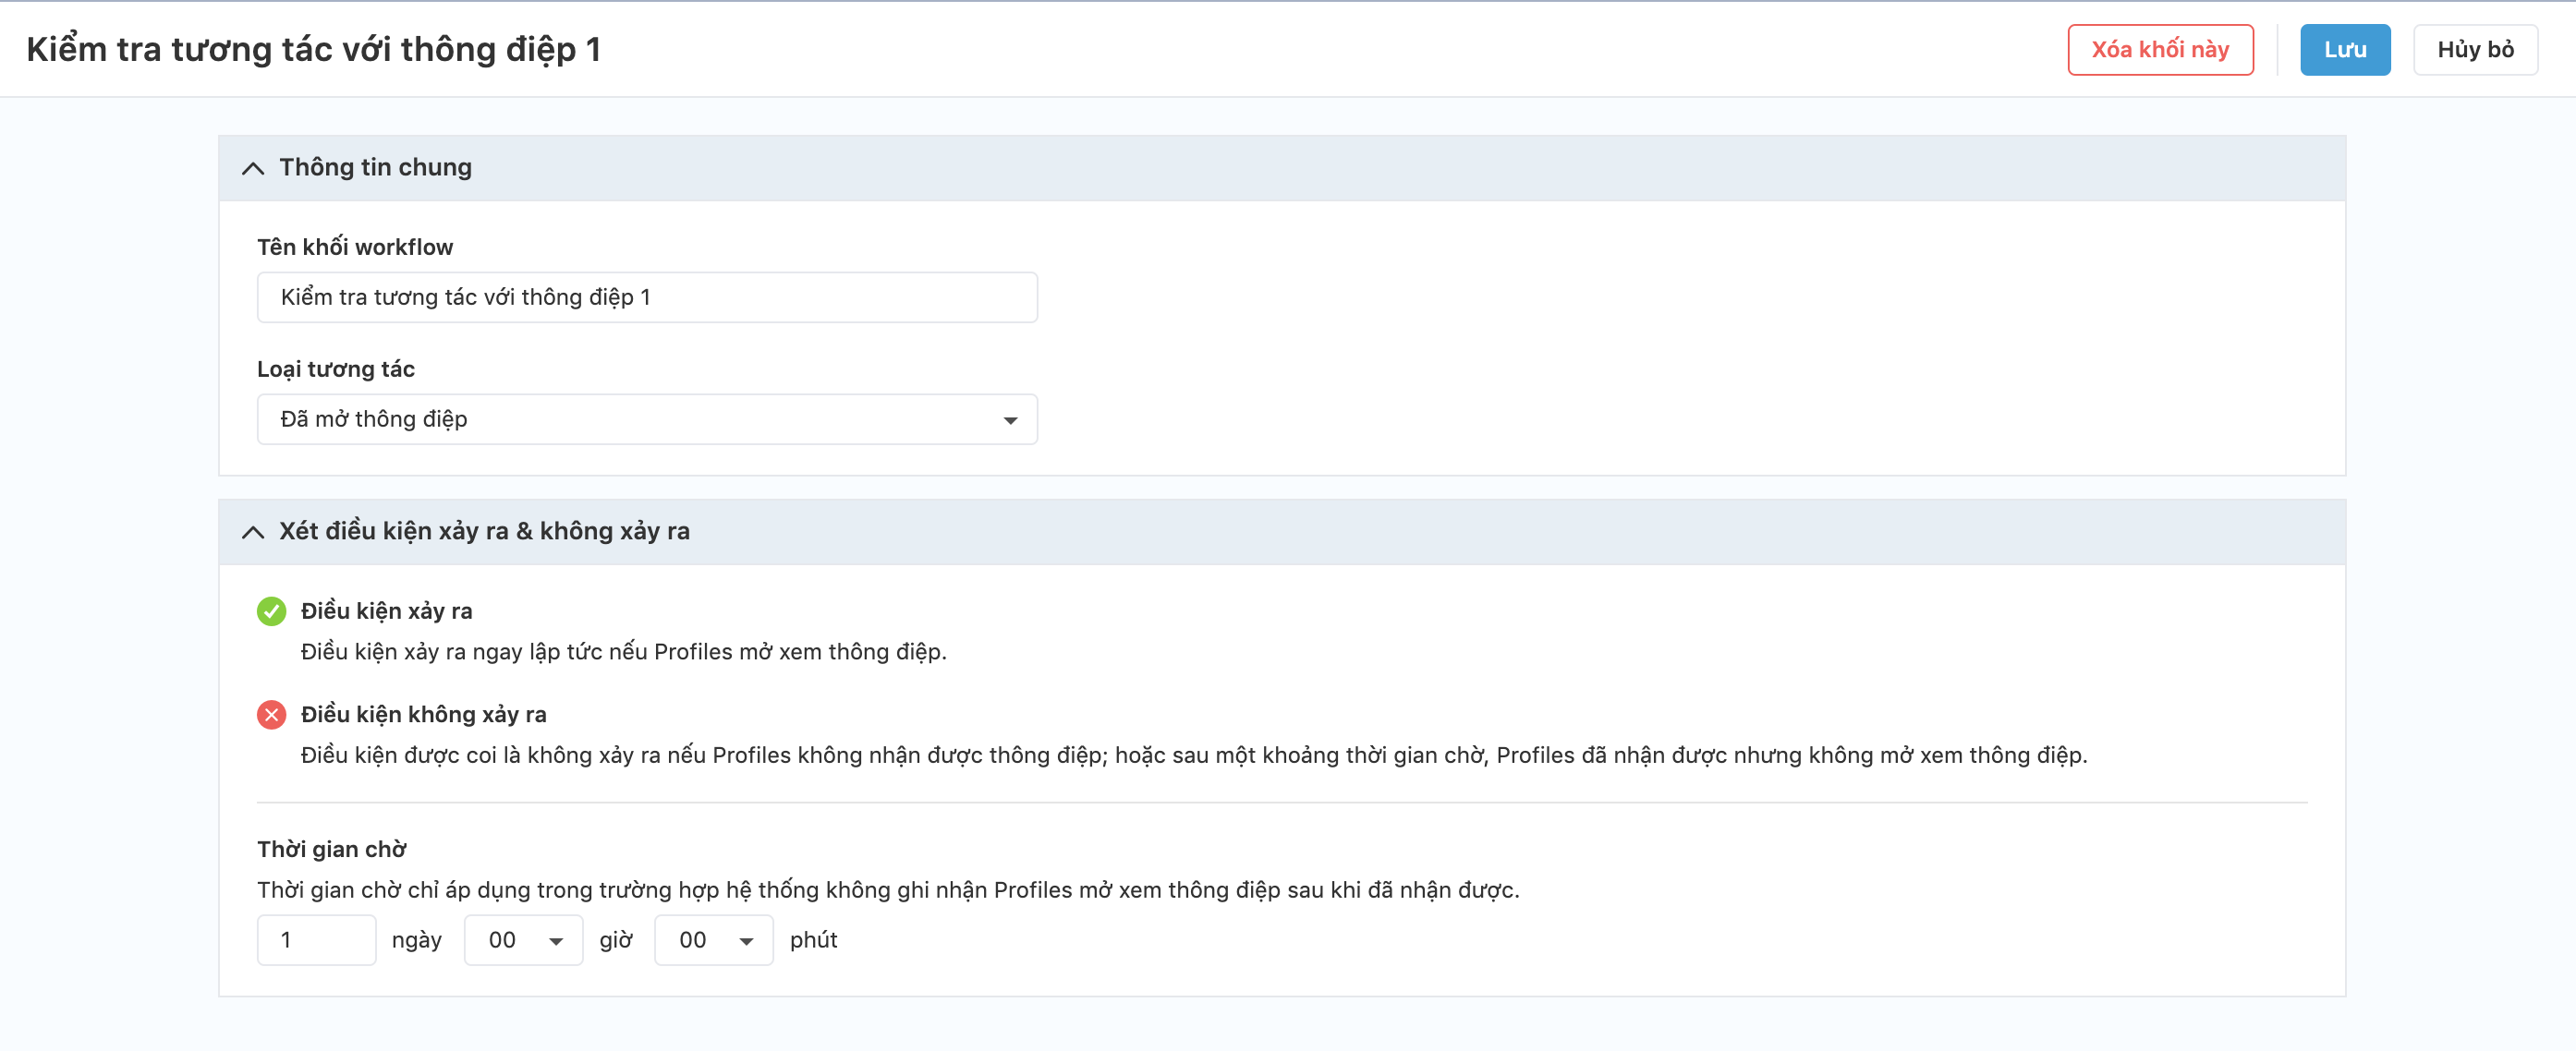
Test the interaction with the message
The purpose of the Test the interaction with the message block is to check whether the customer has satisfied the conditions for interaction/not interacting with the previous message, to send the next message or not.
When you drag the Test the interaction with the message block to the bottom of the Message block, the system displays a plus sign.
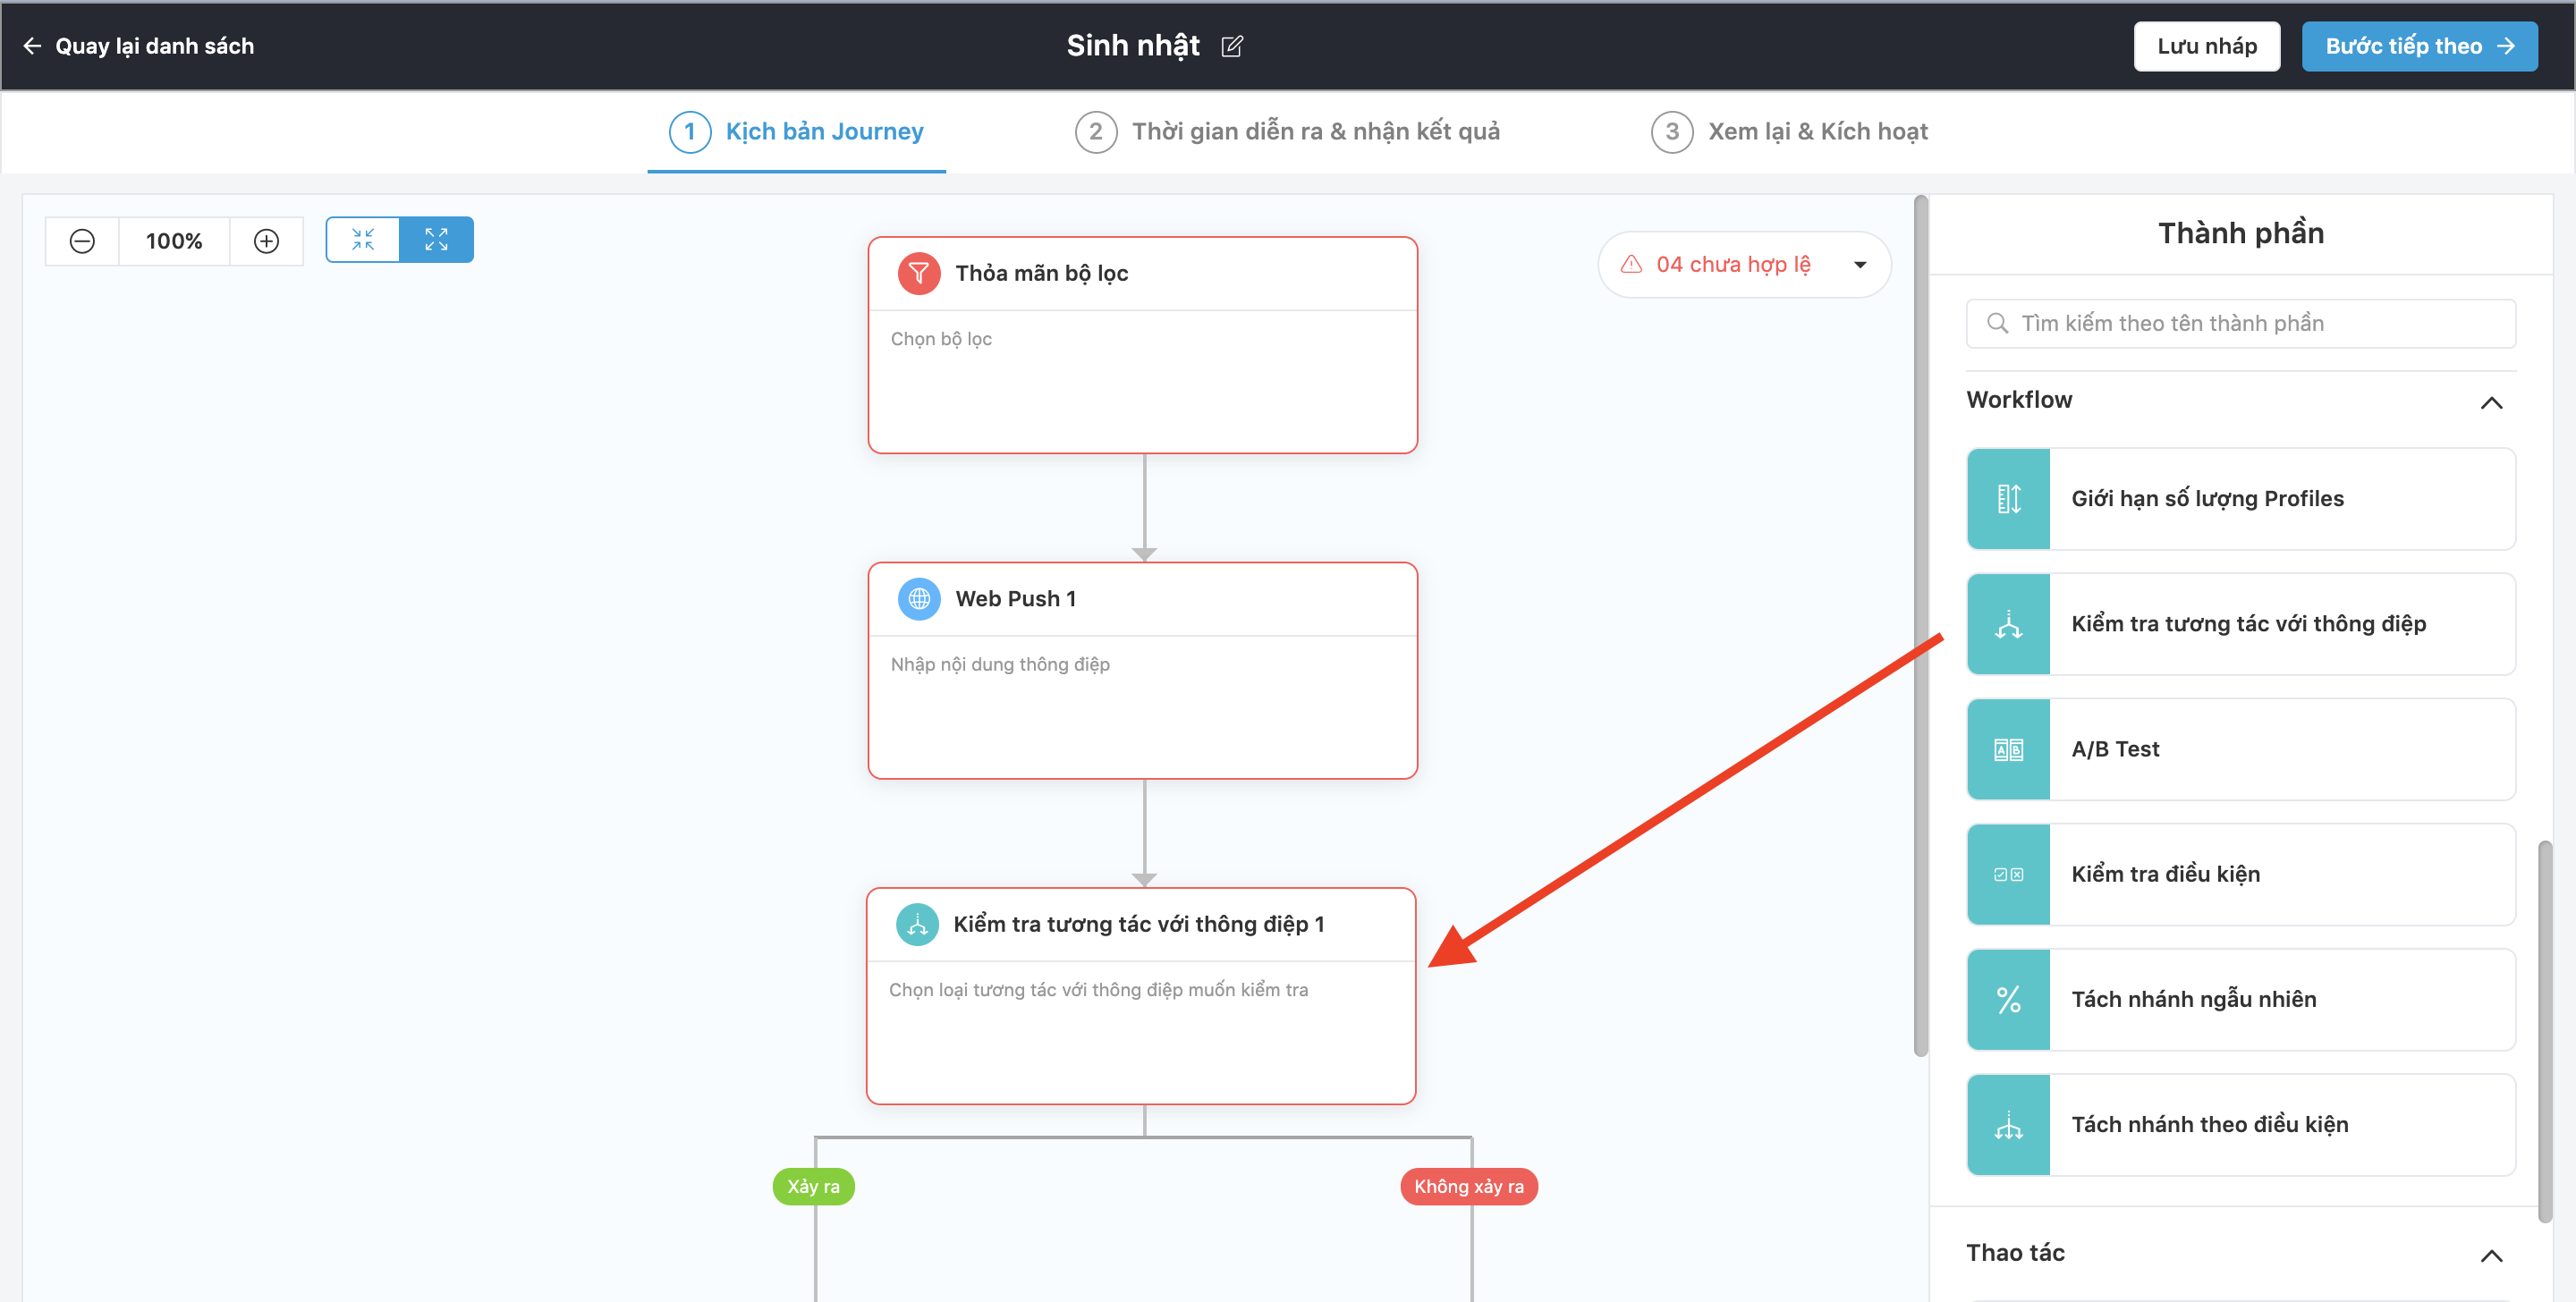
The block allows you to check whether the customer has interacted with the message, including: received; opened; clicked the link; converted (perform a CTA in the Landing Page, used the voucher attached in the message, made a purchase)
Double-click the block to select the condition. Click Save to finish.
A/B test
The purpose of the A/B Test block is to compare the effectiveness of test versions when sending messages to customers, thereby helping businesses choose effective content and increase conversion rates for customers.
When dragging the A/B Test block to the bottom of the message block, the system will display a plus sign.
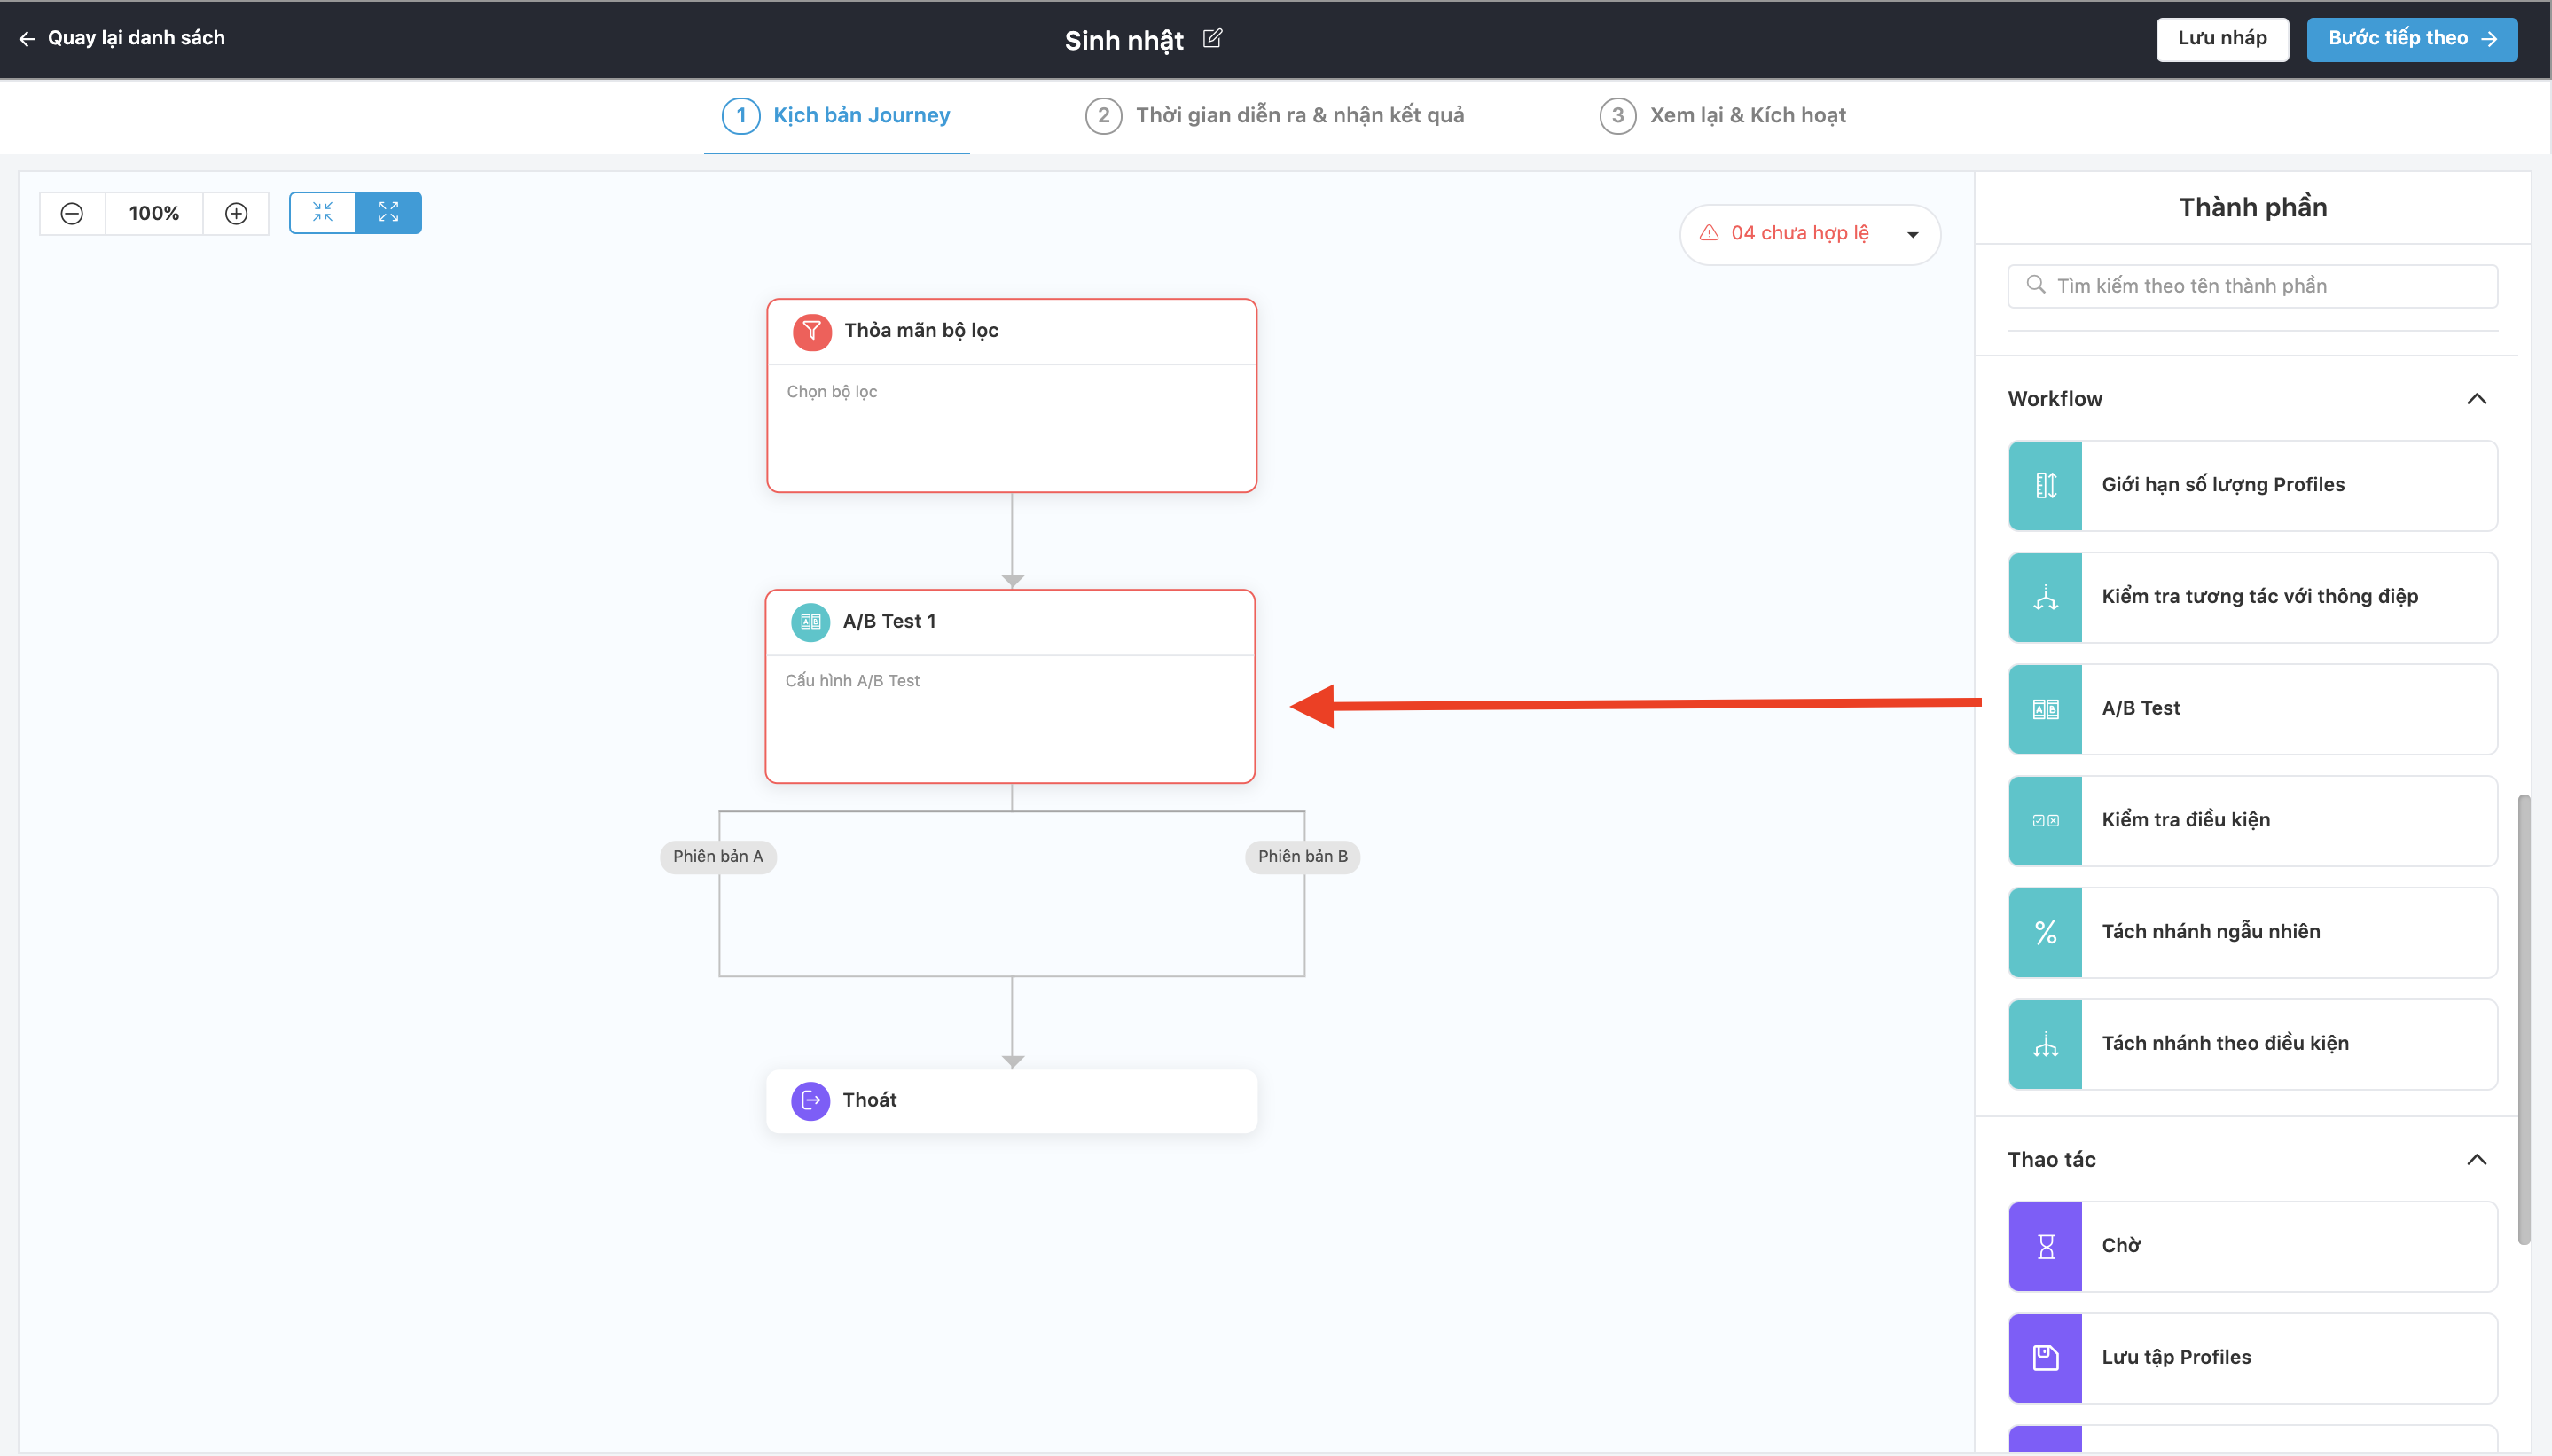
The operation of using the A/B test block includes the following steps:
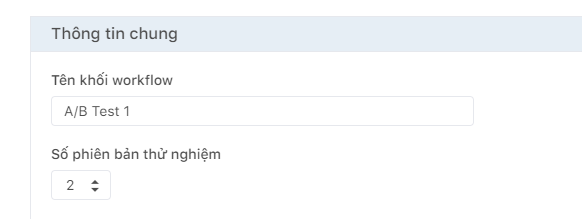
Step 1: Overview information
- Workflow block name.
- Test version number (minimum 2 versions).
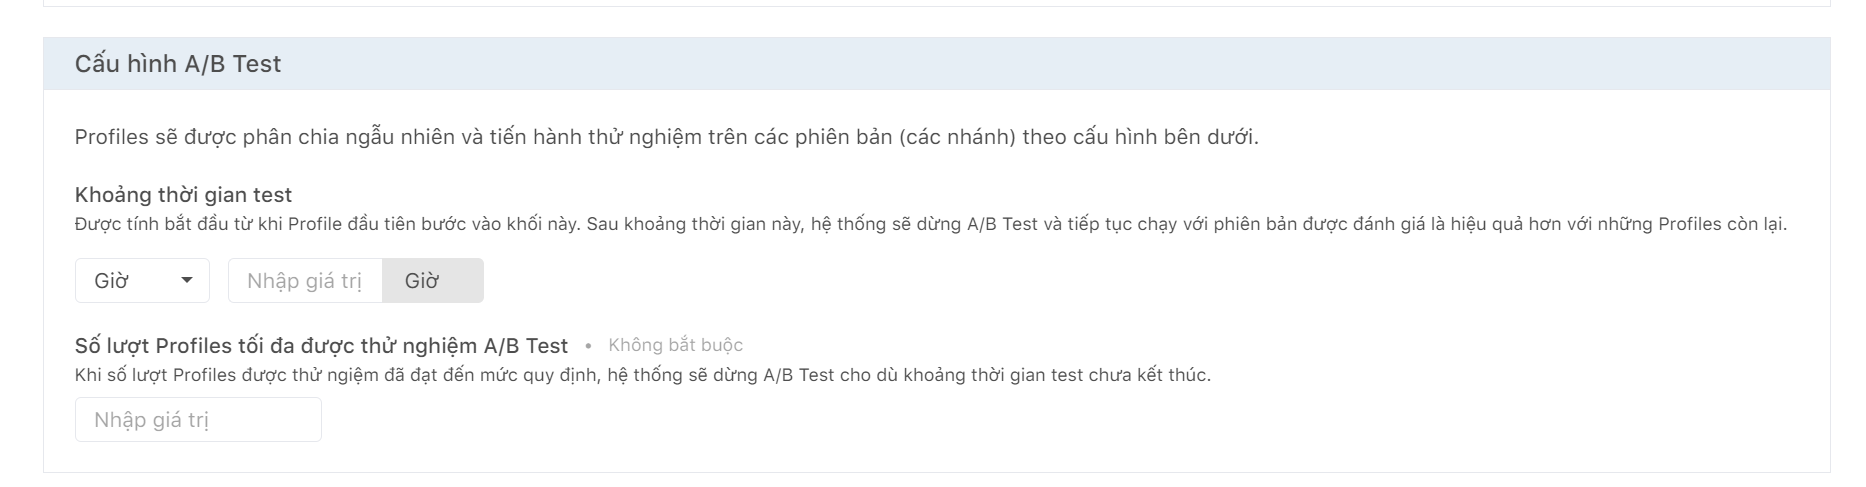
Step 2: Configure A/B tests.
- Test interval: After this period, the system will stop the A/B Test and continue running on the version judged to be more effective, with the remaining Profiles.
- Maximum number of Profiles for A/B test: Limit the number of test profiles in a campaign.
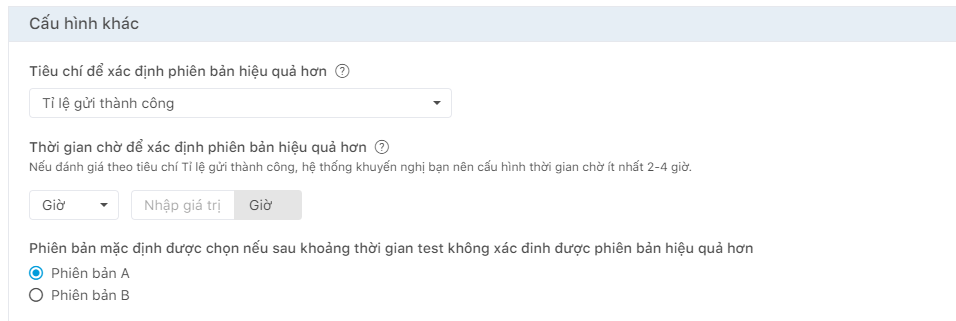
Step 3: Other configuration.
+ Criteria to determine the more efficient version:
- Successful sending rates.
- Rate of message opening.
- Click rates.
+ More efficient versioning timeout: During this period, the system will calculate the effectiveness of the test versions.
The default version is selected if a more efficient version cannot be determined after the test period.
Check condition
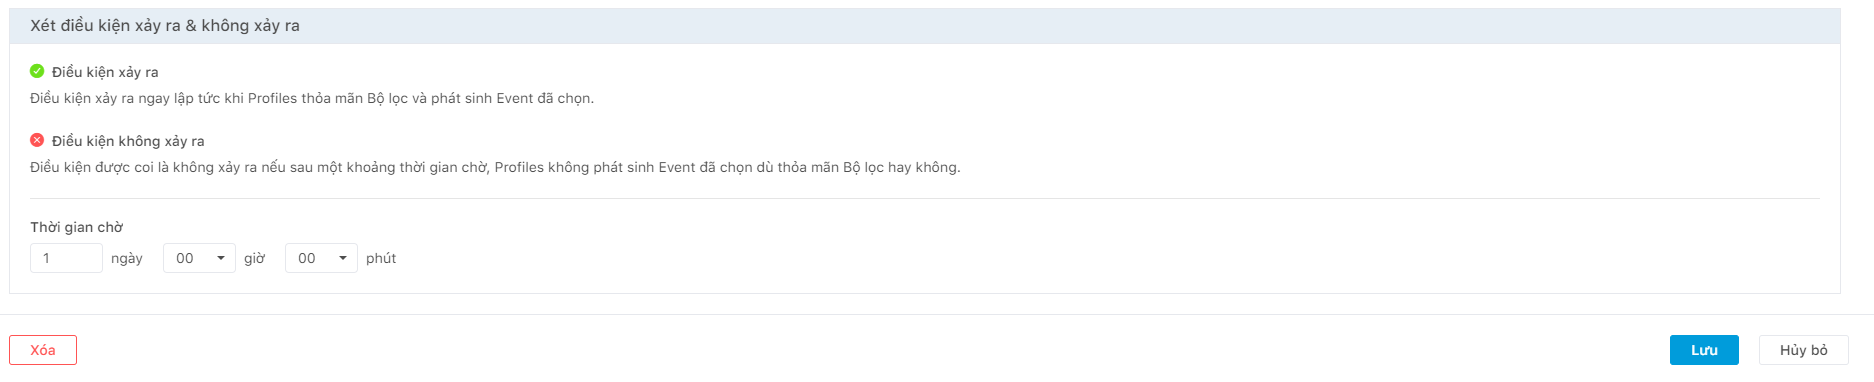
The purpose of the Check Condition block is to check whether the customer Profile meets the conditions for interacting with the Trigger event, or whether the filter condition (Customer Segment) is satisfied, to send the next message.
When you drag the Check Condition block to the bottom of the message block, the system displays a plus sign.
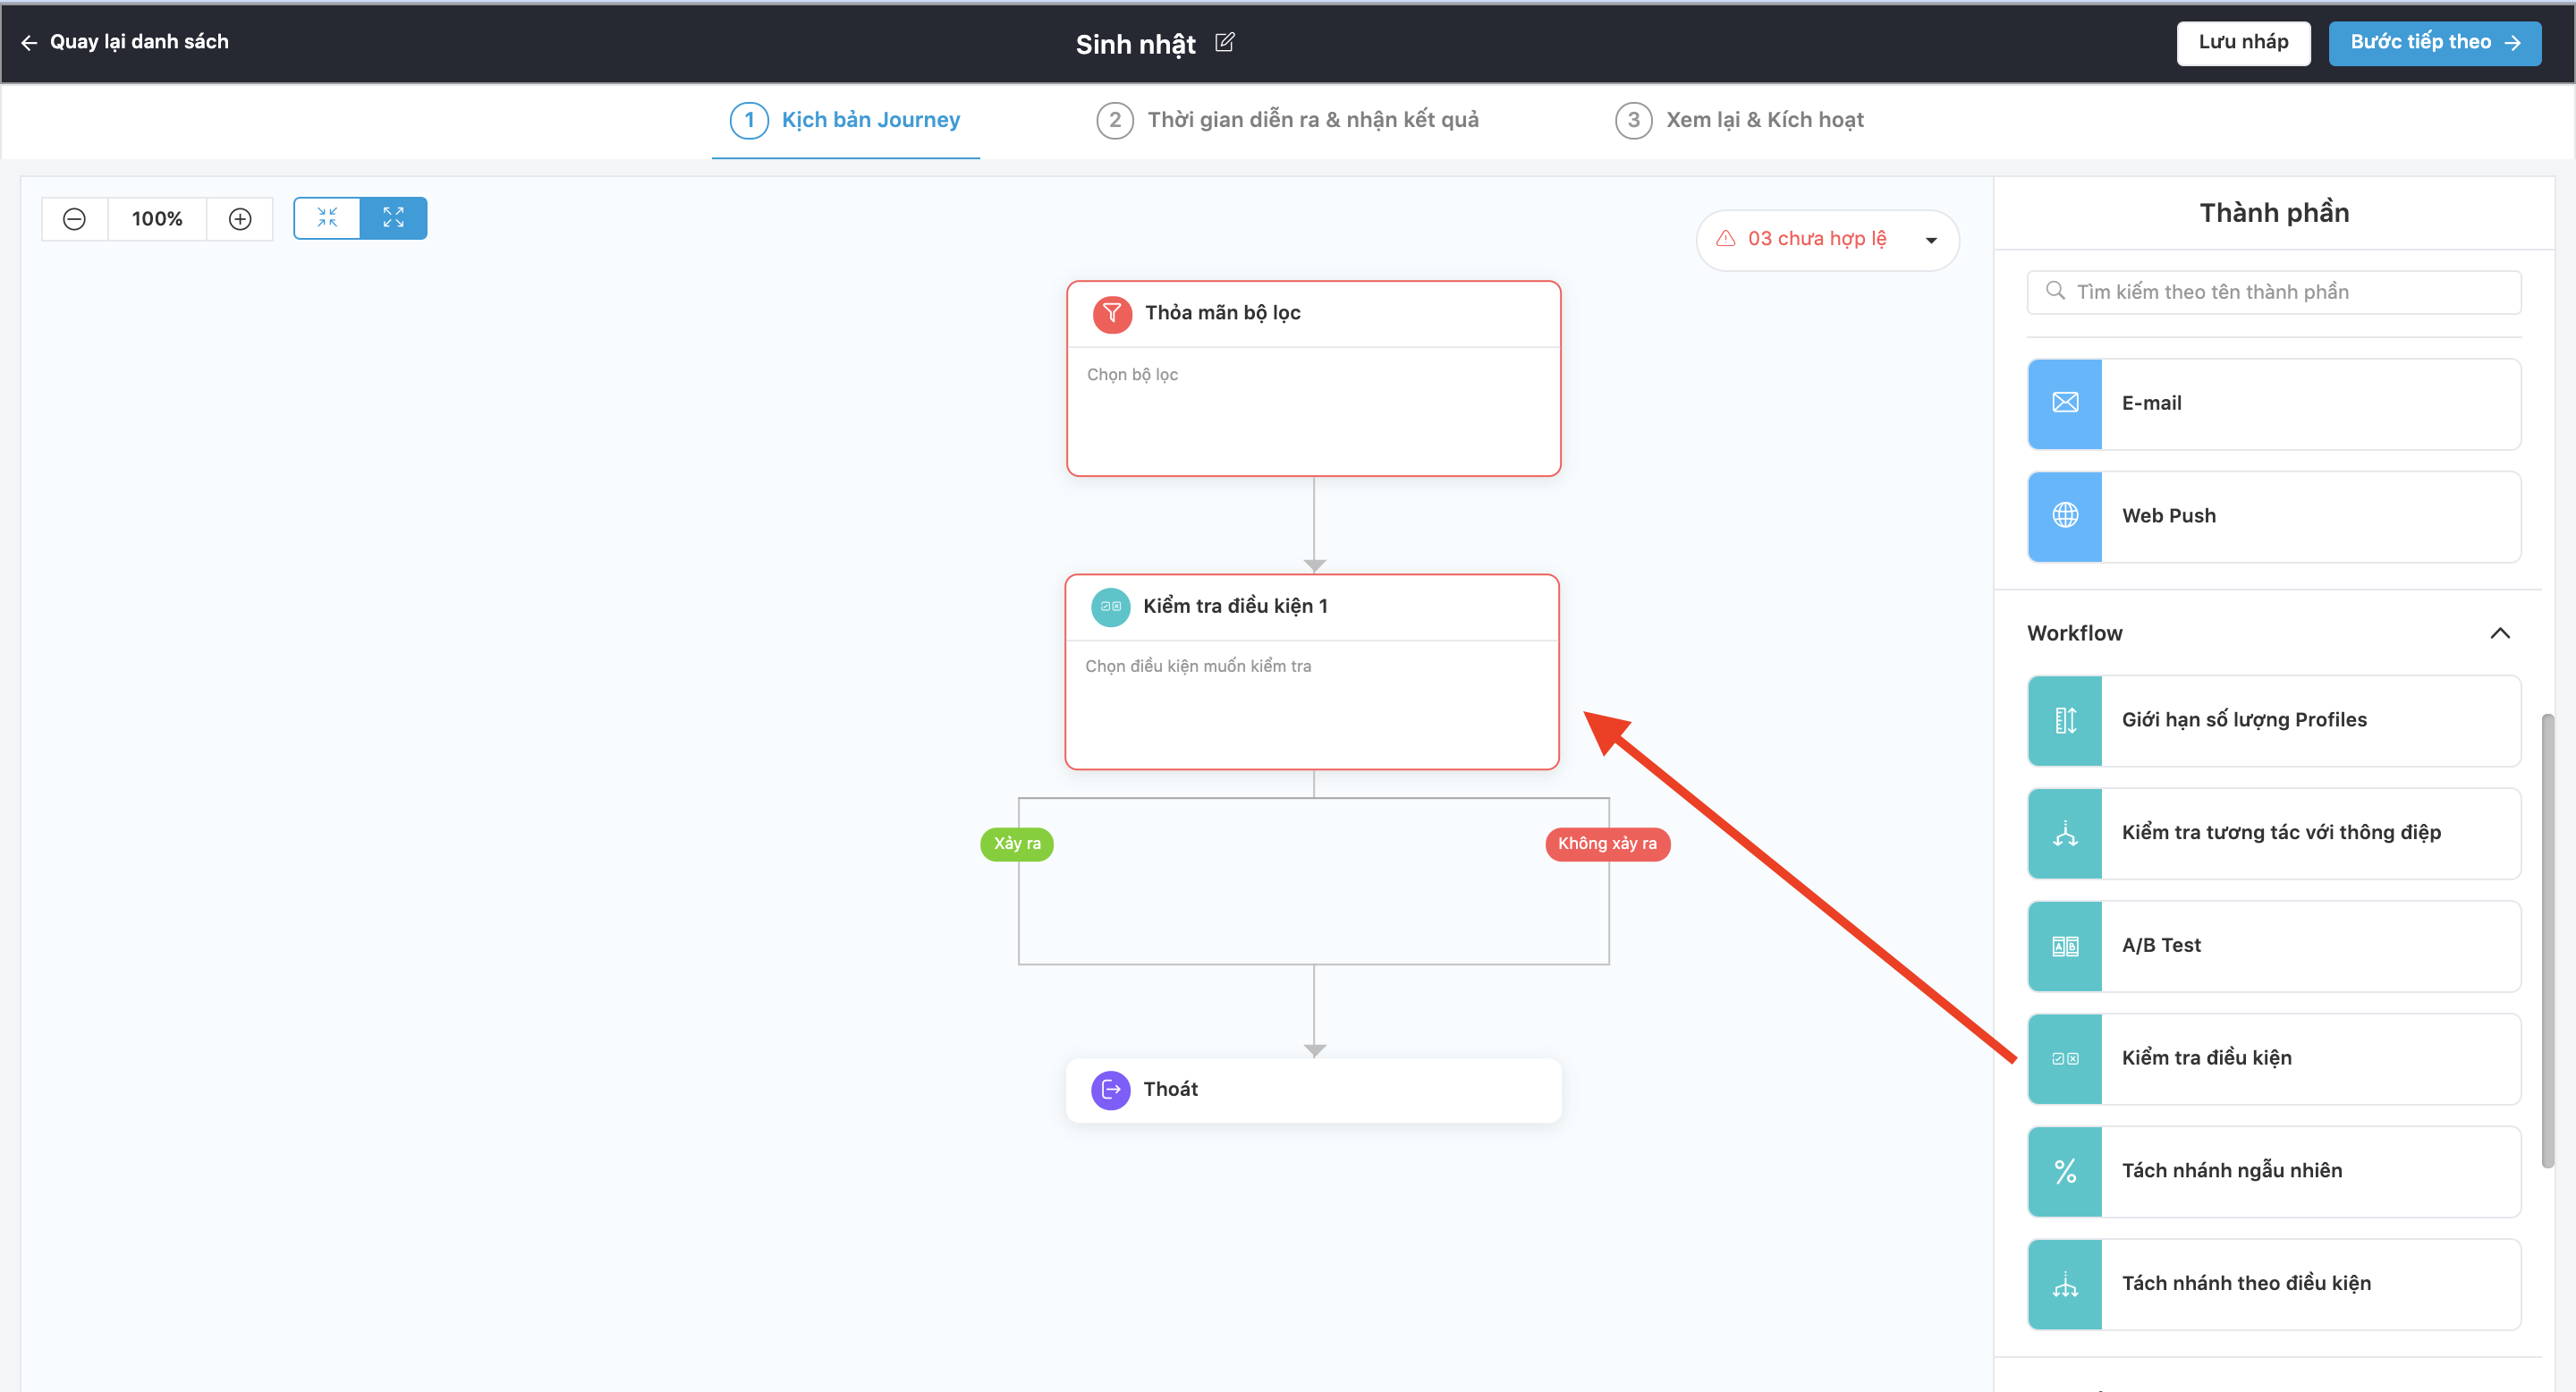
The Check Condition block operation consists of the following steps:
Step 1: Select the condition type.
- Satisfy filter (To filter customers according to certain segment conditions).
- Generate Event (To filter customers who interact with Trigger Event).
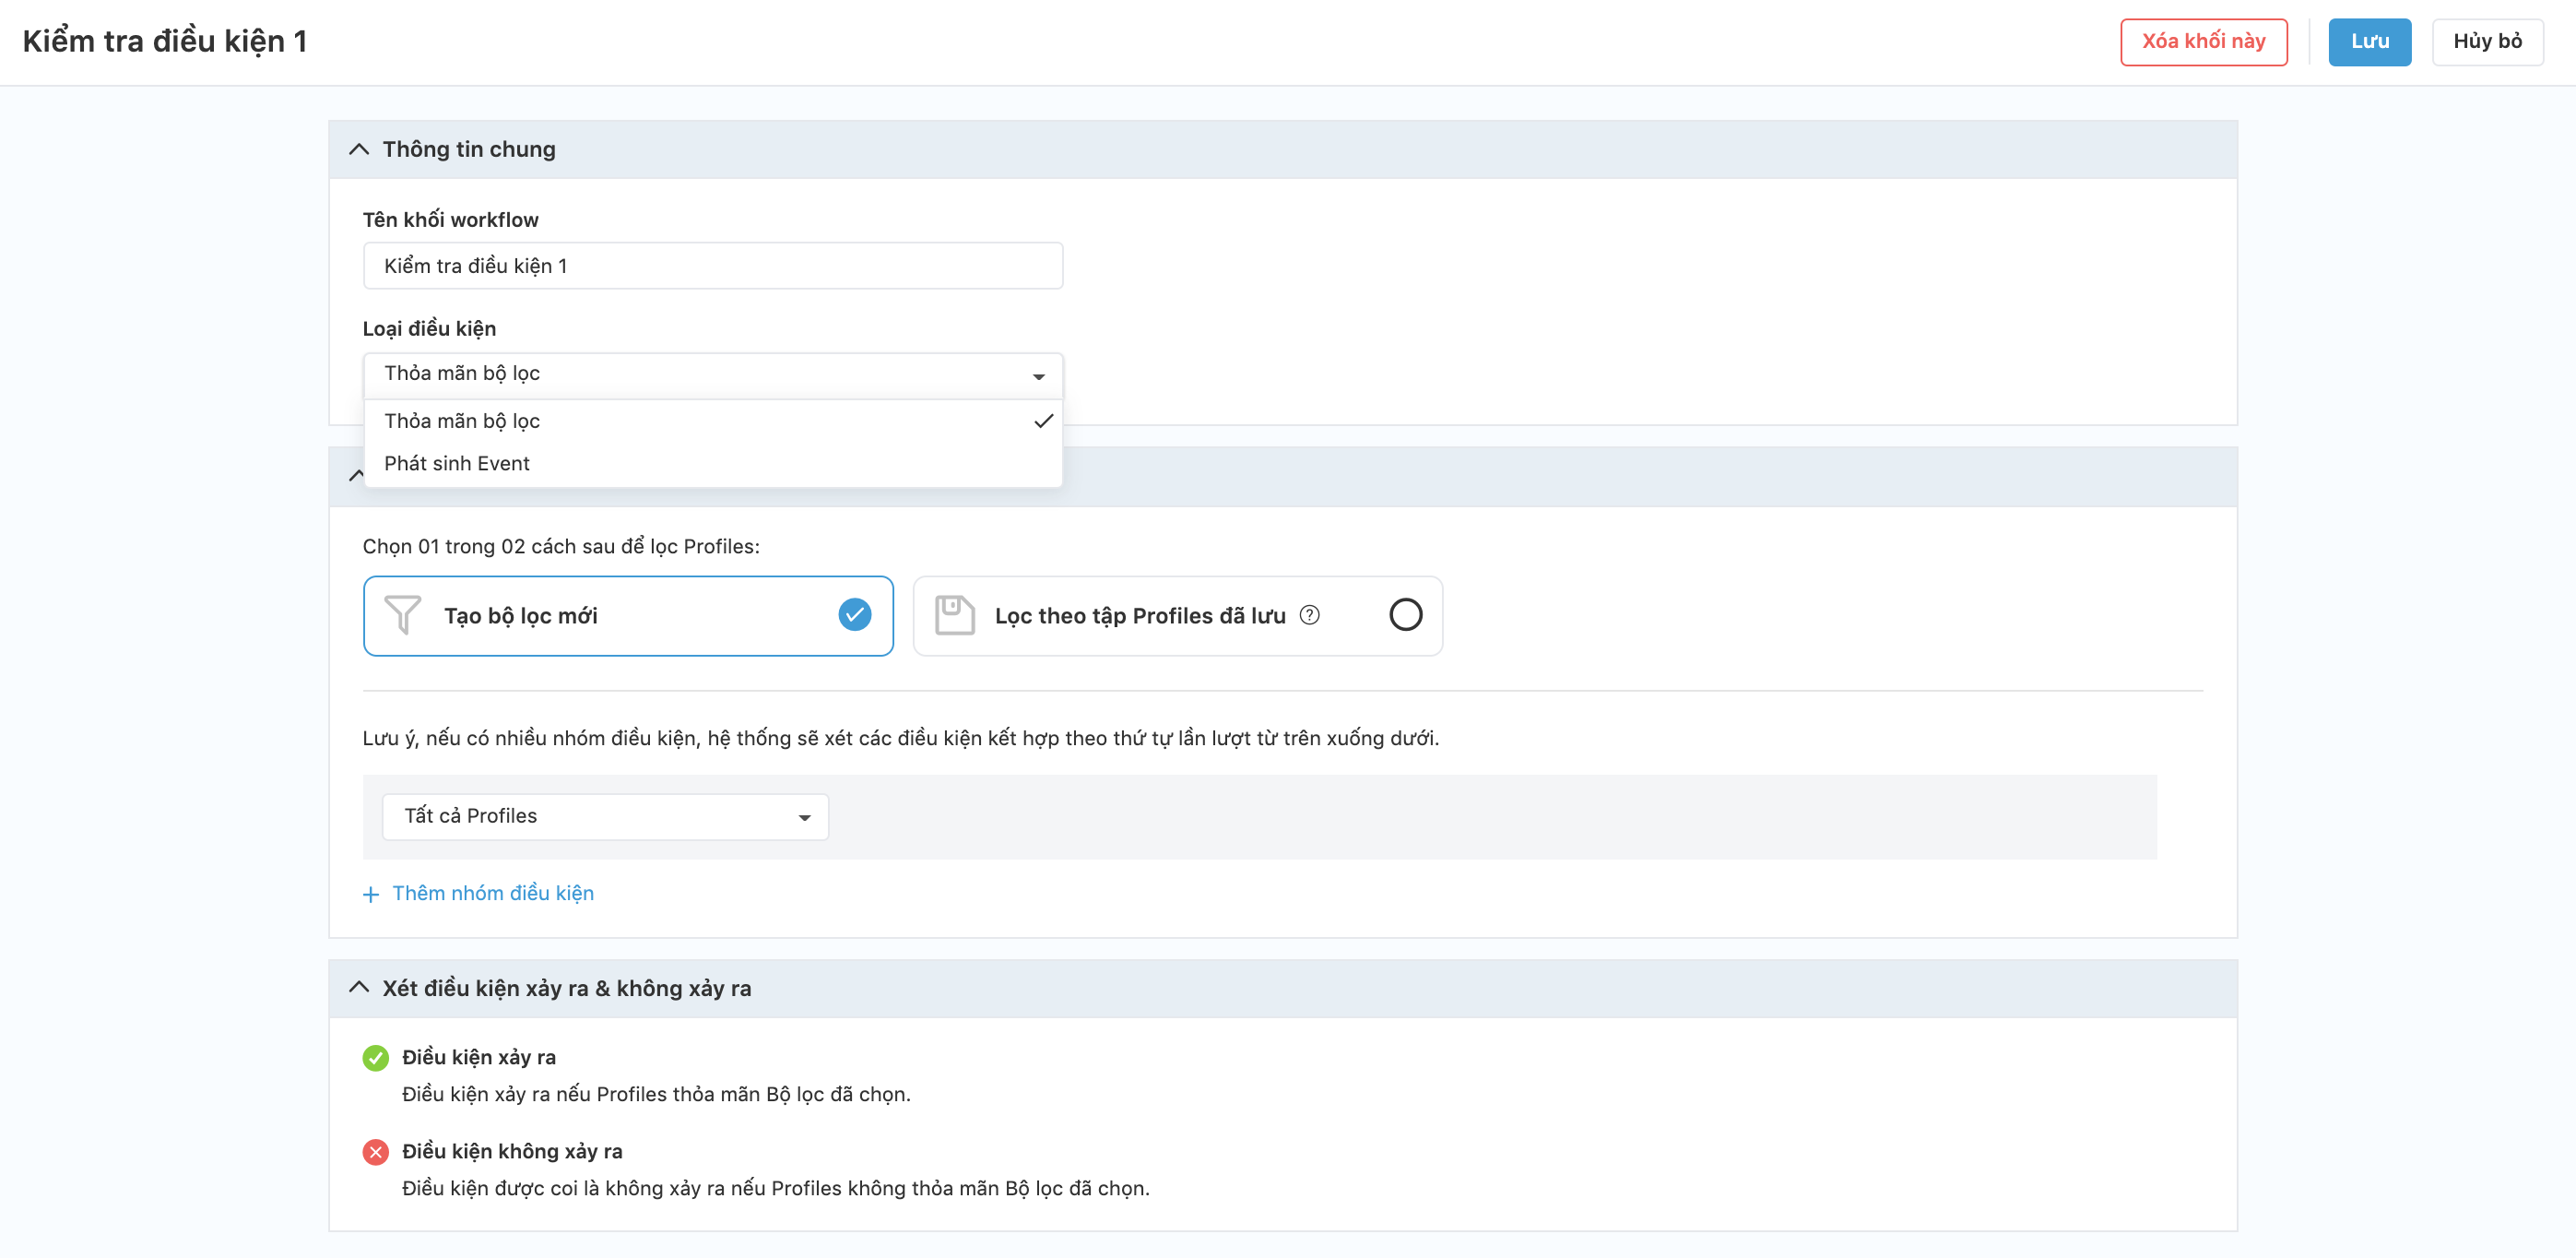
Step 2: If the Event Trigger condition is selected, the user needs to select the type of Event (Trigger) that they want to check in the message.
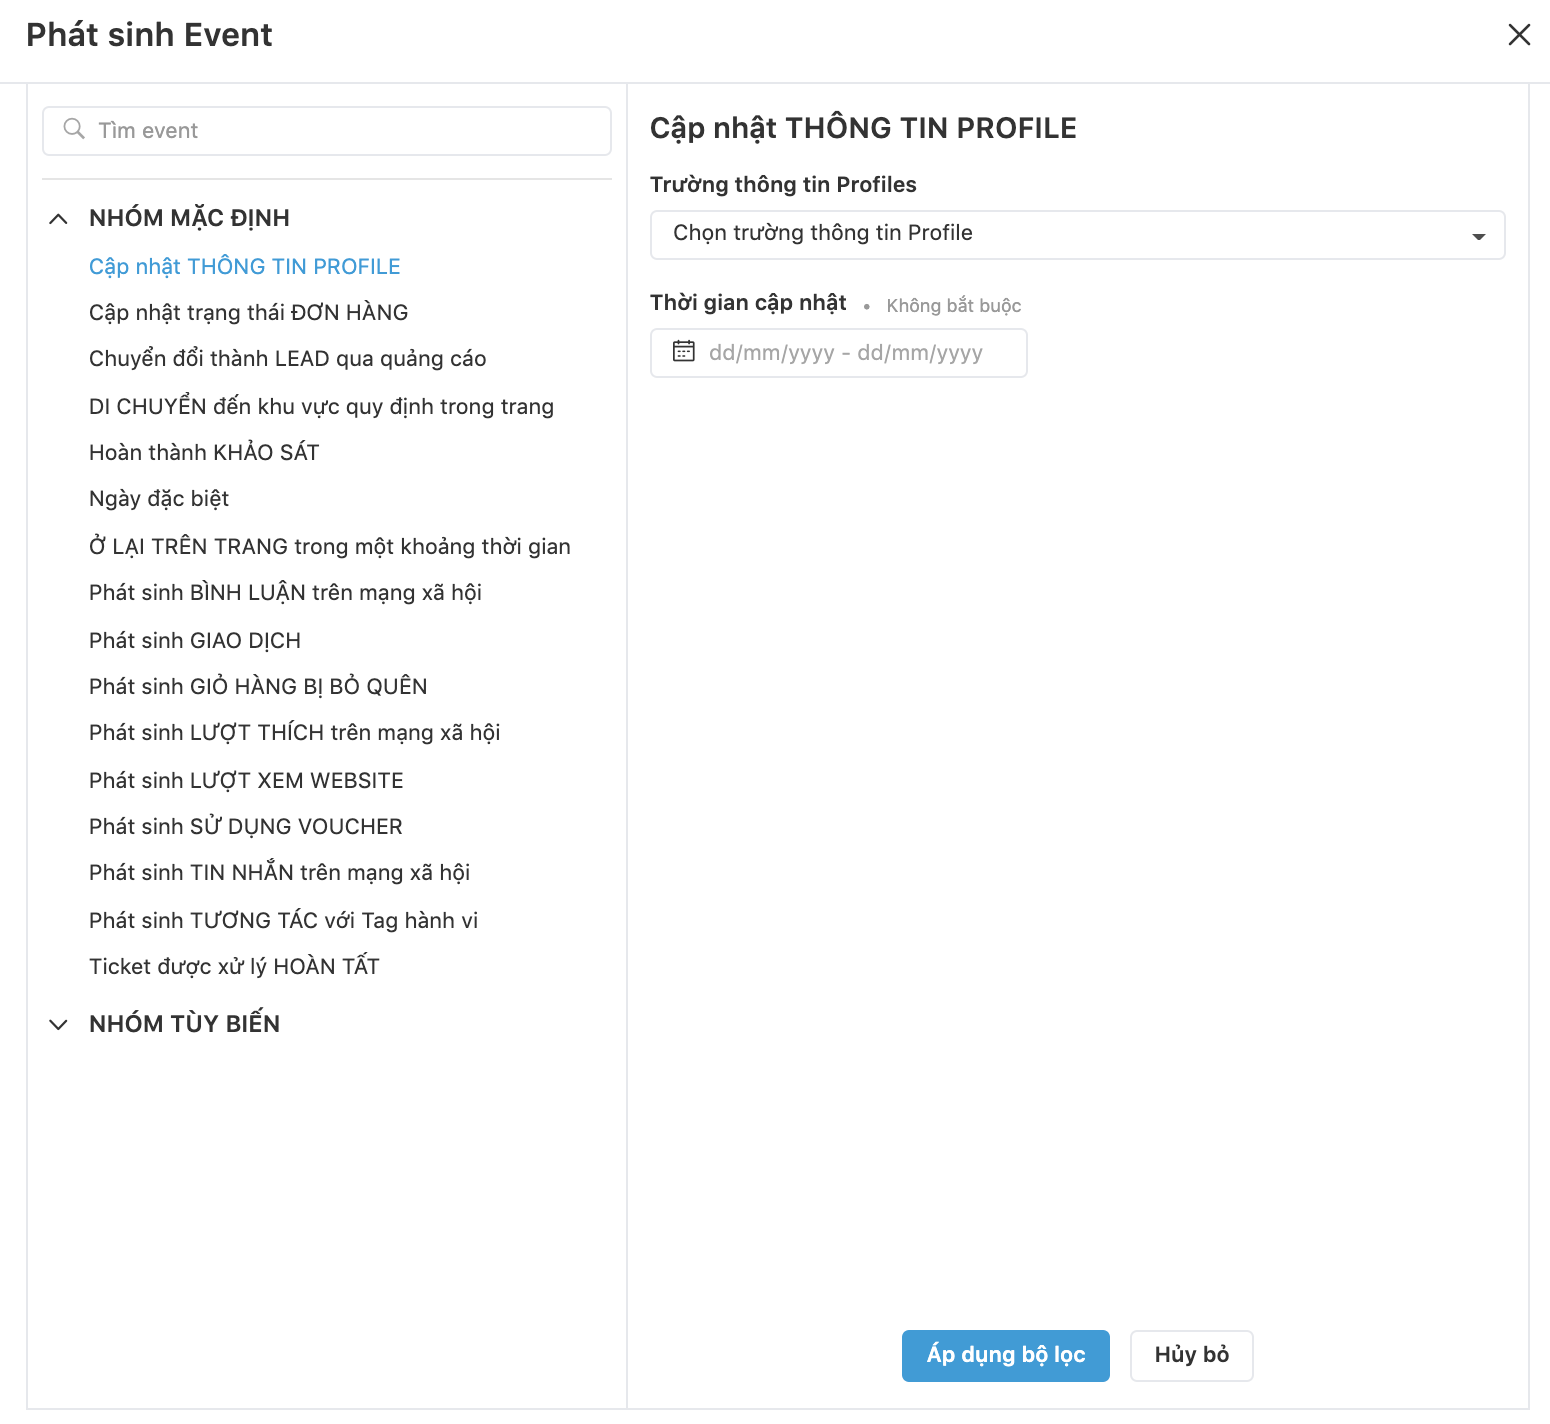
Step 3: Enter the information for the selected Trigger → Click Apply Filter.
Step 4: Select the time when the condition check occurs → Click Save to complete the Check condition block.
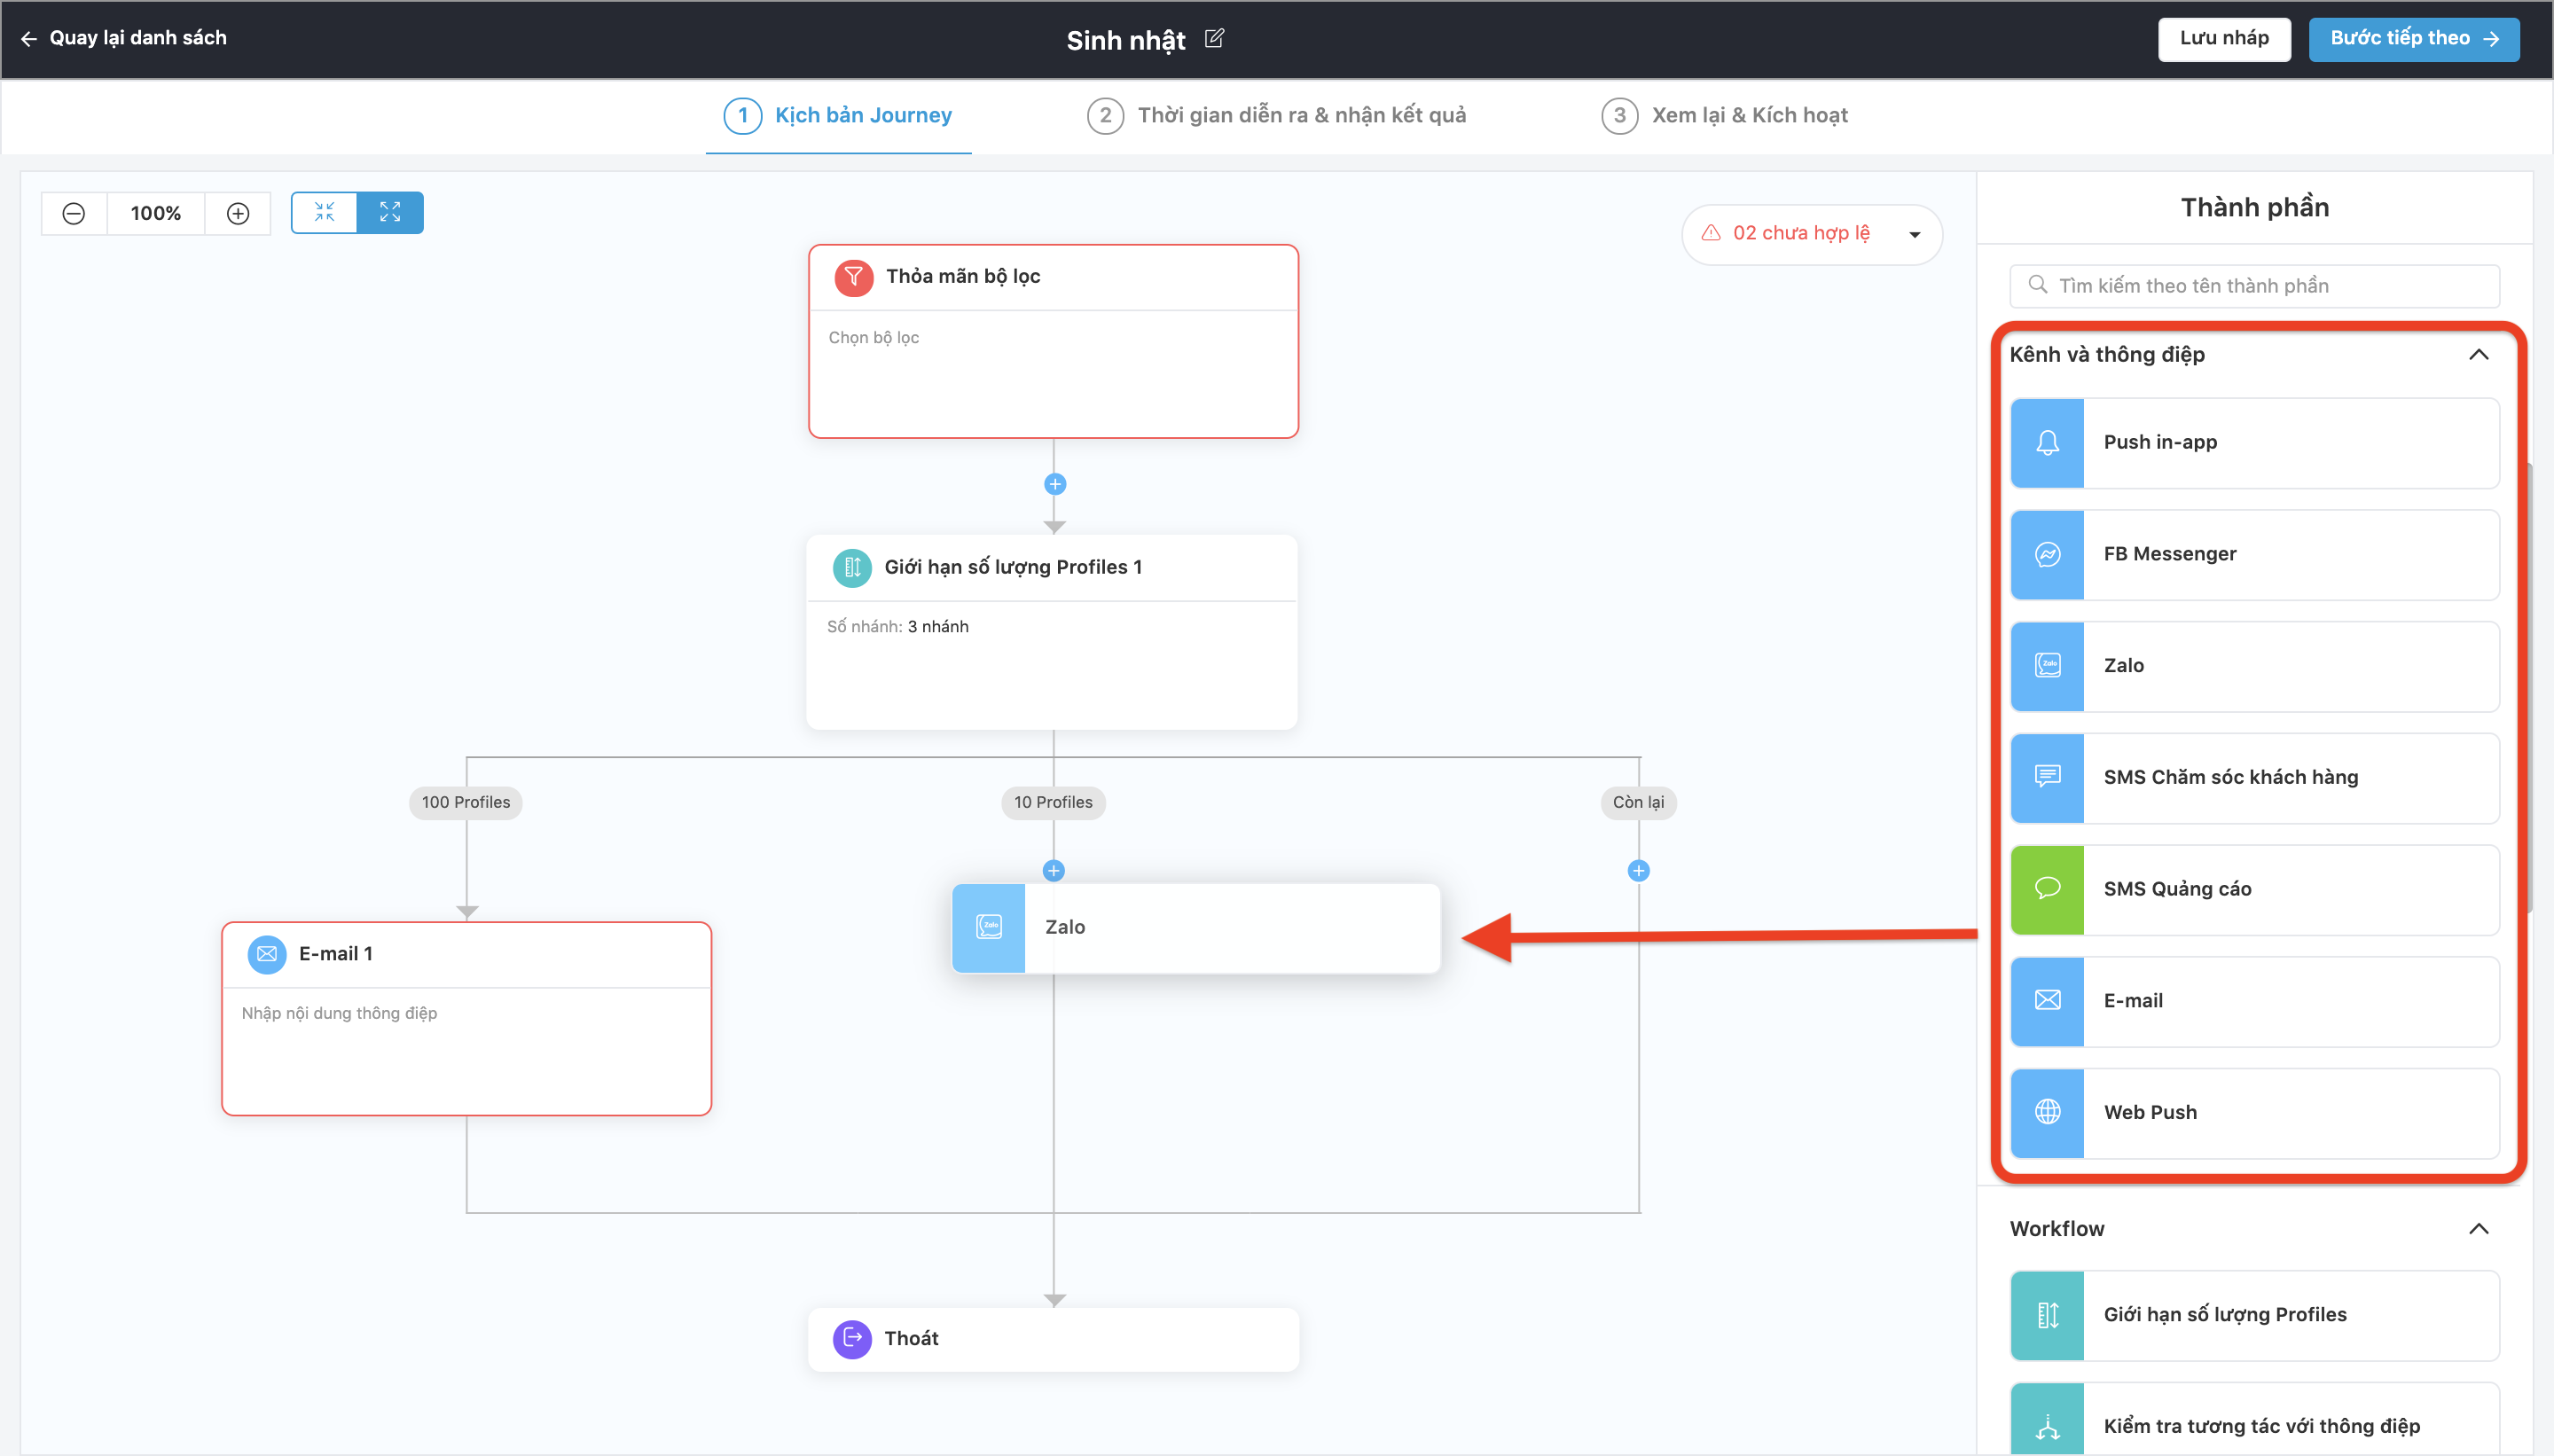
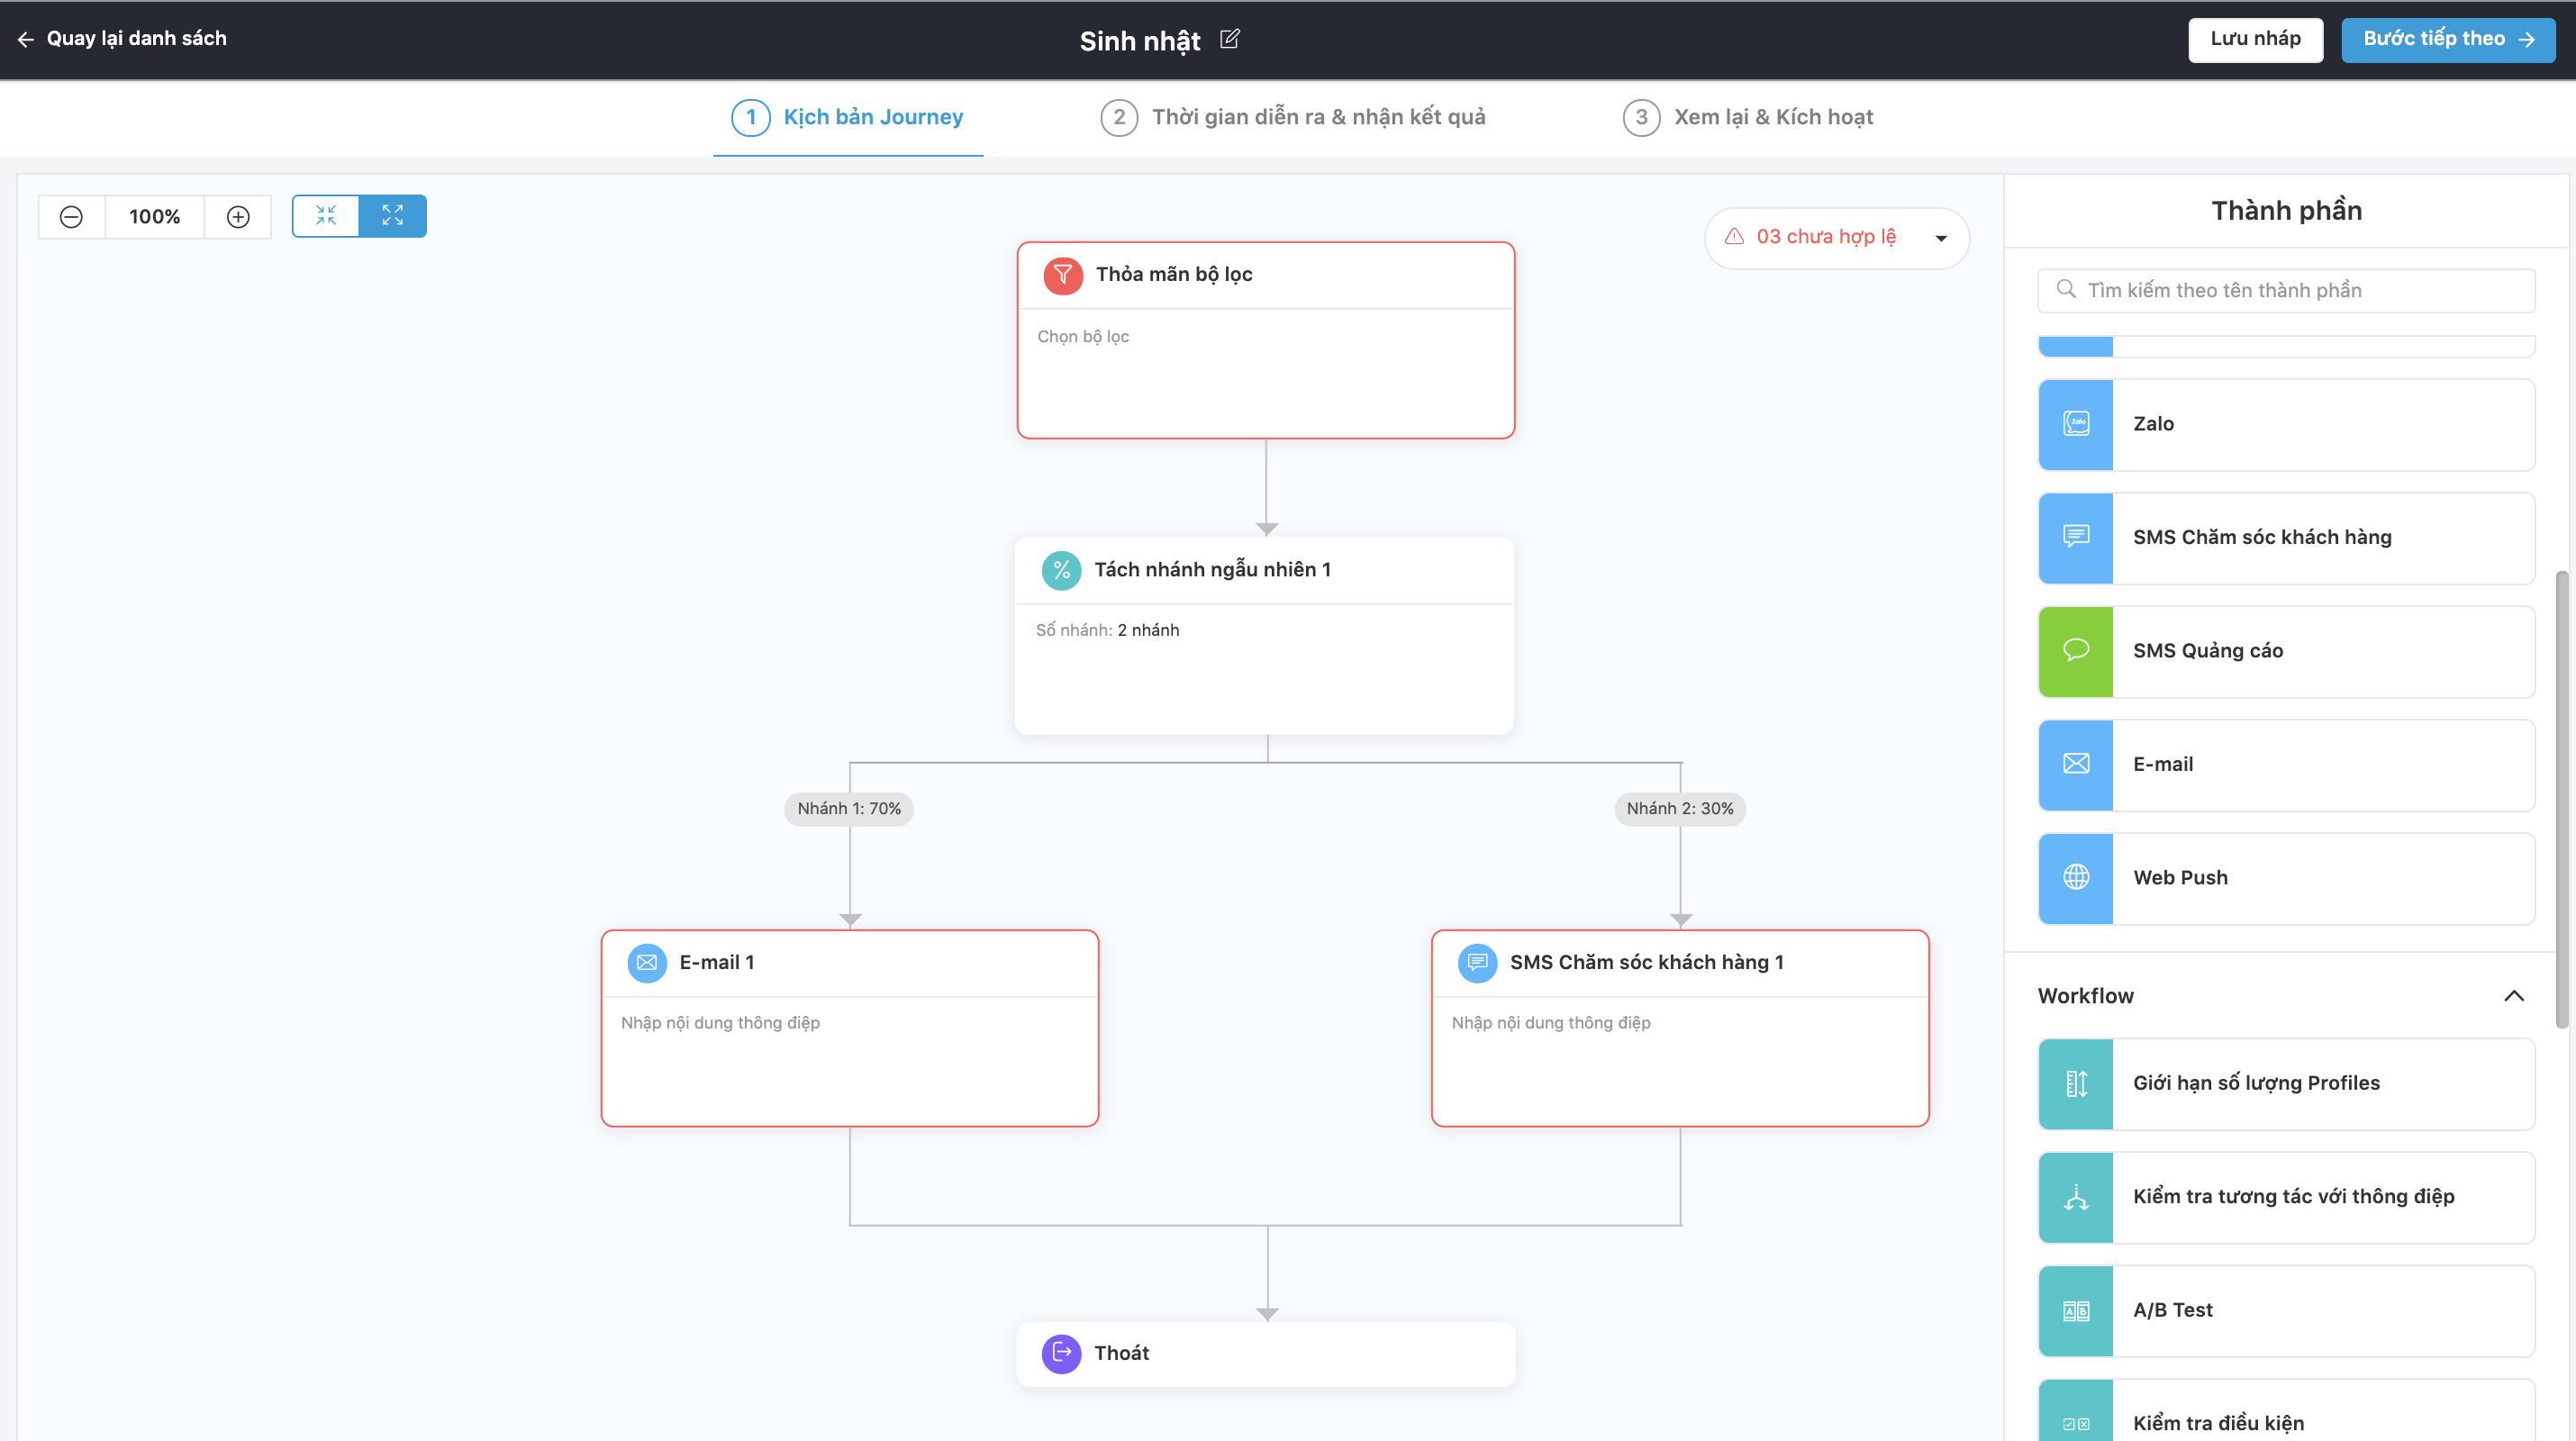
Random branch split
Random branching helps users diversify their messages and desired messaging channels in a campaign. Depending on the percentage and number of branches that users configure, Profiles will be randomly divided into branches and receive corresponding messages/message channels.
Step 1: Drag and drop the Random Branch block into the Journey.
Step 2. Double-click the block and edit the content in the block.
Mobio allows up to 5 branches to be created in this block.
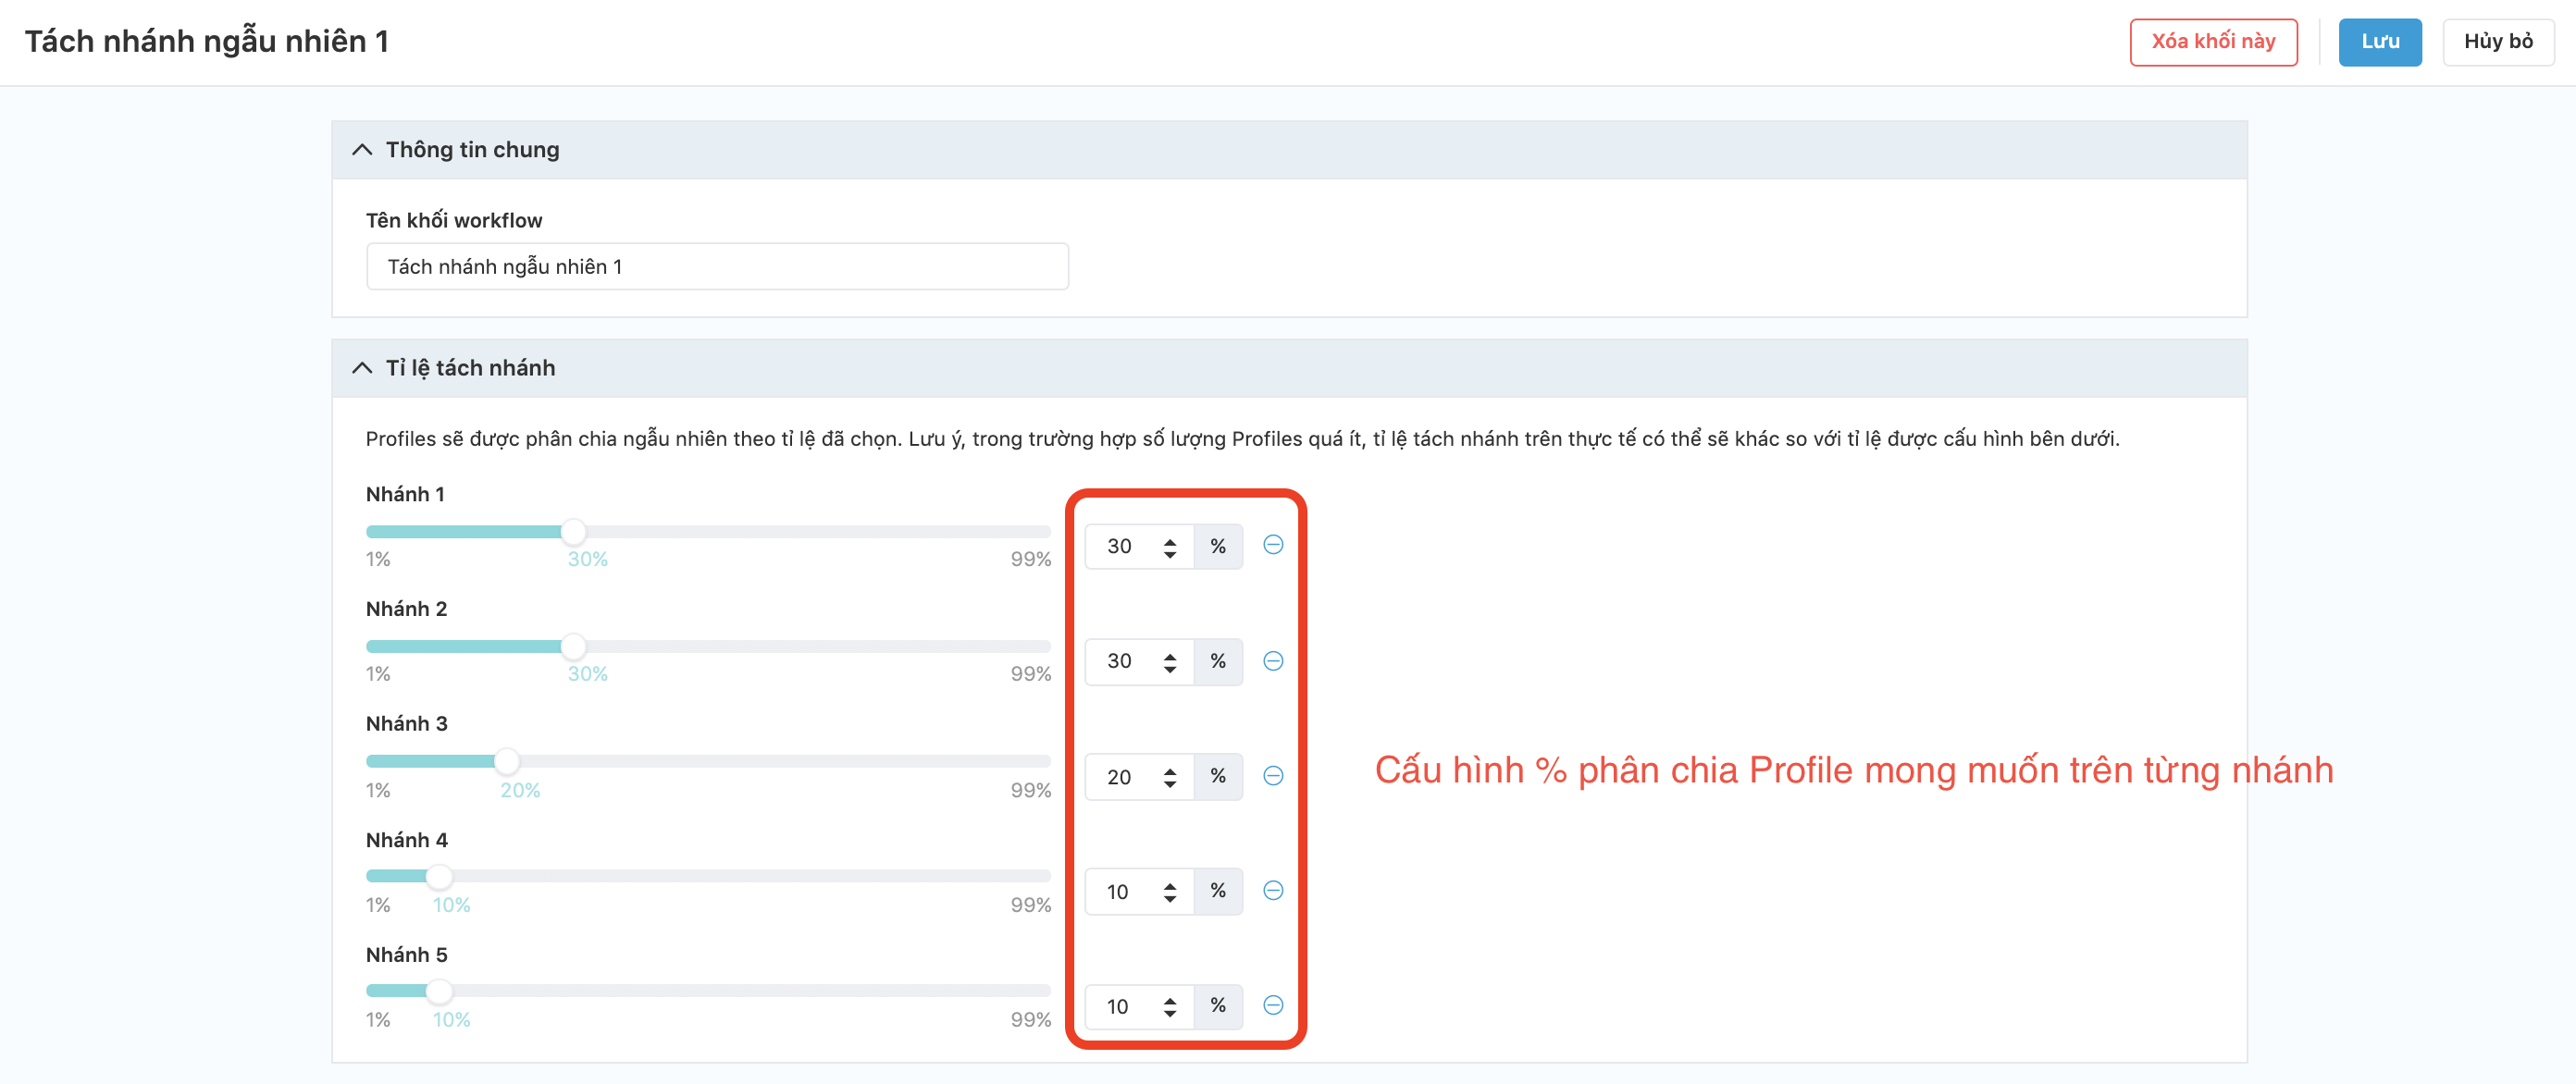
Once you’ve configured it, click Save and return to the Journey.
Step 3: Drag and drop message blocks into each branch and edit content for each message block.
Split branch by condition
Similar to the Random branch split block, the Split branch by condition block allows users to configure to push the Profiles to different channel/message branches. However, in the Split branch by condition block, users can set conditions for each branch to direct the Profiles to the right and desired branch. The purpose of the block is to help users reach many different target audiences in the same campaign at the same time, while reducing the time of manipulation and allowing comparison and evaluation of effectiveness on the same report.
To create a Split branch by condition by block:
Step 1: Drag and drop the Split branch by condition block into the Journey.
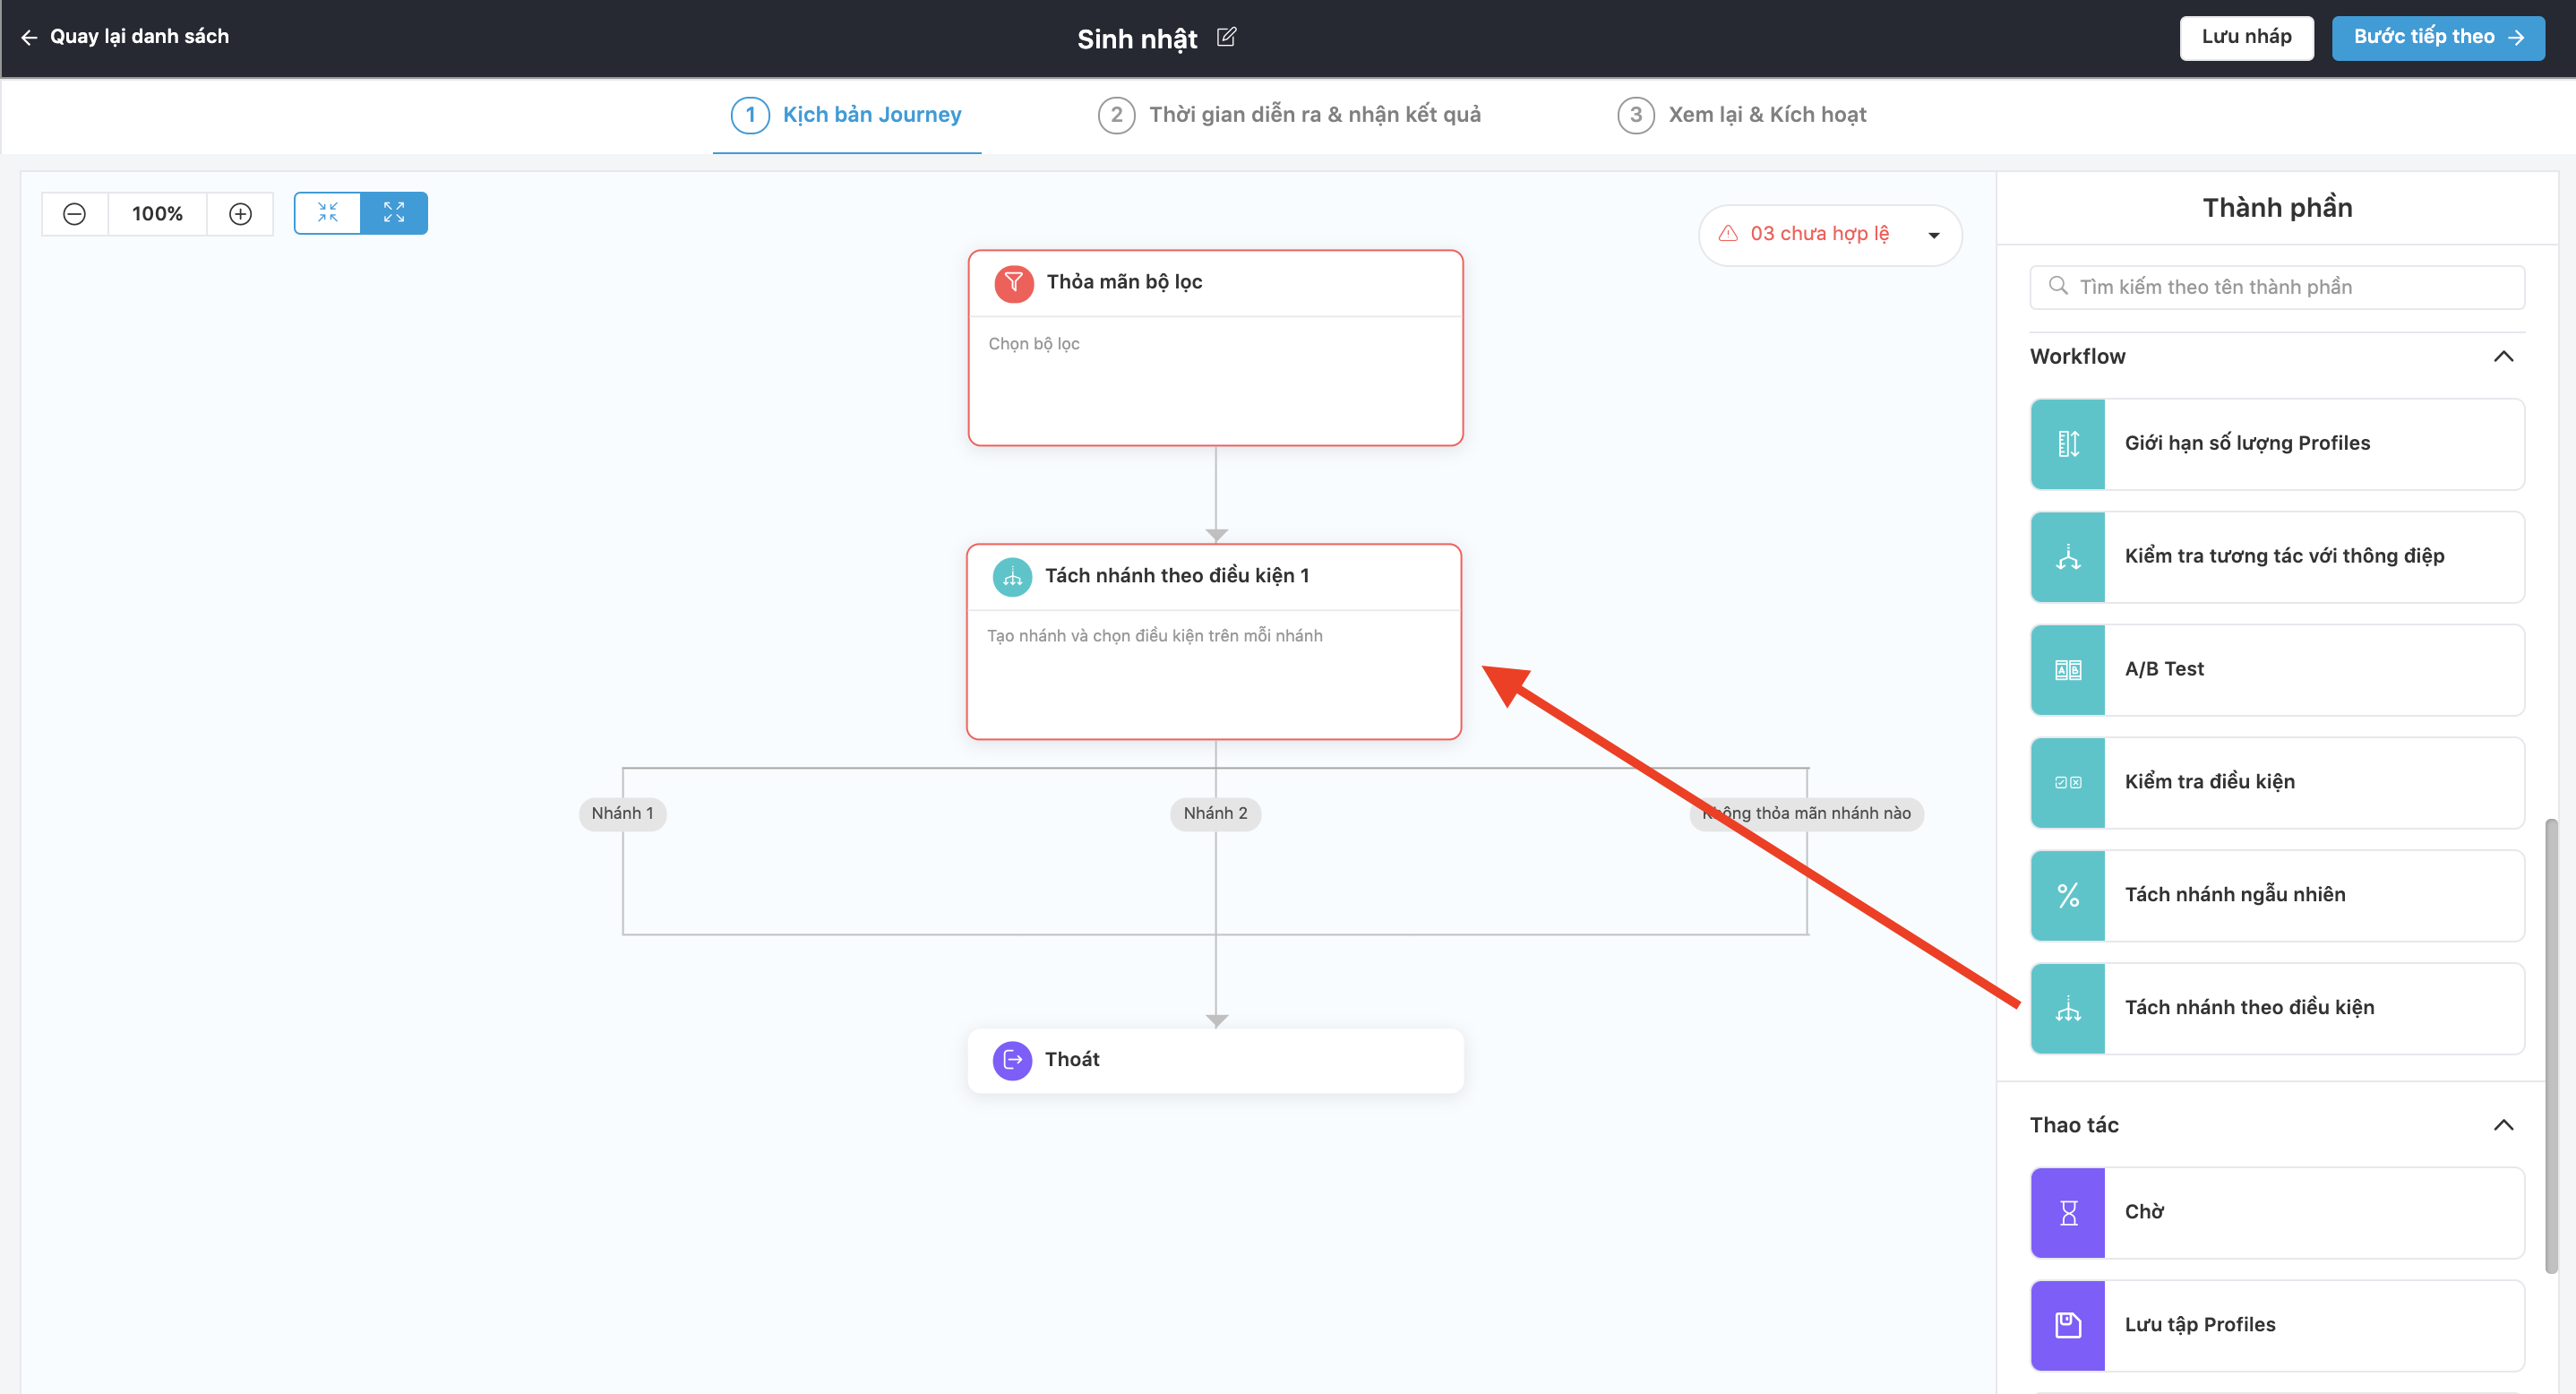
Step 2. Double-click the block to edit the contents of the block.
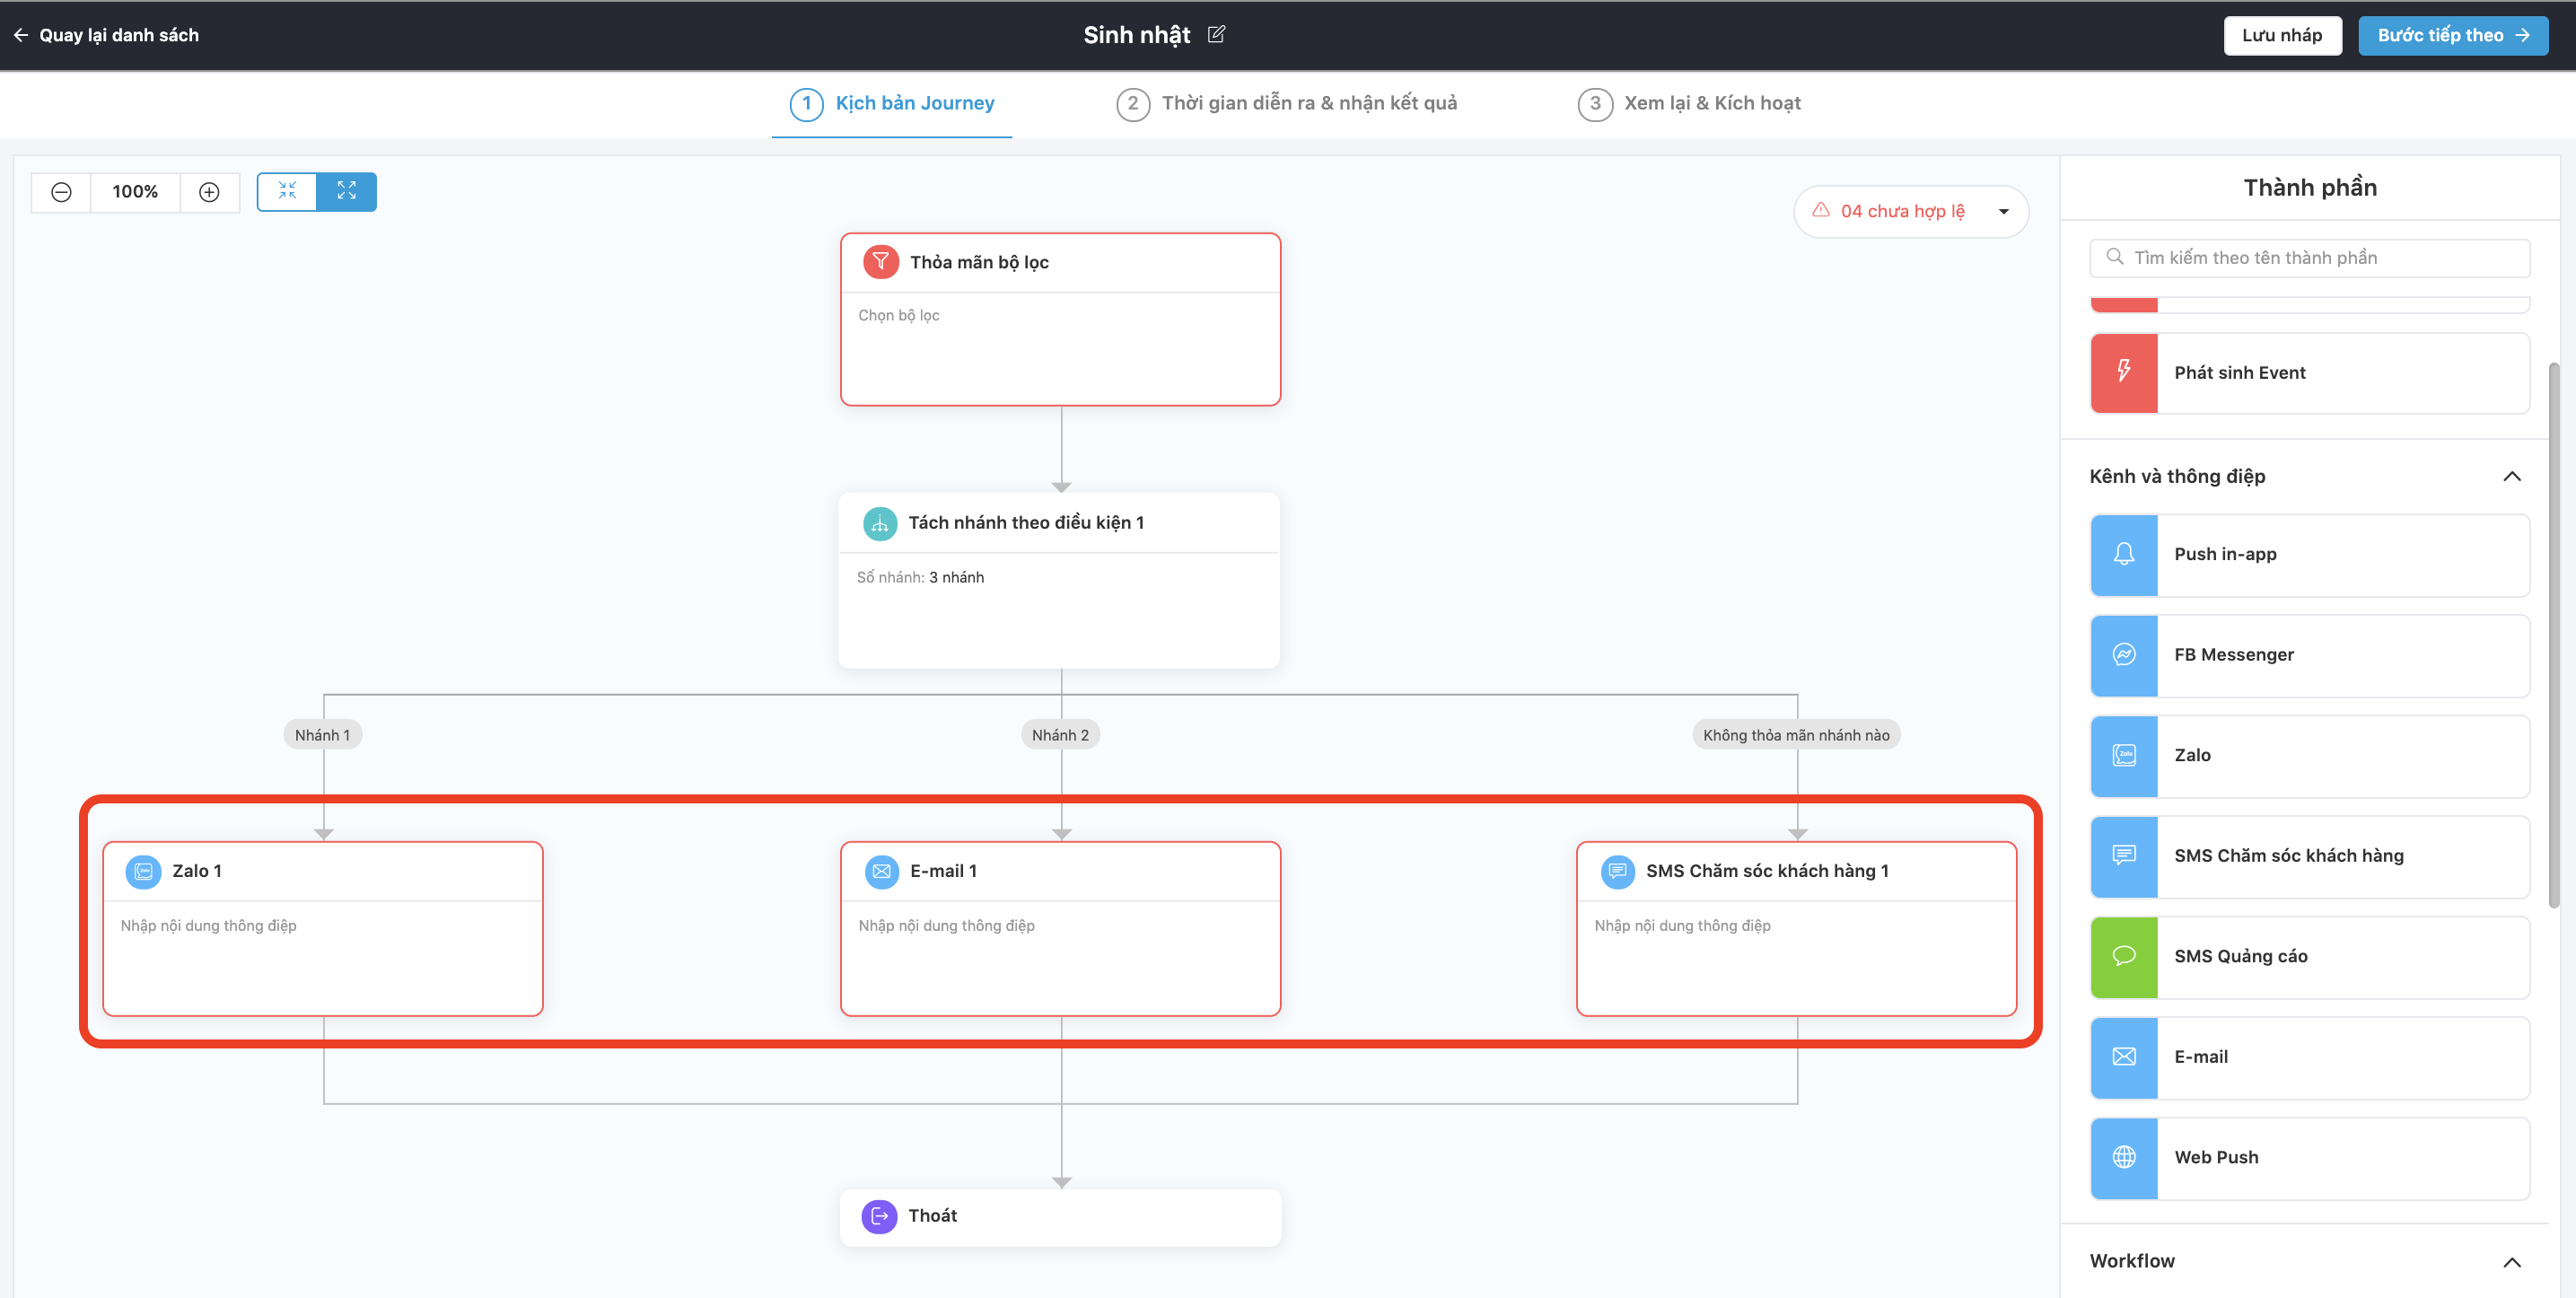
Mobio allows up to 4 branches to be created in this block, and there will always be one branch that exists by default – Satisfied no branch. Profiles that belong to the target audience but do not satisfy any conditional branches will be pushed into this branch.
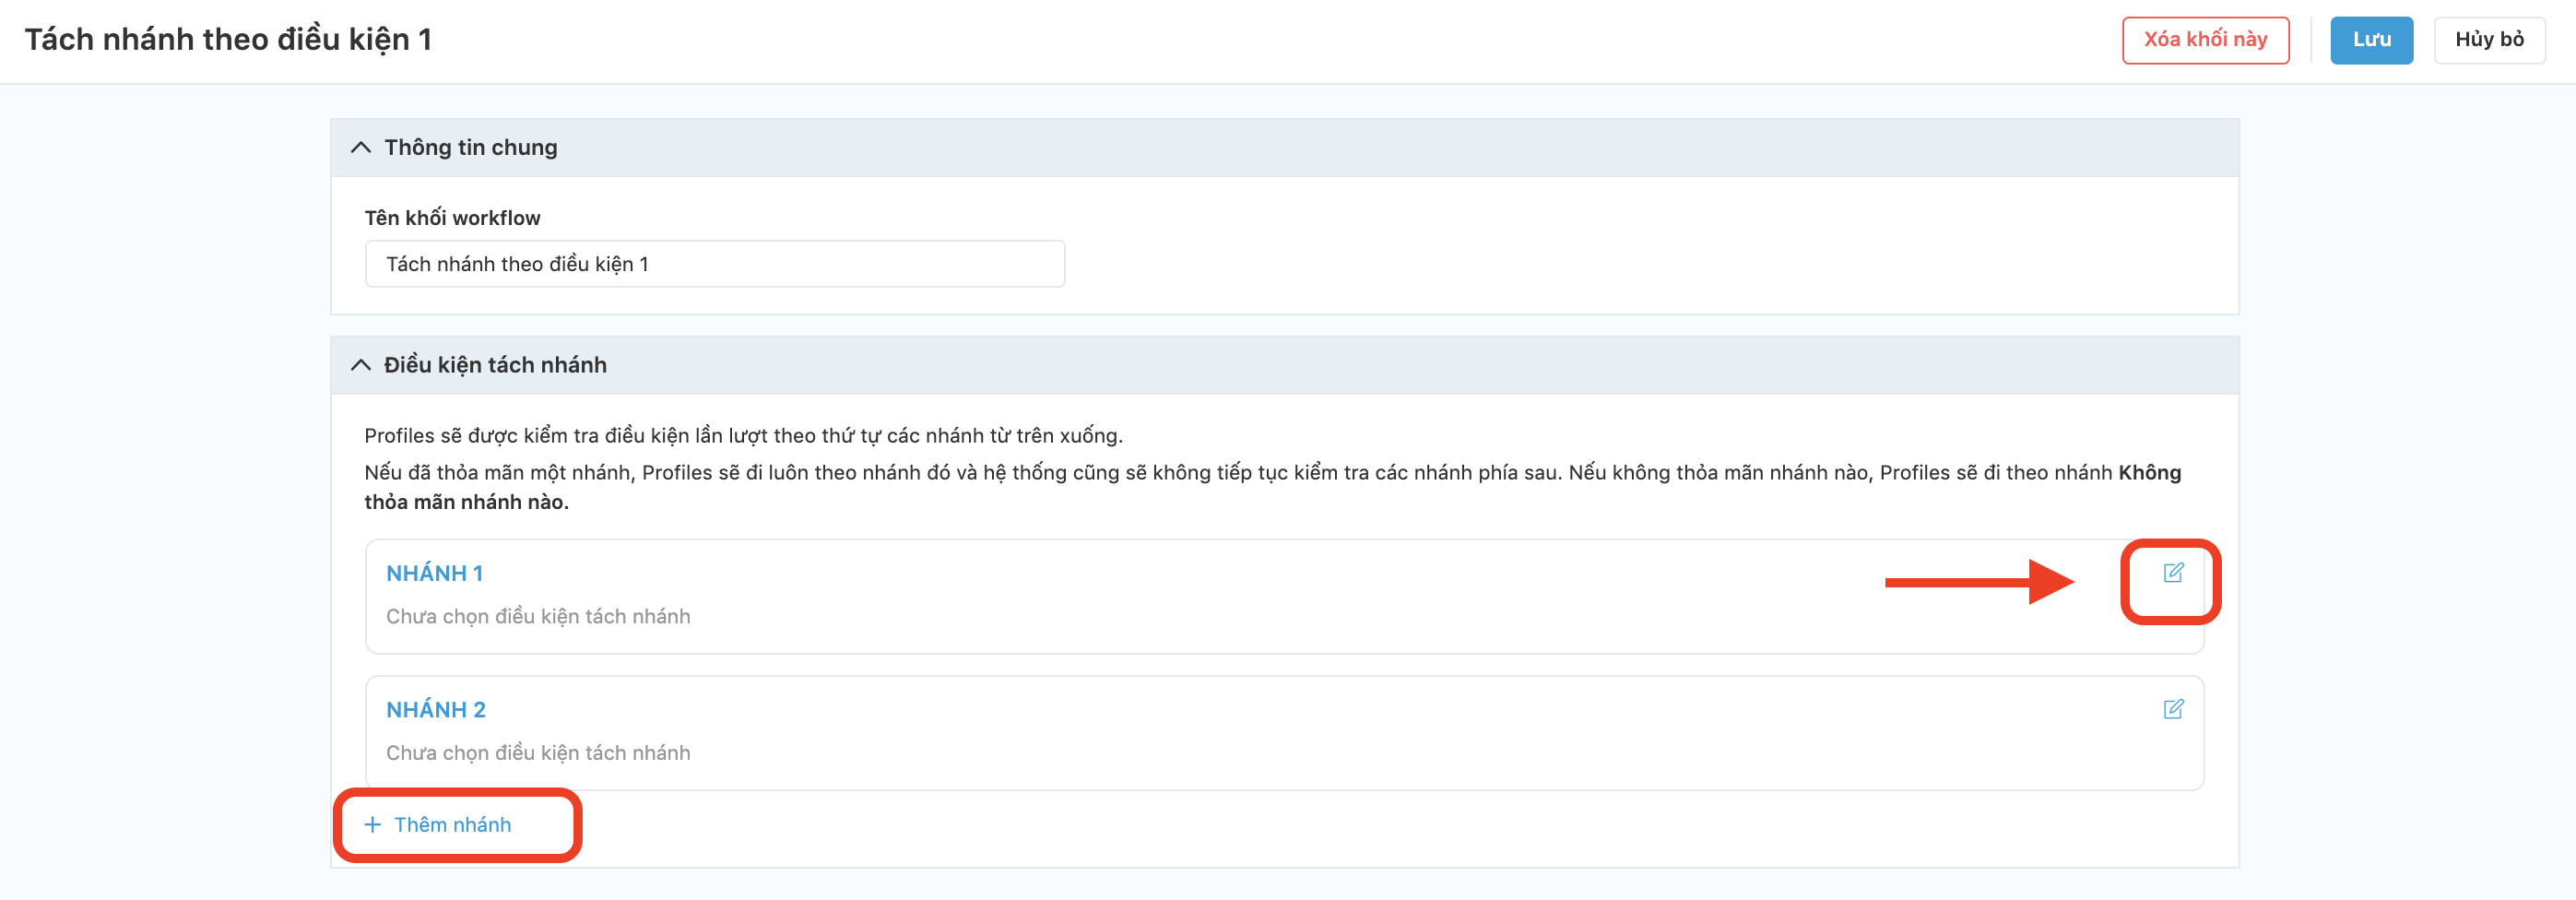
Tap the icon  in each branch to add conditions to the branch.
Select Profile according to the following criteria:
- All Profiles
- Profiles that satisfy the selected condition
- Saved Profiles list

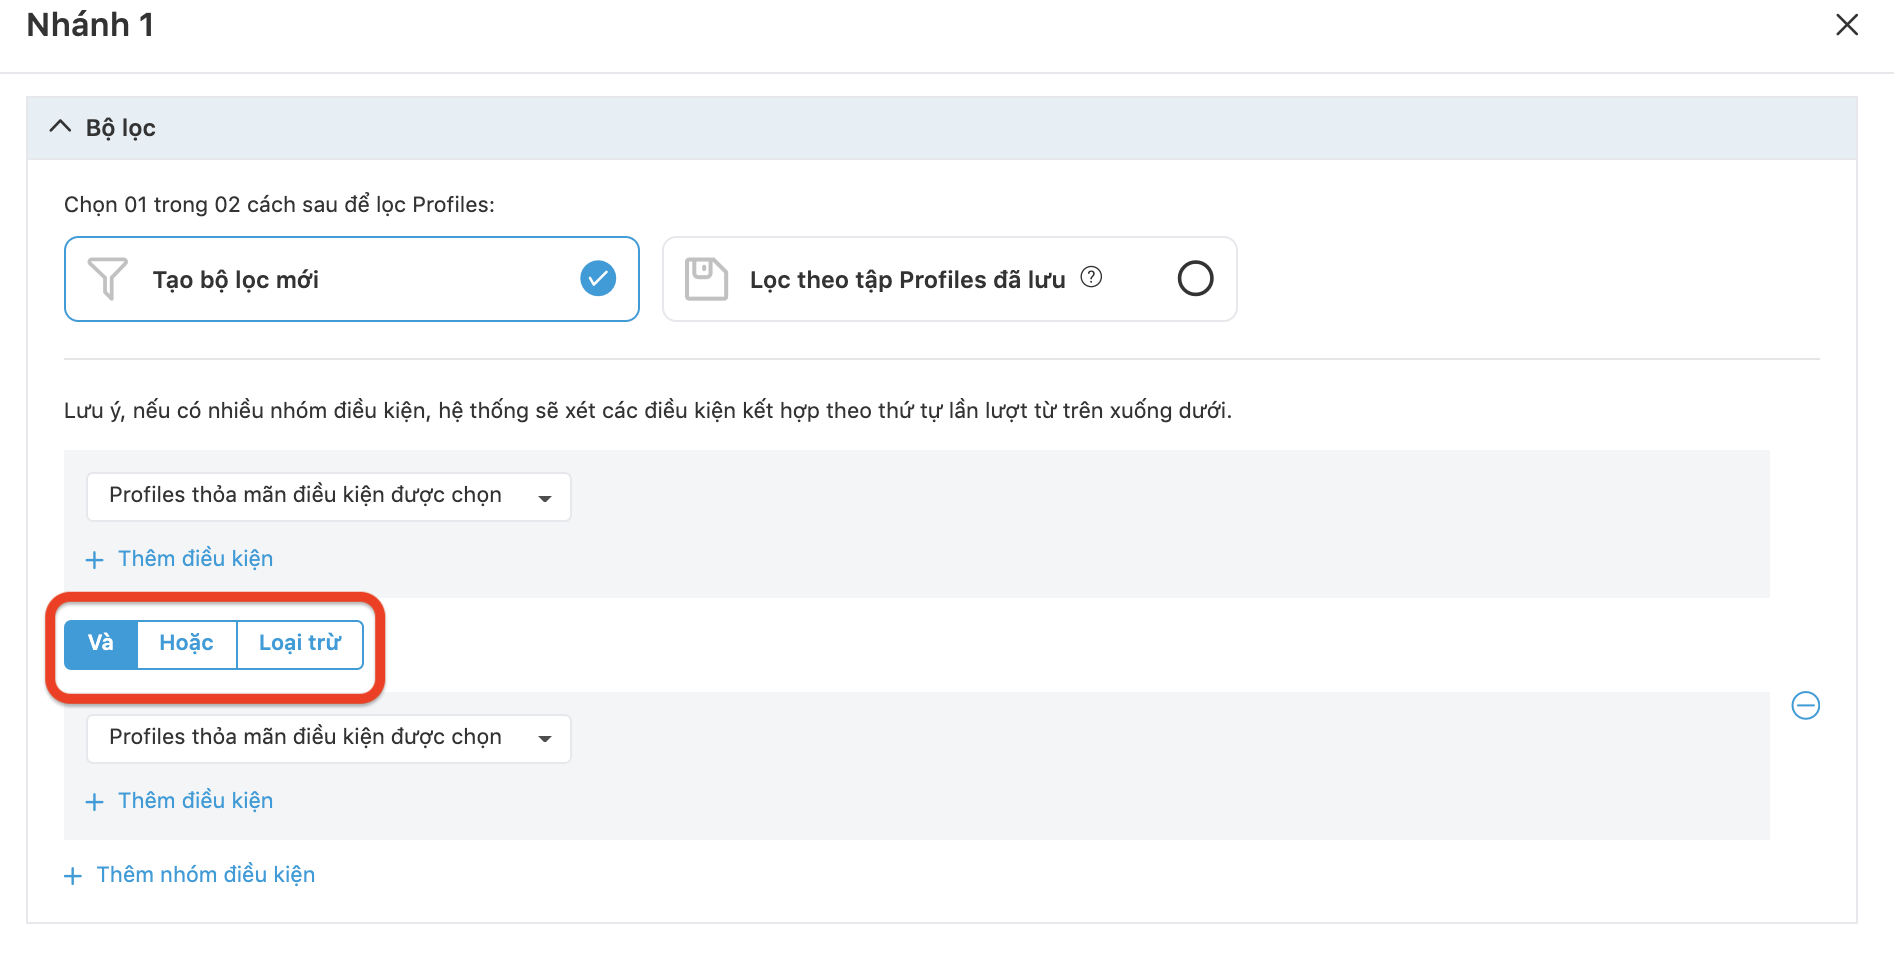
Add the included AND/OR/EXCLUDE condition set if desired. Click the Add condition group → the screen displays more filter conditions for the user to choose.
Click Save to finish and return to the Journey.
Step 3: Drag and drop message blocks into each branch and build content for each message block.
Limit the number of Profiles
The Limit the number of Profiles block allows users to limit the number of Profiles they want to run in a campaign branch.
The difference of this block from Random branch split and Split branch by condition blocks is that it allows users to limit and allocate the number of Profiles per entry – not random splitting. For example, using this block, the user can configure a limit of the first 50 people who receive message 1, the next 50 people who receive message 2 (branches of the Random branch split and Split branch by condition blocks will not do this).
Step 1: Drag and drop the Limit the number of Profiles block into the Journey.
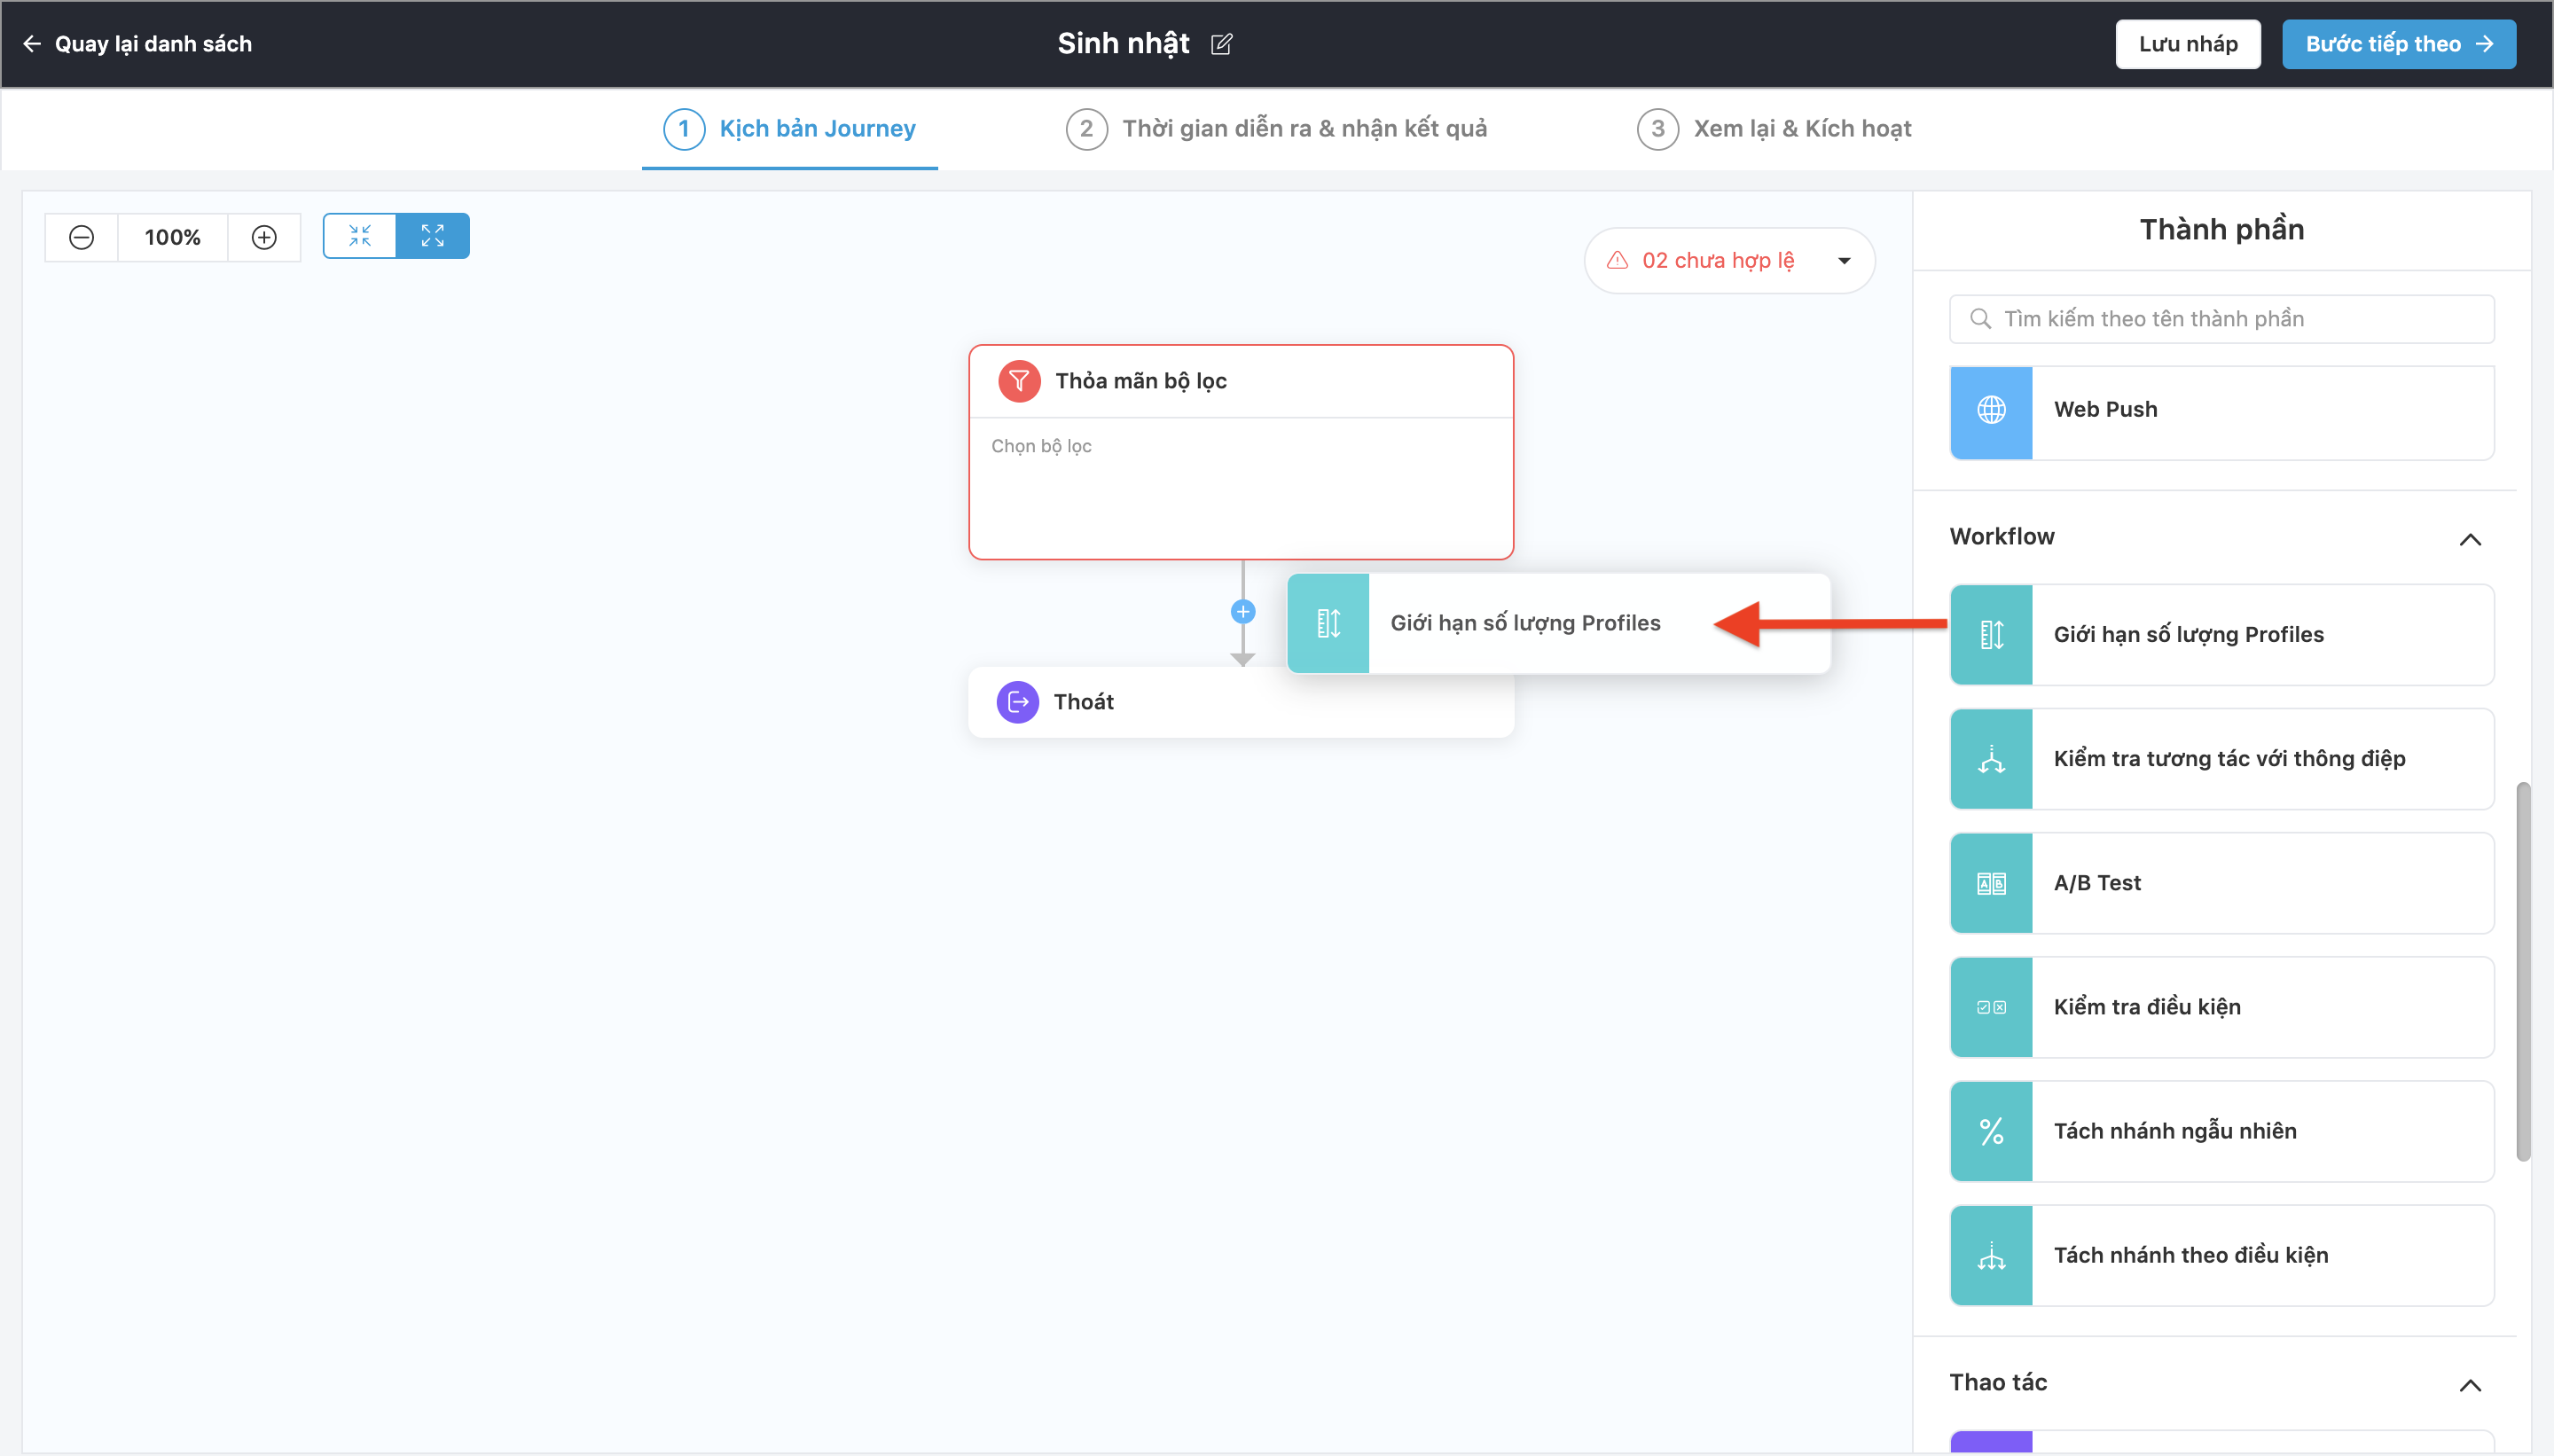
Step 2. Double-click the block to edit the contents of the block.
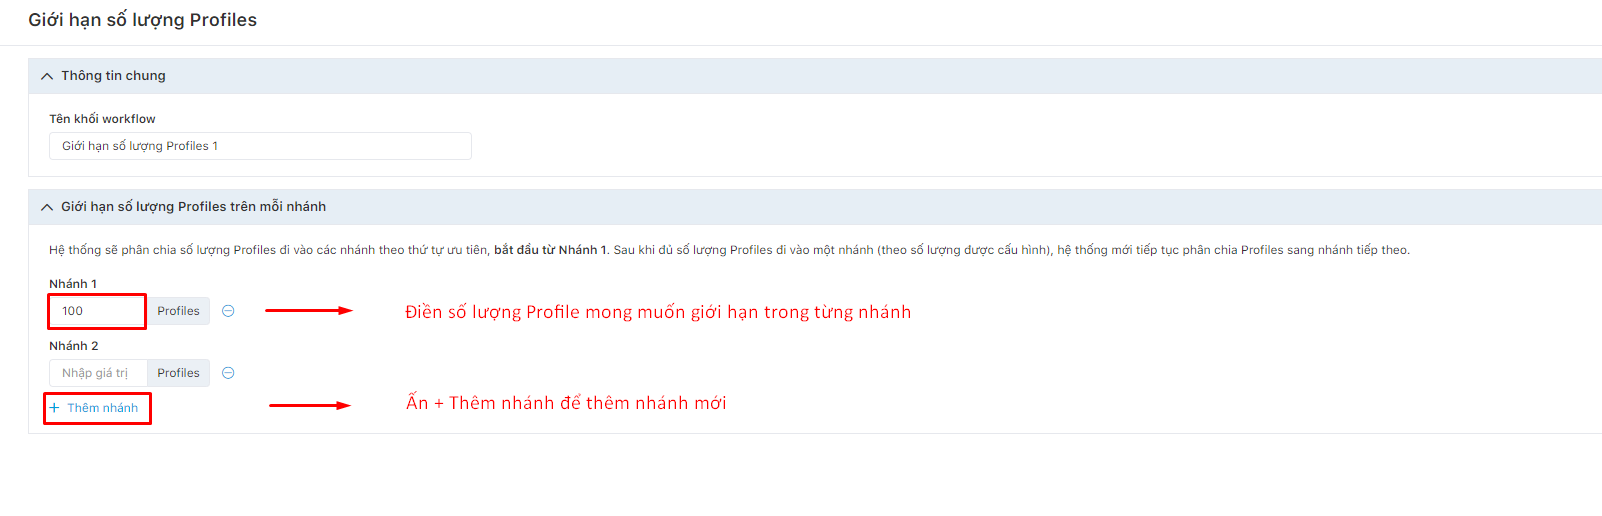
Mobio allows you to create up to 4 branches in this block, and there will always be one branch that exists by default – the Remaining branch. Profiles that are not allowed to enter the limited number of branches that will go into this branch.
The system will divide the number of Profiles into branches in order of priority, starting from branch 1. After a sufficient number of Profiles enter a branch (according to the configured number), the new system continues to divide the Profile into the next branches.
Click Save to finish and return to the Journey.
Step 3: Drag and drop message blocks into each branch and build content for each message block.